|
Page 1 of 3 Paths are the basic way to create a drawing using Canvas. In this extract from a chapter in my new book on JavaScript Graphics we look at the fundamentals of paths.
Now available as a paperback or ebook from Amazon.
JavaScript Bitmap Graphics
With Canvas

Contents
- JavaScript Graphics
- Getting Started With Canvas
- Drawing Paths
Extract: Basic Paths
Extract: SVG Paths
Extract: Bezier Curves
- Stroke and Fill
Extract: Stroke Properties
Extract: Fill and Holes
Extract: Gradient & Pattern Fills
- Transformations
Extract: Transformations
Extract: Custom Coordinates
Extract Graphics State
- Text
Extract: Text, Typography & SVG
Extract: Unicode
- Clipping, Compositing and Effects
Extract: Clipping & Basic Compositing
- Generating Bitmaps
Extract: Introduction To Bitmaps
Extract : Animation
- WebWorkers & OffscreenCanvas
Extract: Web Workers
Extract: OffscreenCanvas
- Bit Manipulation In JavaScript
Extract: Bit Manipulation
- Typed Arrays
Extract: Typed Arrays
- Files, blobs, URLs & Fetch
Extract: Blobs & Files
Extract: Read/Writing Local Files
Extract: Fetch API **NEW!
- Image Processing
Extract: ImageData
Extract:The Filter API
- 3D WebGL
Extract: WebGL 3D
- 2D WebGL
Extract: WebGL Convolutions
Now that we have a canvas object and a drawing context it is time to find out how to draw on the bitmap. What methods you have available depends on the drawing context you selected, but the most common is the 2D context. You might be surprised to learn that this doesn’t have a huge range of drawing commands and nearly everything you want to do has to be achieved using a custom path. In fact, the only predefined shape that is available is the rectangle and we will look at this at the end of the chapter. First let’s find out about the more general idea of a path.
Paths
In general the drawing methods work by creating a path which you can then fill or stroke (draw as an outline). You can think of a path as a specification for drawing an outline which is stored in a Path object.
You can create a Path object using its constructor:
var myPath=new Path2D();
The Path object has a range of methods which are used to specify the path. Usually the first method used is the moveTo(x,y) call which sets the start of the path to the specified position i.e. x,y. Following the moveTo you can start to draw straight lines using the lineTo(x,y) method.
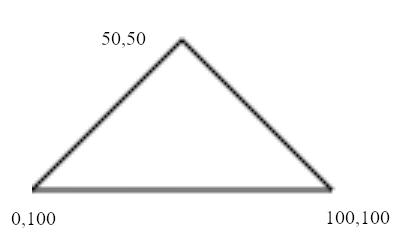
For example to draw a triangle you might use:
var myPath = new Path2D();
myPath.moveTo(50, 50);
myPath.lineTo(100, 100);
myPath.lineTo(0, 100);
myPath.lineTo(50, 50);
This defines the path shown in the diagram:

You can’t see the path at the moment – it is just a set of co-ordinates and instructions to draw lines. To see the path you have to render it to the canvas object using one of the drawing context’s methods. You can use fill() to create a filled shape or stroke() to just draw the path as an outline. Fill and stroke are the subject of Chapter 4.
So to draw our path using the default stroke setting the entire program is:
var myPath = new Path2D();
myPath.moveTo(50, 50);
myPath.lineTo(100, 100);
myPath.lineTo(0, 100);
myPath.lineTo(50, 50);
ctx.stroke(myPath);
Once you have defined a Path object you can use it as many times as you want to draw the same shape. If you change the last line to:
ctx.fill(myPath);
the result is a triangle filled with the default fill color.
Notice that while you can use expressions in the path specification, these are worked out and stored. This means that the path always has a fixed location and shape. We will find out how to use paths at different locations in Chapter 5.
You can use additional moveTo function calls to create a disconnected path. Think of moveTo as moving a pen to a new location with the pen up and off the paper and lineTo as moving with the pen down. For example:
var myPath = new Path2D();
myPath.moveTo(50, 50);
myPath.lineTo(100, 100);
myPath.lineTo(0, 100);
myPath.lineTo(50, 50);
myPath.moveTo(50, 110);
myPath.lineTo(0, 60);
myPath.lineTo(100, 60);
myPath.lineTo(50, 110);
ctx.stroke(myPath);
draws two disconnected paths in the shape of a star:

The two triangles are sub-paths of the complete path.
You can see that the need to create a line that moves back to the start of a sub-path is needed to create any closed path. The closePath function will draw a line from the current position back to the start of the current sub-path.
So we can write the star path program as:
var myPath = new Path2D();
myPath.moveTo(50, 50);
myPath.lineTo(100, 100);
myPath.lineTo(0, 100);
myPath.closePath();
myPath.moveTo(50, 110);
myPath.lineTo(0, 60);
myPath.lineTo(100, 60);
myPath.closePath();
ctx.stroke(myPath);
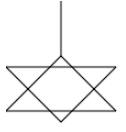
Notice that each closePath call closes the current sub-path. It is also very important to be clear that closePath doesn’t in any sense end the sub-path. You can carry on drawing and extend the sub-path from its initial position. For example, if you change the first sub-path to:
myPath.closePath();
myPath.lineTo(50, 0);
the sub-path continues and you get:

That is, closePath draws a line back to the starting point of the sub-path and nothing else. To start a new sub-path you need to use a moveTo call.
|


