|
Page 1 of 2 The stroke function simply colors the outline of the path. This all sounds easy and obvious, but in practice it is subtle and you need to understand it to get control of what exactly is happening. In this extract from a chapter in my new book on JavaScript Graphics we look at some of the fine detail of stroke.
Now available as a paperback or ebook from Amazon.
JavaScript Bitmap Graphics
With Canvas

Contents
- JavaScript Graphics
- Getting Started With Canvas
- Drawing Paths
Extract: Basic Paths
Extract: SVG Paths
Extract: Bezier Curves
- Stroke and Fill
Extract: Stroke Properties
Extract: Fill and Holes
Extract: Gradient & Pattern Fills
- Transformations
Extract: Transformations
Extract: Custom Coordinates
Extract Graphics State
- Text
Extract: Text, Typography & SVG
Extract: Unicode
- Clipping, Compositing and Effects
Extract: Clipping & Basic Compositing
- Generating Bitmaps
Extract: Introduction To Bitmaps
Extract : Animation
- WebWorkers & OffscreenCanvas
Extract: Web Workers
Extract: OffscreenCanvas
- Bit Manipulation In JavaScript
Extract: Bit Manipulation
- Typed Arrays
Extract: Typed Arrays
- Files, blobs, URLs & Fetch
Extract: Blobs & Files
Extract: Read/Writing Local Files
Extract: Fetch API **NEW!
- Image Processing
Extract: ImageData
Extract:The Filter API
- 3D WebGL
Extract: WebGL 3D
- 2D WebGL
Extract: WebGL Convolutions
In chapter but not in this extract:
- Color
- Alpha
- Stroke and Fill Color
Stroke Properties
There are a set of properties of the drawing context which change the way a path is stroked starting with the most fundamental which sets the width of the stroke:
ctx.lineWidth = value;
The value is the width in the co-ordinate system. By default this is set to 1.0 and the stroke is drawn equally each side of the path. That is, the path defines a line centered on the path with half the width to either side. Because of the way antialiasing works, this has some unexpected consequences, see the next section.
The lineCap property sets the way a line ends. The possible values are butt, round or square. The only real problem with lineCap is working out exactly what the types correspond to. The default, butt, simply ends the line where you specify, using a straight edge, round puts a small semicircle on the end, so lengthening the line by its LineWidth, and square does the same thing, but with a square.
You can see the effect of lineCap using the following program:
ctx.lineWidth = 10;
var path1 = new Path2D();
path1.moveTo(100, 300);
path1.lineTo(500, 300);
ctx.lineCap = "butt";
ctx.stroke(path1);
var path2 = new Path2D();
path2.moveTo(100, 320);
path2.lineTo(500, 320);
ctx.lineCap = "round";
ctx.stroke(path2);
var path3 = new Path2D();
path3.moveTo(100, 340);
path3.lineTo(500, 340);
ctx.lineCap = "square";
ctx.stroke(path3);
This draws three lines, each with a different lineCap:

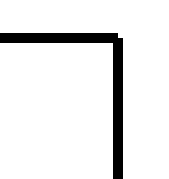
You can see that the round and square lineCaps really do make the line longer. The round cap is useful if you want a decorative line, an underlining say, but what is the use of the square lineCap? The answer is the way two disconnected lines meet. For example, if you draw a right angle to the same point using two butt ends the result has a small square missing:

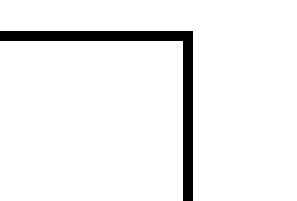
If you use square ends however the result is a sharp corner:

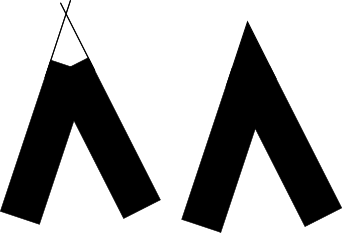
Notice that this only applies if the two lines are not connected, i.e. not part of a closed sub-path. If the lines are connected then what controls the way that they connect is the lineJoin property, which can be set to any of bevel, round or miter (default). The miter join is usually what you expect to happen when lines join – their outside edges are extended to where they meet:

|


