Programming The ESP32 In C - Phased Pulses
Written by Harry Fairhead   
Tuesday, 25 February 2025
Article Index
Programming The ESP32 In C - Phased Pulses
Setting Multiple GPIO Lines

Setting Multiple GPIO Lines

There is no way of using supplied SDK methods to change multiple GPIO lines at the same time, even though the hardware makes it possible. To do the job you need to write some code that accesses the hardware directly, see Chapter 19 for more details. In this chapter we simply present and make use of the function explained there:

#include "soc/gpio_reg.h"
void gpio_set(int32_t value,int32_t mask){
   int32_t *OutAdd=(int32_t*) GPIO_OUT_REG;
   *OutAdd= (*OutAdd & ~mask) | (value & mask);
}

This works by directly accessing the GPIO registers. The function gpio_set uses a mask to determine which lines will be set and a value that gives the states to set them to. Any bits not set in the mask leave the corresponding GPIO line unchanged.

It is easy to create a mask for any GPIO lines. For example, if you want to modify only lines GPIOn and GPIOm then the mask is:

mask = 1<<n | 1<<m

and so on if you have more lines to modify.

The value can be constructed in the same way. If you want to set the lines to a and b then value is:

value = a<<n | b<<m

Notice that if the corresponding bit isn’t set in mask then the bit in value has no effect. That is, mask determines which bits you are going to modify and value determines what those bits are set to.

Making use of this we can write the previous program without lags as when value and mask are used to update the GPIO register all of the lines change at once:

#include <stdio.h>
#include "driver/gpio.h"
#include "freertos/FreeRTOS.h"
#include "esp_rom_sys.h"
#include "soc/gpio_reg.h"
void gpio_set(int32_t value,int32_t mask){
   int32_t *OutAdd=(int32_t*) GPIO_OUT_REG;
  *OutAdd= (*OutAdd & ~mask) | (value & mask);
}
void app_main(void)
{
    
     gpio_reset_pin(2);
     gpio_set_direction(2, GPIO_MODE_OUTPUT);
     gpio_reset_pin(4);
     gpio_set_direction(4, GPIO_MODE_OUTPUT);
 
    int32_t mask = 1<<2 | 1<<4;
    int32_t value1= 0<<2| 1<<4;
    int32_t value2= 1<<2| 0<<4;     
    while (1) {          
     gpio_set(value1, mask);
     gpio_set(value2, mask);
    } 
}

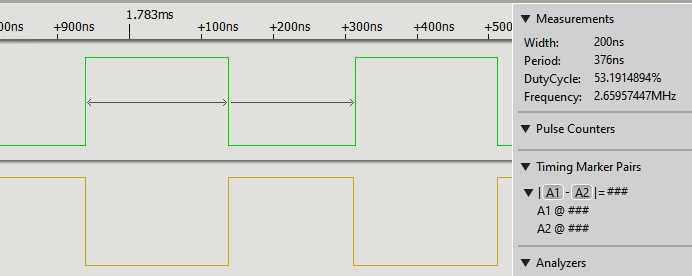
As we are changing the same pins each time, we only need a single mask. The value, however, changes each time. If you run this program you will see an almost perfect pair of out-of-phase 0.2µs pulses:

pulsephase2


Summary

  • Output is easy because the program decides when to change the state of a line. Input is hard because you never know when an input line will change state.

  • GPIO lines can be set to act as inputs or outputs or both.

  • If a line is set to output it can be set high or low using the gpio_set_level function.

  • You can generate pulses as short as 320ns.

  • A delay can be introduced into a program using vTaskDelay, but this only works for times longer than portTICK_PERIOD_MS, which is typically 10ms.

  • An alternative is to use a busy wait loop which is simply a loop that keeps the CPU busy for an amount of time. It is easy to obtain an equation that gives the delay-per-loop repetition.

  • By using the POSIX gettimeofday you can read the time to the nearest microsecond. This can be used to time pulses shorter than 10ms.

  • Pulses with a fixed period can be produced using delay_until.

  • The running task is interrupted every 10ms for a minimum of 8μsYou can compensate for this using delay_until.

  • Producing pulses which are in accurately in phase is not possible using gpio_set_level as it only changes one GPIO line at a time.

  • If you access the hardware directly, you can change multiple lines in a single operation.


Programming The ESP32 In C
Using The Espressif IDF

By Harry Fairhead

espC360

Available as a softback, hardback and kindle from Amazon

Contents

       Preface

  1. The ESP32 – Before We Begin
  2. Getting Started
  3. Getting Started With The GPIO 
  4. Simple Output
     
    Extract: Phased Pulses ***NEW!
  5. Some Electronics
  6. Simple Input
  7. Advanced Input – Interrupts
  8. Pulse Width Modulation
         Extract: PWM First Example
  9. The Motor Control PWM
         Extact: MCPWM First Example 
  10. Controlling Motors And Servos
  11. Getting Started With The SPI Bus
  12. Using Analog Sensors
  13. Using The I2C Bus
  14. One-Wire Protocols
         
    Extract: The S3's RGB LED 
  15. The Serial Port
  16. Using WiFi
          Extract:Socket Web Client
  17. Direct To The Hardware
  18. Free RTOS 

<ASIN:1871962919>

<ASIN:187196282X>

espbook


Comments


or email your comment to: comments@i-programmer.info

To be informed about new articles on I Programmer, sign up for our weekly newsletter, subscribe to the RSS feed and follow us on Twitter, Facebook or Linkedin.

Banner


Last Updated ( Tuesday, 25 February 2025 )