| Pi IoT In Python Using GPIO Zero - On/Off Devices |
| Written by Harry Fairhead & Mike James | |||
| Monday, 14 December 2020 | |||
Page 2 of 2
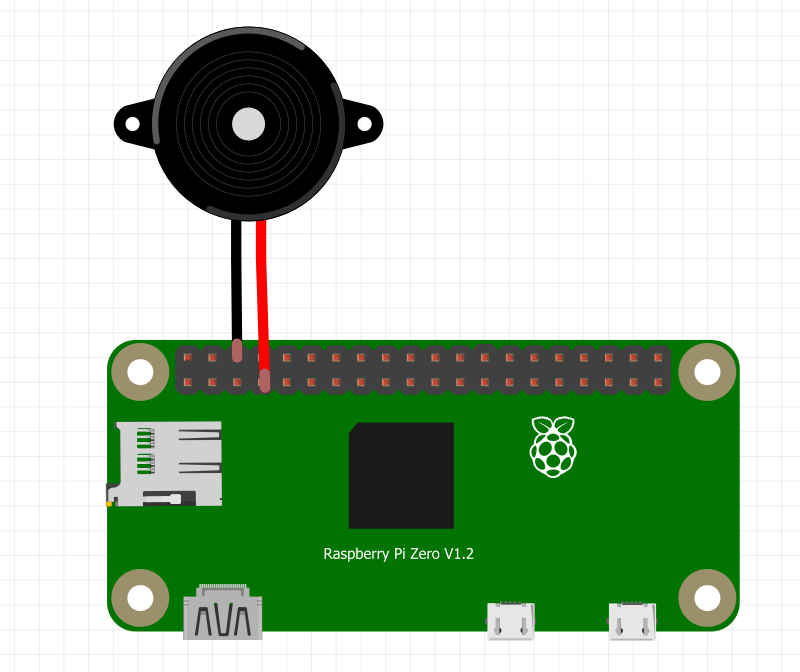
BuzzerThe only other standard on/off device is the Buzzer and it goes on and off in the sense that it is driven by a single GPIO line, just like an LED, and makes a sound when the line is high and is silent when the line is low. It isn’t capable of making different tones, it is either on or off.
You don’t need a current-limiting resistor as piezo buzzers take very little current. All you have to do is to make sure that will operate at 3 volts. All you have to do to use one is connect the negative lead to ground and the positive lead to a GPIO line:
The Buzzer object has all of the properties and methods of the LED object. The on and off methods now make the buzzer sound but work in exactly the same way. The one small change is that blink is now renamed beep. It works in exactly the same way but now the buzzer is switched on and off. from gpiozero import Buzzer
from signal import pause
buzz = Buzzer(4)
buzz.beep(on_time=1,off_time=1,n=100)
print("Program Complete")
pause()
You can see quite clearly that creating a Buzzer class is more about renaming things, so that your program can be more understandable, than introducing anything new. A Custom On/Off DeviceThere are lots of on/off devices other than LED and Buzzer, so how do you arrange to work with them? One solution is to treat everything as if it was an LED. For example, if you have an electric door lock you could write: lock=LED(4) lock.on() … lock.off() It would work, but it might be confusing in the future when you have forgotten the program and are forced to wonder what an LED is doing with a lock and what lock.on() means. A better and simpler solution is to derive a custom on/off device. You can do this using inheritance from DigitalOutputDevice which provides nearly all of the methods that LED has – in particular it has on and off methods. In this case we can simply pass the constructor parameters to the constructor of DigitalOutputDevice: class Lock(DigitalOutputDevice):
def __init__(self,*args,**kwargs):
super().__init__(*args,**kwargs)
At this point Lock is really just a copy of DigitalOutputDevice and to customize it to be a Lock class we need to add appropriate methods. What we really need are two new methods, lock and unlock, and these can be implemented by calling the on and off methods of the super class: def lock(self):
super().on()
def unlock(self):
super().off()
Now we have a Lock object that has lock and unlock methods that make sense for the device. However, we also still have on, off and blink which don’t make any sense. The simplest solution is to override them with methods that raise an appropriate exception: def on(self): raise AttributeError( This stops the use of the method calls, but the inappropriate attributes are still accessible. That is: lock.on() results in an exception, but: myOn=lock.on works even if you can’t actually call the method. This is probably good enough for most use cases, but you could take it one step further by customizing the constructor. After all, you don’t want to allow active_high to be set to False and have lock mean unlock and vice versa. You can check for any keyword parameter using something like: def __init__(self,*args,**kwargs):
if 'active_high' in kwargs:
raise TypeError("active_high not supported")
super().__init__(*args,**kwargs)
If you would like a more specific error, you could define your own exception class. You can carry on tailoring the behavior of Lock to be more lock-like until you have the perfect class. It is also a good idea to put your code into a module so that you can import Lock. The complete program is: from gpiozero import DigitalOutputDevice
class Lock(DigitalOutputDevice):
def __init__(self,*args,**kwargs):
if 'active_high' in kwargs:
raise TypeError("active_high not supported")
super().__init__(*args,**kwargs)
def lock(self):
     super().on()
def unlock(self):
     super().off()
def on(self):
raise AttributeError(
Using Lock is trivial: office_door=Lock(4) office_door.lock() … office_door.unlock() You can use the same ideas to implement a custom class for any on/off device you care to use. What is interesting is that in practice customizing an existing class using inheritance is often as much about changing and restricting what the class can do as it is about extending it, which is what textbooks always emphasize. This completes the software and it is worth remarking that simple locks of this sort are the same hardware problem as driving a solenoid. As these mostly work with 6 or 12 volts you will need to use a transistor driver and you will need to take account of the voltage and the current involved. See the next chapter for more details. Not in this extract:
Summary
Raspberry Pi IoT In Python Using GPIO Zero
|
|||
| Last Updated ( Monday, 14 December 2020 ) |