| Monitoring a fitness regime |
| Written by Janet Swift | ||||
| Thursday, 29 April 2010 | ||||
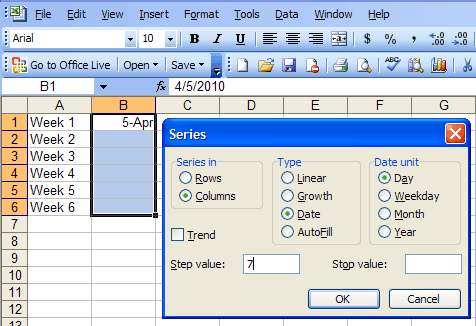
Page 1 of 3 In the first of this three-part series we devised a record card suitable for gathering personal fitness data, along the way uncovering Excel's formatting and data entry shortcuts. Now we'll analyse the data and create a chart to demonstrate weekly progress - and some more Excel techniques. In this project we assume you have already encountered the methods explained in the previous article - so look there for more detailed explanations.DataHaving produced the blank record card we can embark on the hard part - gathering data by doing regular exercise. We are going to continue to work with the same Excel spreadsheet. If you haven't created your own version you can download our example, Fitness1.xls We don't want to overwrite the useful empty record card sheet so to record the results we'll use Sheet 2 which can be renamed "Weekly Data" using the technique explained in Part 1. To make it easier to record six weeks of data we'll first assign dates to numbered weeks. As we dicovered in the previous article Excel's Autofill facility means we can achieve a great deal with minimal typing. In A1 of the Weekly Data worksheet type "Week 1". Then using the Autofill handle drag down 5 more rows and notice that Excel automatically enters Week 2, Week 3 and so. Next enter the date on which the fitness regime started using a Monday to correspond to the grid. Here we start on April 5, entered as "Apr-5" in B1. On the basis of entering a single date we cannot use the fill handle to get a series of dates a week apart. One alternative is to use the Series dialog box. Select the cells in which you want the series to extend, including its starting value, i.e. B1:B6, and use the menu command Edit, Fill, Series. This opens the Series dialog. Enter 7 as the step value and click OK.
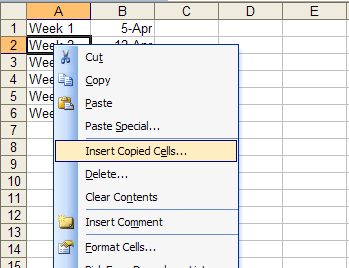
You will now see the dates of the successive Mondays. An alternative is to fill in the first two dates, say 5-Apr in B1 and 12-Apr in B2, select both cells and then drag the fill handle down to produces a weekly series in the same date format. Next we will copy the empty grid from the left of the Record Card sheet to the Weekly Data sheet. In the sheet labelled "Record Card" select cells A1:I9 (this includes an empty row simply for purposes of spacing) and use your preferred method to copy it. In this instance we do not want to use a paste operation. Instead we are going to insert the copied selection. To do this place the cursor in A2 on the "Weekly Data" sheet and either right-click with the mouse and select Insert Copied Cells from the pop-up menu or give the same command via the Insert menu where Copied Cells will appear at the top of the list.
In either case select Shift cells down from the Insert Paste dialog.
|
||||
| Last Updated ( Sunday, 09 May 2010 ) |

 s
s

