| Moving to Excel 2010 |
| Written by Janet Swift | |||||
| Wednesday, 13 October 2010 | |||||
Page 2 of 4

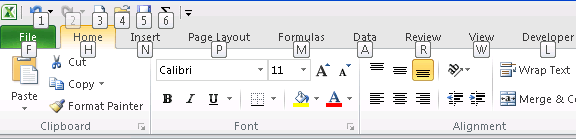
Keyboard shortcutsWe've already mentioned that Ctrl-N still opens a new workbook and similarly the well-known Ctrl-X, Ctrl-C, Ctrl-V can still be used for Cut, Copy and Paste operations. If you were use to selecting items from Excel's menu using the the Alt key then it's worth discovering what happens when you press Alt in Excel 2010:
(Click on this picture to expand and view it)
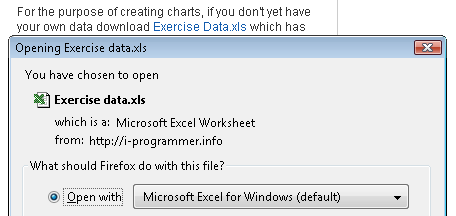
You'll notice that letters appear against each of the 10 tabs and also numbers for each of the commands on the QAT. If you press H (for the Home menu) while Alt is held down you'll see a new set of letters and numbers for each of the commands on the Home tab.
(Click on this picture to expand and view it)
So almost anything you can do with the mouse can also be achieved using the keyboard if required. Charting in Excel 2010Another respect in which Excel 2010 seems very different is when you come to create a chart. Where is the chart icon that we seasoned Excel users simply click on? It has gone and instead the Insert tab presents a group of chart options. This change occurred in Excel 2007 and the new charting engine was claimed to produce better-looking charts. So let's try it out with some data we already have available - and in the process discover how to use a spreadsheet created in an earlier version of Excel. Opening and using a .xls fileGo to the article Fitness success with a spreadsheet. Click on the link Exercise Data.xls just above the second screen shot:
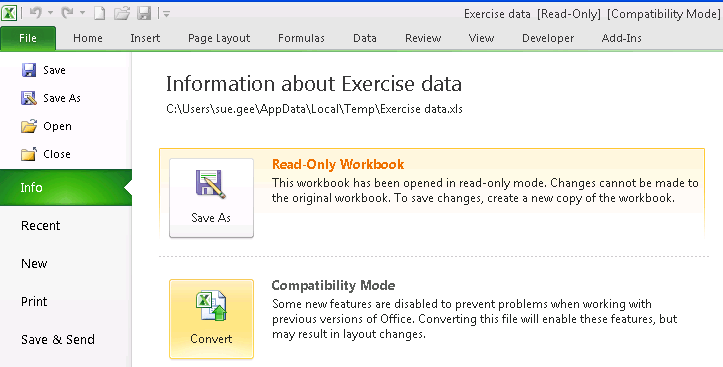
With the radio button on Open with and Microsoft Excel for Windows as the selection in the drop-down list click on OK. When Excel opens you will discover that the spreadsheet has opened as Read Only in Compatibility Mode and the first step is to save it as an Excel 2010 Workbook, in the .xlsx format.
(Click on this picture to expand and view it)
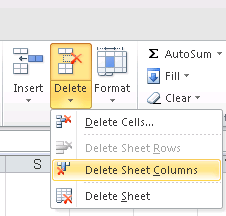
In the File tab, click the Convert icon to open the Save As dialog. By default the file will be saved in the Temp directory so choose an alternative location for it. You will then be prompted to Save and Re-open the spreadsheet in order for changes to take effect. Prepare data for chartingBefore charting this data we will make one change to it. We currently have two sets of labels, week numbers and Week Starting. Deleting Column B avoids having two sets of labels along the X-axis and allows Excel to use the Week numbers as category data whereas given dates it would treat the axis as continuous and would construct a different type of chart. Click on B1 (or any cell in column B) and, click on the down arrow below Delete in the Cells section of the Home tab.
|
|||||
| Last Updated ( Wednesday, 13 October 2010 ) |