| Easy Thumbnails |
| Written by Harry Fairhead | |||||||
| Friday, 31 July 2009 | |||||||
Page 4 of 6
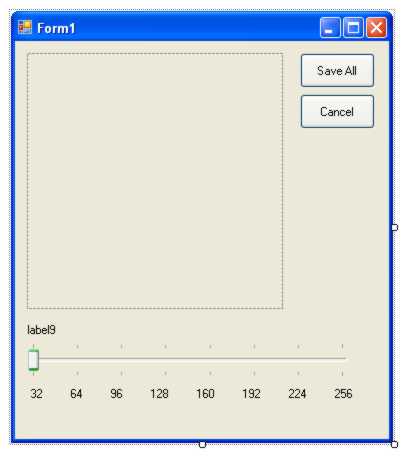
The user interfaceNow that we have finished with the installation of the Send To option it’s time to move on to consider the User Interface (UI). The idea is to show the user the thumbnailed version of one of the files and let them drag a slider to change its size. When they have selected a size, clicking on a Save All button creates all of the thumbnails at that selected size. Place a PictureBox on the form in the top left-hand corner and use the Properties window to set it to 256 x 256 and Size Mode to Autosize. Place a TrackBar below the PictureBox and use the Properties window to set its LargeChange, SmallChange, TickFrequency and Minimum properties to 32. Set Maximum to 256. Finally place labels below the ticks on the TrackBar, a label called label9 just below the PictureBox and two buttons SaveAll and Cancel on the form. The final layout should be something similar to the screen dump. The User Interface Getting the pictureWhen the application opens with more than just one argument then there are some picture files to process. In this case we need to read in one of the files, which might as well be the first in the list, and we need to extract the path of the directory that the files are stored in: if (m_args.Length > 1) Notice the use of the Path class. If you find yourself thinking about using general string manipulation to extract a file name or a directory then remember the Path class because it already does everything you could possibly want it to do! In this case it simply strips out the directory part of the path i.e. removing the file name. We need to add two global variables: private Bitmap m_first; To use the graphics classes easily we also need to add (to the start of the project): using System.Drawing.Imaging; The getImage function simply reads the file into a Bitmap class: public Bitmap getImage(string name) For simplicity no check is made that “name” actually specifies a valid graphics file but this is essential to add if you want the program to be robust. Finally we call the TrackBar’s Scroll event handler to load and process the first picture: trackBar1.Value = 256; The TrackBar’s value is set to 256 to initially display the largest thumbnail.
This ends the second If statement and the form’s constructor: public Form1() The Scroll event is raised every time the user moves the TrackBar’s slider and we have to draw the thumbnail at the size it specifies. As the first file is already stored in m_first we can use this to discover the picture’s current size. When you thumbnail the image you can choose to keep the height to width ratio the same as the original or squash or crop it to fit into a square format. In this case the TrackBar’s value is used to set the height of the image and the width is calculated using the ratio of height to width in the original: private void trackBar1_Scroll(As m_w and m_h are going to be used to scale all of the images when the user clicks the appropriate button they need to be global variables: private int m_w, m_h; To let the user know the size of the thumbnail selected we can change the text displayed in label9: label9.Text = m_w.ToString() + Finally we thumbnail the image and display it in the PictureBox: pictureBox1.Image = thumb( Of course we still have to write the thumb function but it is very easy: public Bitmap thumb( This makes use of the GetThumbnailImage method, which every Bitmap object has. There are a number of things worth knowing about the way that this works. The biggest problem with it is that if the image is associated with a built-in thumbnail then it is this thumbnail which is resized. This could be a problem, but it certainly isn’t with JPEGs and TIFFs. If it is a problem then use one of the more general Bitmap redrawing methods. |
|||||||
| Last Updated ( Friday, 31 July 2009 ) |
