| Commando Jump Game For The Micro:bit In Touch Develop |
| Written by Mike James | ||||
| Thursday, 18 February 2016 | ||||
Page 2 of 3
Starting The Program - Top DownThere is always a problem in getting started. A blank sheet of paper, or its digital equivalent a blank screen, is scary - for most people anyway. There is an old but still incredibly useful approach to programming, and many other things, called "top down programming". What you do is assume that you have already solved all of the problems in writing your program. So, for example, in our game we can pretend that we have a function that starts the game, one that plays it and a function that ends it. If you don't know about functions you need to look them up, but at their simplest they are a way of grouping a block of code under a name and from then on you can use the block of code by simply using its name. For example, start a new Touch Develop project and enter:
Of course, to be able to to this you also need to create three new functions. The quickest way is to click the script button at the top right of the screen. The first lines of the program use three new functions, startGame, playGame and endGame. All each one does at the moment is a stand in for the function you are going to write. In the jargon these are called "stubs" and the idea is that the stub stands in for the real function that you haven't written yet. Not particularly useful but we can now write our program as:
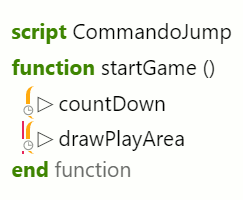
Again you may not be too impressed, but we have a program that we can compile run and test. We have a start and no longer have a blank screen to look at. This is the joy of top down programming. Of course you now have to fill out the definitions of each of the functions to actually do something, but this isn't unreasonable. Another advantage is that you can fill in one of the stubs and still run and test the program while the other stubs remain stubs. This is called stepwise refinement. Refining the startGame functionThe easiest of the functions to refine is startGame. Let's add some code to show the player a short countdown to the start of the game and then display the wall which constitutes the playing area of the game:
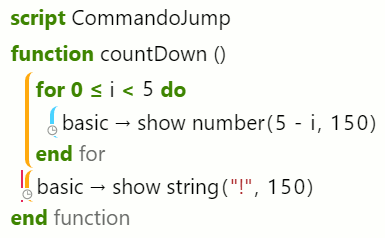
This may at first seem like procrastination of the worst sort, but as your arithmetic teacher should have told you: "put off doing any working out as long as possible". This is equally true of top down stepwise refinement. Each time you need to use an action don't write the code for it. Instead create a new function and come back to the problem later. Now we do need to write some code to create the functions in startGame - there does come a time when you can't split something down into yet more functions. However you should aim to keep all of your functions shorter than ten or so lines of code. The countDown function is simply:
The count is complicated by the fact that you cannot set the initial value of a for loop. That is, all for loops start from zero and there isn't anything you can do about it. This makes things slightly easier because you can introduce a single enumeration loop as "repeat n times" as:
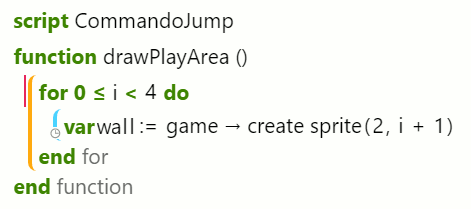
with the small disadvantage that the index runs from 0 to n-1. Notice that this is different from the for loop in the Microsoft Block editor which does loop on the final value specified. This inconsistency isn't good for upgrading. The limited for loop isn't good from the point of view of needing different index ranges. The student is going to have to learn to transform the index as in this example where 5-i is used to reverse the order. The drawPlayArea function is just as easy:
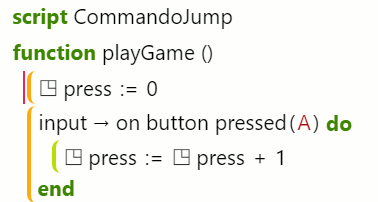
This displays a "wall" of full on LEDs in the middle of the screen ??x=2 and y runs from 1 to 4. In this case the for loop runs in the standard direction and so is easier to understand - but the index still needs shifting by one. Notice that both of these functions are simple and this is another advantage of top down programming. It means you only ever have to deal with small functions that do simple things and not a huge program made up of lots of lines of code. The playGame functionThe playGame function is obviously going to be the most complex of the set. We need to put a time limit on how long the player has and we need to keep track of the commando's vertical position. We also need to count the number of key presses the user has made to work out when to move the commando. Unlike MicroPython there is no supplied function which returns the total number of times a button has been pressed. However, it is easy to add a global variable that counts the number of presses using the on button pressed event handler. This needs to go at the start of the playGame function:
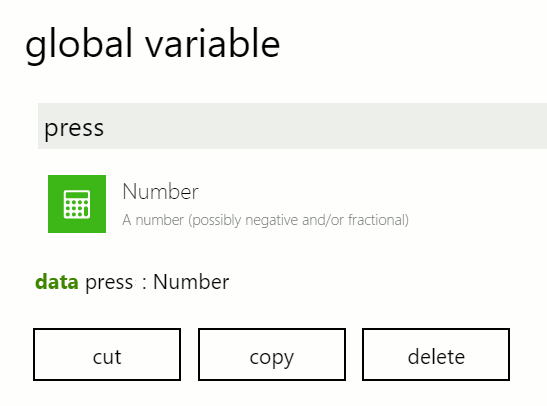
You also need to create a new global variable by selecting the Script icon on the right, clicking add new and then selecting var data. The press variable is a number. Each time the user presses the button the variable has one added to it - however things aren't quite as simple as they might be, see later when we get to the while loop.
Global variables are accessible from anywhere in the program. Contrast this to a local variable which is only accessible from within the function or block it is defined in. We need one other global variable, man, to keep track of the commando's sprite, and you might as well define it at this point. The main while loopThe main part of the playGame function is a while loop that repeats while the game is in play. The commando, which is just a single LED and so appears as a "block", is going to move up one place for every ten presses. However the while loop also has to end if the allotted time is up. We first record the time that the loop starts and create the commando's sprite:
The variable t holds the time at which the player starts to play and input->running time -t is therefore the elapsed time in milliseconds. The loop runs for a maximum of 20 seconds which is a bit long for a real game of skill but good for debugging. The commando is a sprite that will sit there and do nothing if we leave it alone. In this game if the user has pressed button A 10 times we want the commando to move up one. This is fairly easy to arrange:
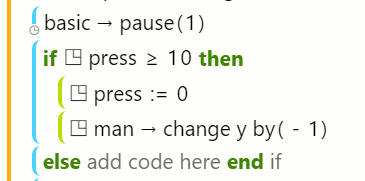
The if block tests to see if press is 10 or more and then changes the position of the commando's y coordinate by -1, keep in mind that y gets smaller as you go up the screen. The variable press is then zeroed so the count for ten presses can start over. The big question is why the pause before the if? Presumably we want to check for button pushes as fast as possible so why wait 1ms before doing it? The answer is that, unless you implement it, a Touch Develop program can only do one thing at a time. It is single threaded in the jargon. What this means is that if you start a loop that keeps the machine busy the button press event handler never gets to run. A pause of 1ms returns control to the system and allow it to check the button's status. When we do the update there is also the possibility that the player has the commando at the top of the wall. You can test for this just by checking to see if position is zero:
If the commando is at the top of the wall we simply use the break command to stop the loop which also exits the function.
|
||||
| Last Updated ( Saturday, 23 April 2016 ) |

