|
Page 4 of 4
An embossed effect
Now that we have most of the mechanics of creating a custom effect out of the way all that remains is to work out how to manipulate pixels to create good looking effects - this is a lifetime of fun.
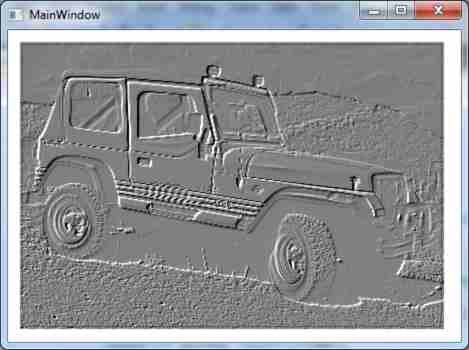
To demonstrate how things work let's try an embossed effect.
This works by taking the difference between neighbouring pixels and converting the result to a grey scale image.
The shader is fairly simple:
sampler2D bitmap1:register(s0);

float4 main(float2 uv:TEXCOORD):COLOR
{
 float4  result=tex2D(bitmap1,uv);
 result.rgb-=tex2D(bitmap1,uv-.005).rbg;
 result.rgb+=0.5;
 result.rgb=
    (result.r+result.g+result.b)/3.0;
 return result;
}
The sampler is supplied by register s0 and this can be explicitly set as a brush or the default rendered brush.
The main function starts off as usual and stores the color of the current pixel in result. Next it subtracts the color of the pixle 0.005 to the left of the current pixel. Notice the use of the .rgb selector or "swizzel" to perform a simple vector update. Only the difference between the RGB values is computed, the Alpha component is ignored. In the same way the next statement:
result.rgb+=0.5;
only adds 0.5 to each of the RGB values. This changes the mean of the color values from zero to 0.5.
Finally the color is removed by averaging the three color values.
If you now create an EmbossEffect class with a suitable dependency property:
public class EmbossEffect:ShaderEffect
{
 public Brush Bitmap1
 {
  get{ return
   (Brush)GetValue(Bitmap1Property); }
  set{ SetValue(Bitmap1Property,value);}
 }

 public static
   readonly DependencyProperty
    Bitmap1Property = ShaderEffect.
     RegisterPixelShaderSamplerProperty(
       "Bitmap1",typeof(EmbossEffect),0);
 public EmbossEffect()
 {
  PixelShader pixelShader =
                  new PixelShader();
  Uri uri = new Uri(
      Directory.GetCurrentDirectory() +
       @"\..\..\Shader\shader1.ps",
                 UriKind.Absolute);
  pixelShader.UriSource = uri;
  this.PixelShader = pixelShader;
   UpdateShaderValue(Bitmap1Property);
  }
You can now apply the new effect:
Uri uri = new Uri(
     Directory.GetCurrentDirectory() +
       @"\test.jpg", UriKind.Absolute);
BitmapImage bmi = new BitmapImage(uri);
ImageBrush pic=new ImageBrush(bmi);
EmbossEffect BE = new EmbossEffect();
BE.Bitmap1=pic;
button1.Effect = BE;
The result can be seen below:

The embossed effect
Summary of key points
- The shader consists of a kernel function which is applied to every pixel in the area needed to render the control that the effect is applied to.
- The kernel function works with variables that are assigned to registers that contain constants and samplers.
- For each register that you want to set within your C# program to either a constant or a sampler you have to create a dependency property and associate it with the register.
- Any sampler dependency property not explicitly set can be made to default to a bitmap that is the result of rendering the control that the bitmap is assigned to.
- All co-ordinates are scaled to (0,0) top left and (1,1) bottom right
- You can increase the area the effect works with using the Padding properties of the ShaderEffect class.
Where next?
All you really need to do now is to examine code written in HLSL to implement various effects and learn how to extend, modify and make your own up from scratch. Notice that you already know how to use multiple bitmaps within a shader, pass constants to control it and change the side of the rendered area.
To access the code for this project, once you have registered, click on CodeBin.
WPF .NET Core - Creating Objects With XAML
If you've never encountered WPF (Windows Presentation Foundation) you are missing a versatile tool. This article is part of a series devoted to it. XAML can be confusing - especially if you think it i [ ... ]
|
Custom Bitmap Effects - Getting started
The simplest possible custom effects project is enough for you to see how it all works and to move on to building your own effects that do something useful. This is an introduction to using HLSL in WP [ ... ]
|
Simple WPF data binding
Find out how WPF data binding really works. It's not the binding object that matters - it's the binding expression.
|
WPF .NET Core - Inside Dependency Properties
One of the great mysteries of WPF is the strangely named "Dependency Properties". In this chapter we learn how dependency properties really work by creating a custom dependency property
|
Getting Started with WPF
WPF Windows Presentation Foundation is the new way to do forms and all things graphical in .NET. You can still use Windows Forms but don't expect anything particularly new to be added to [ ... ]
| | Other Articles |
<ASIN:1430219106>
<ASIN:1430226501>
<ASIN:0735627045>
<ASIN:0470499834>
<ASIN:0672330318>
|

