| Bitmap Effects |
| Written by Administrator | ||||||||||
| Monday, 24 May 2010 | ||||||||||
Page 3 of 3
Applying an effect to a bitmapYou might think that we have already covered applying an effect to a bitmap - but no.

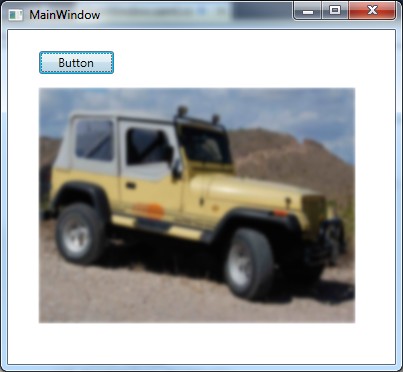
The effects might be called bitmap effects, and indeed they are as they work with pixels, the pixels are the result of rendering a graphic - usually a vector graphic. A bitmap is a graphic but it is only rendered when displayed on the screen. As already explained, when we apply an effect to an image control it is the entire control which the effect applies to i.e the pixels that result from rendering the control and its contents. Suppose, however, we want to apply the effect to a bitmap to produce a new bitmap which is then displayed in an image control say? You can do this but it isn't quite as simple as it seems. What you have to do is to use a RenderTargetBitmap to render the original bitmap with the effect applied. As explained in another article, using RenderTargetBitmap isn't always easy to use. First let's just use the Image control and basic set up in the previous examples. That is first load the bitmap into the Image control: Uri uri = new Uri( Notice that the image control doesn't stretch the bitmap to fit whereas in other screen dumps it did. Now we apply the effect, create a RenderTargetBitmap of the same size as the original bitmap and render the Image control to it: image1.Effect = new Notice the need to use Arrange on the Image control to make sure that the WPF layout works correctly during the render. Finally we can display the new bitmap in the original Image control: image1.Effect = null; Notice that we only get the portion of the bitmap that actually displayed in the Image control. This is the basic problem with this approach of using an Image control, i.e. the original bitmap is cropped to fit the Image control and this is what is rendered into the RenderTargetBitmap. If you make the Image control the same size as the bitmap and then render it then you do get the entire bitmap with the effect applied. However there is a better method which doesn't involve displaying the original bitmap at all. What we can do is create a Rectangle shape with the bitmap as a Fill. Then we can render the Rectangle to the RenderTargetBitmap. This sounds simple but the tricky bit is that the Rectangle is sized in terms of logical pixels, i.e. assuming 96 pixels per inch, so we have to be careful to use the bitmap width and height not its pixel width and height to set the size of the rectangle. First we load the bitmap: Uri uri = new Uri( Next we create the Rectangle shape, set its Fill to be a Brush created from the bitmap and set the desired effect: Rectangle rct = new Rectangle(); Next we set the size of the Rectangle using the WPF layout system: Size sz=new Size(bmi.Width, Finally we render the Rectangle to the RenderTargetBitmap and display the result: RenderTargetBitmap rtbmp = new
A bitmap with an effect applied - notice that the edges of the Image control are sharp as the effect is applied to the bitmap not the control. Notice that applying a bitmap effect to a bitmap is slower than applying it to a "live" rendered graphic such as a Button or an Image control. The reason is that pixels have to be transferred in both directions from video memory. However if you apply a bitmap effect to a bitmap then it only has to be done once and the bitmap can be reused without reapplying the effect. In most cases using the GPU to render the image as needed is likely to be faster. Now that you have mastered the built-in bitmap effects it's time to move on to custom effects.
<ASIN:1430219106> <ASIN:1430226501> <ASIN:0735627045> <ASIN:0470499834> <ASIN:0672330318> |
||||||||||
| Last Updated ( Saturday, 22 May 2010 ) |