| Exploring Edison - Life At 1.8V |
| Written by Harry Fairhead | ||||
| Monday, 04 January 2016 | ||||
Page 2 of 3
Output Level ConversionThe most basic level converter has already been introduced in earlier chapters but it is worth repeating:
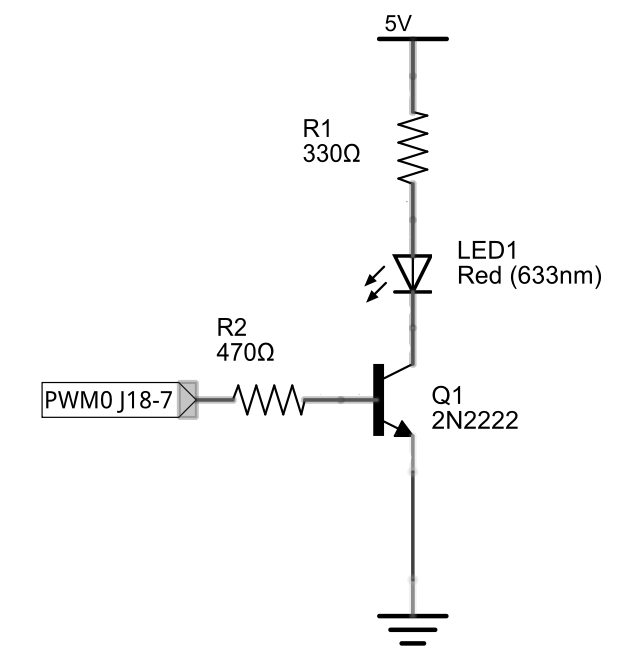
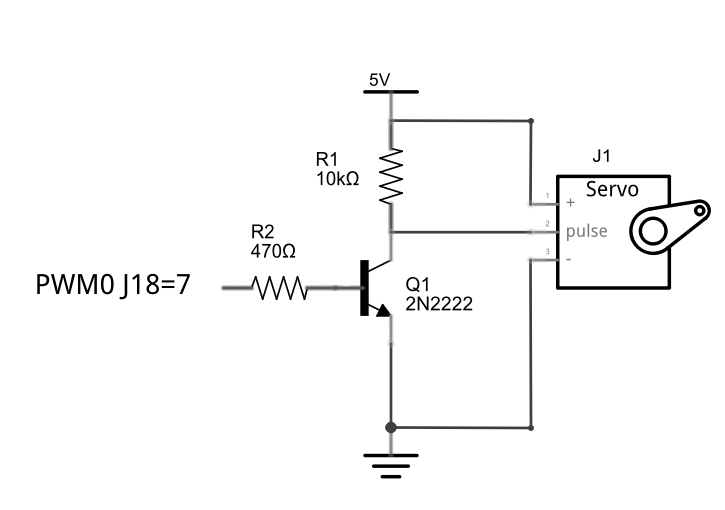
When the Edison's output line is high the transistor conducts and there is an approximately 0.6V between the base and the emitter and hence 1,8-0.6=1.2V across R2. First, let's assume that the output line is set to strong - i.e. active pull up and active pull down. The problem here is that the default setting for the output line in the mini-breakout board is pull up using a 50K resistor. This can only provide a low current drive (0.25mA) and hence irrespective of the base resistor R2 the current in the load is only going to be around 1.5mA. Enough for some applications, but for others you need to switch the output mode to strong - see the final chapter. For the rest of this chapter it is assumed that the output mode is strong except for the circuits that work with open collector buses. The output line can provide 3mA so the smallest value of R2 you should use is 400 ohms i.e. 1.2/0.003. Although the diagram shows a value of 470 ohms you can use higher values to limit the current to lower values. Given that the 2N2222 always has a current gain of more than 50, if you put all of the output current into in the base, i.e. the current in the output line to I mA then the load can have up to 50*I mA roughly 150mA in this case of the example. In practice the load would take less than this because its current is limited by R1. The voltage drop across the transistor can be ignored as it is a few tenths of a volt, it is as if the LED is connected to ground when the transistor is full on. A red LED typically has a voltage drop of 2 volts and a working current of 10-20mA - this is why we don't try to drive an LED directly from the 3mA limited output line. Thus the voltage across R1 is 5-2=3V and the target current is 10mA giving R1=3/10*1000=300 ohms minimum. The same circuit works with 3.3V. The only change needed is in the value of the load resistor. Again assuming the LED drops 2 V and works at a current of 10 mA then R1=(3.3-2)/10*1000= 130 ohms. In general, if you want to drive a current load simply find the current you want to flow through it I and what voltage V is across it at that current - look it up in a data sheet. Then the load resistor that you need is R1=(Vs-V)/I ohms. were Vs is the supply voltage - 5V or 3.3V in the two cases above. Things are a tiny bit more complicated when the load is a voltage load. A voltage load simply wants to be connected to a varying voltage and doesn't pass very much current - it is a high impedance load. In this case you don't put the load in series with the load resistor, but connect it to the load resistor as shown:
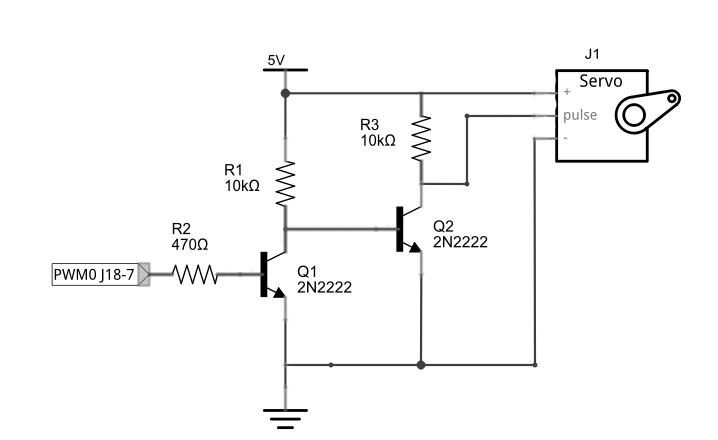
This is the servo circuit introduced in the chapter 7. The pulse input to the servo is a high impedance voltage input. In this case R1 simply acts to limit the voltage through the transistor. At 10K ohms the current through the transistor is at most 0.5 mA. As long as the connection to the servo or any voltage load only takes a small current compared to this 0.5 mA you can ignore the load and consider the voltage across R1 to vary from zero to 5V. Changing the supply voltage to 3.3V simply lowers the current though the transistor and R1. The problem with this circuit is that as far as the voltage is concerned it is inverting. If the Edison's output line is low then the transistor is cut off and the the pulse line is effectively connected to 5V via R1. When the line is high the the transistor is fully on and the voltage on the pulse line is zero as it is effectively connected to ground though the transistor. Hence: Edison line high = pulse line low and vice versa. Notice that this is a problem even if you replace the BJT with a MOSFET. In the previous chapter we solved this problem with software and inverted the way the line was driven. Sometime - because you are using third party software say this is not possible. The standard way of getting a non-inverting voltage converter is to use two transistors.
This works well but there is an easy way to do the same job with a single transistor - although it does have some limitations.
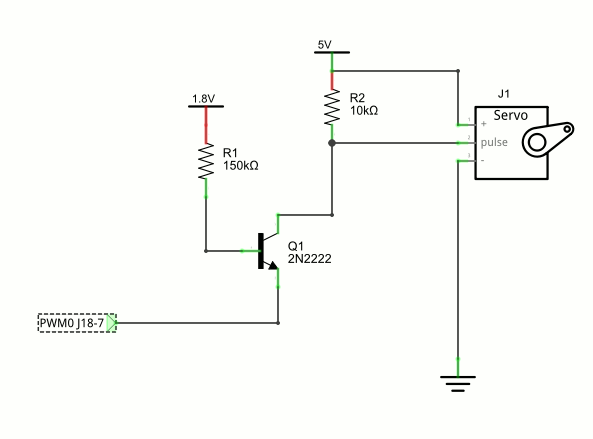
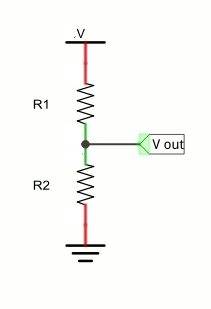
In this variation on a common base mode the transistor's base is connected to 1.8V and its collector to the 5V supply. If the Edison output is low then the base emitter voltage is 1.8V and the transistor is hard on, pulling the output to the servo low. If the Edison output is high the base emitter voltage is zero and the transistor is cut off, making the output to the servo high. You can see that this is non-inverting, but the problem is that the current that flows through R2 is also the emitter current, which is the current the Edison I/O line has to sink. What this means is that the current in R2 is limited to around 2mA and this circuit provides no amplification. Of course you could add another transistor to provide current amplification but in this case you would be better off going back to the standard 2-transistor arrangement. This circuit does, however, work with most servos so in this role it is useful. If you are going to try it out with the servo program from the chapter on PWM remember to change the timings to drive it in a non-inverted way. Both circuits also work at 3.3V. 5V and 3.3V to 1.8V inputGoing from high to low logic for input is very easy. All you need are two resistors to form a potential divider. V is the input from the external logic and Vout it the connection to the Edison's input line:
You can spend a lot of time on working out good values of R1 and R2. For loads that take a lot of current you need R1+R2 to be small and divided in the same ratio as the voltages. For most uses a total of 5K or even 10K is good enough and if V is 5V then R1=3.3K and R2=1.8K works well and for V= 3.3V R1=2.2K and R2=2.7K work well. The problem with a resistive divider is that it can round off fast pulses due to the small capacitive effects. This usually isn't a problem, but if it is then the solution is to use a transistor buffer again.
The role of R2 is simply to limit the input current taken from the output of the 5V or 3.3V device. The current is V-0.6/R2 where V is 5 or 3.3. Notice that this is an inverting buffer but you can usually ignore this and simply correct in software i.e. read a 1 as a low and a 0 as a high state. In most case you should try the simple voltage divider and only move to an active buffer if it doesn't work. |
||||
| Last Updated ( Wednesday, 11 May 2016 ) |