| Remote C/C++ Development With NetBeans |
| Written by Mike James | ||||
| Monday, 23 May 2016 | ||||
Page 3 of 3
Shared Directory On Remote Build ServerNetBeans doesn't really care how you share a folder as long as the folder in question is accessible from both the local and remote machine. An alternative to the set up we have just described is to have the shared folder on the remote build server. The only complication is that if the remote machine is Linux and the local machine Windows the simplest way to share is to use SMB/CIFS and this means installing Samba on the Linux machine. To install Samba, assuming it isn't already installed use:
Next we have to edit the configuration file to specify the share. Use any editor you are happy with to use to edit:
There are many ways to set up a share but it turns out that one of the easiest to to use the default home directory share. The only thing you have to do is to change "read only = yes" to "read only = no" After you edit the file the share specification should read:
This shares the home directory of the Linux user who signs in. So if user pi signs in the directory /home/pi/ is shared as pi. You will need to restart the Samba service using:
and the following commands also come in useful
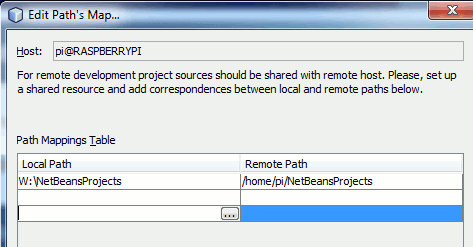
Now we can move back to NetBeans but first we need to map the share to a drive. For reasons that aren't clear NetBeans doesn't work well if you use a share using a UNC of the form \\Server\path. It doesn't seem to work at all if you simply mount a directory with no sub-directories, e.g. a mounted drive like W:\ doesn't work unless you make use of a subfolder such as W:\NetBeansProjects as the project directory. You can't use W:\ as the project directory. This is one of the advantages of using the home directory share. Map the home directory share to a drive W: in this example. Make sure you can open the share and create a folder/file. If not specify your Linux user name and password as credentials. Finally edit the Path Mapper for the build host to read W:\NetBeansProjects for local path and /home/pi/NetBeansProjects for the remote machine.
After this you should be able to create and run a new project as long as you make sure that the project directory is specified as W:\NetBeansProjects. Of course this has the disadvantage that you are sharing a complete home directory when all you actually want is the NetBeansProjects directory. If you don't like the idea of sharing the home directory you can share a single directory but because NetBeans doesn't like creating projects directly in a share it has to have a NetBeansProjects or similar directory within it For example create a new directory NetBeansShare in the home directory and add a sub-folder caalled NetBeansProjects - you can use any names you wan to. Next edit the Samba configuration Share Definitions and add:
Restart Samba and map the share to a drive W: in this case. Now go back to NetBeans and set up the following path mappings local W:\NetBeansProjects/ remote /home/pi/NetbeansShare/NetBeansProjects/ You can see that the need to have a folder in the share is slightly messy. Now you can create a new project and run the result. If you can't then you will need to modify permissions. If a share doesn't work then troubleshooting can be complex because of the caches and the lags inherent in the system. Once a share has failed it often continues to fail even though you have corrected the problem - rebooting everything is a good idea. Shared Folder On A File ServerThis final configuration is now easy because we know how to connect to a share using both Linux and Windows. First set up a share on the NAS or File server called NetBeansShare and create a folder called NetBeansProjects within it. You have to be able to access this share from both Windows and Linux and how to you achieve this depends on the file server. On the Window host map the share to a drive - W in this case. On the Linux remote build host you need to you the smb client to connect to the file server:
Where now the IP Address is the address of the file server. You may not need to specify the username or password if the file server share is public. Now we are back in the same situation as in the previous section only now the NetBeansShare isn't stored on either the local or remote build server but on a third party file server but as the shares are the same we still need the same path mappings used in the previous section.
Now you can create a project and run it with the files all stored on the shared file server as long as you remember to specify the project directory as W:\NetBeansProjects. ConclusionUsing a shared file set up can be difficult and frustrating. The cause of this is entirely due to the need to get permissions correctly set. Before you start worrying about anything to do with NetBeans you have to make sure that the share can be written to and modified from both machines and on the remote system at least by the user that you specify in the SSH connection. Once you have it all working there is very little that can go wrong, which is more than can be said for file copying. The extra effort is usually worthwhile.
Related ArticlesGetting Started With C/C++ On The Micro:bit
To be informed about new articles on I Programmer, sign up for our weekly newsletter, subscribe to the RSS feed and follow us on Twitter, Facebook, Google+ or Linkedin.
|
||||
| Last Updated ( Monday, 23 May 2016 ) |