| Remote C/C++ Development With NetBeans |
| Written by Mike James | ||||
| Monday, 23 May 2016 | ||||
Page 2 of 3
File SharingOne of the reasons why file sharing seems to be more difficult is that it not clear exactly what is being shared. In file copying there are two copies of the project files. One on the local machine running NetBeans and one on the remote build server. The two are kept in sync by NetBeans copying files that have changed. In NetBeans file sharing there is only ever one copy of the project files. These can be stored on the local system, the remote build host or even on a third machine or a NAS say. In this scheme no files are copied each machine simply accesses the files over the network or locally. For example, if the project is stored in NetBeansProjects on the local machine, which is shared, then the local machine accesses the files directly. The remote machine accesses the files using share. If the project is stored in NetBeansProjects on the remote machine, which is also shared, then the remote machine access the files directly and the local machine accesses via the share. If the project is stored on a NAS in NetBeansProjects and it is shared then both the local and remote machines access the files via the share. This all sounds very simple but it can be quite difficult to keep it all straight in your head and when you add in the difficulties of creating shares and connecting to shares in two different operating system it gets complicated. Lets look at the cases in turn. Shared Directory On Windows Local MachineIf the shared directory is on the Windows local machine you simply have to share it. Sharing under Windows has become quite complicated as Microsoft has attempted to simplify the task for the innocent user. The simplest way to share a folder is to right click on it and select Share With,Specific people. By default the share will be with yourself i.e your user identity on the machine. If you want to use another identity then make sure you add it. Notice that Windows will only share resources with users of the machine or domain users if the machine is joined to a domain. Use this procedure to share NetBeansProjects in your MyDocuments folder. You can share a different folder to store your projects in but this is a good choice. At this point it is worth checking that you can connect to the share and create a file or a folder from another machine. Next you have to move to the remote machine which is assumed to be running Linux. To connect to a Windows share you need to mount a cifs volume and to do this you need to make sure you have cifs-utils installed. On Raspberry Pi and Debian distributions you can make sure you have the latest version using the command: sudo apt-get install cifs-utils Before you mount the Windows share you need to create a folder as a mount point. The folder doesn't have to be empty but when you mount the share any contents become unavailable until you unmount the share. The share's contents replace the contents of the mount point for the duration of the mount. To mount the share you can create NetBeansProjects in your home directory. If you have been using the file copying method of remote build host then it will already exist. If it doesn't use the command:
You can of course use any folder name that you want to. Next we need to mount the Windows share. You can make the mounting operation automatic by editing the fstab file but to get started it is simpler to manually mount the share using the command line. The only complication is that the share is owned by the Windows system and after it is mounted NetBeans will attempt to create folders and files on it using the Linux users credentials. Of course if you don't do something to match up the Linux user with the Windows user who has permission to modify the share the system will block any attempt to do so. To specify the Linux user we need not the user name bu the system's identifier for the user - the uid. To get this you simply use the command:
or whatever the user name is. From the response you can find the uid number an for user pi we have uid=1000. Now we can mount the share using the command:
where you replace IP Address by the correct IP address and the path to the NetBeansProjects directory on the local Windows machine and the username by the Windows user name. The system will prompt you to supply the Windows password corresponding to the user. There are lots of alternative ways of setting all of this up but this is simple. Notice that you have to supply the user name and password for the Windows user and the user id of the Pi user. After the mount completes if you look at the NetBeansProjects folder on the remote machine you should see anything that is stored in the NetBeansProjects folder on the local machine. Before moving on make sure that you can create a folder when you are logged into the local machine i.e. as the Pi user create a folder using a console to the Pi. If you can't NetBeans won't be able to save files or create folders either because it uses the same credentials. To unmount the share you simply use:
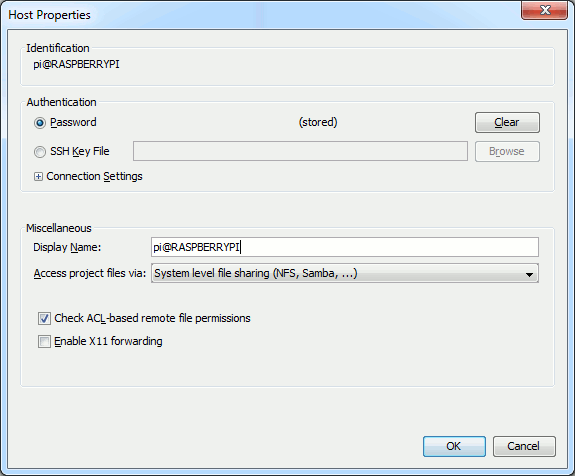
Setting PathsNow that you have the shared folder set up on the local and remote machines you can create a build server that makes use of the share. You first set up the build server as before: Drop down the C/C++ Build Hosts in the Services window, use Window,Services if it isn't showing. Select Add New Host and fill in the details, IP address, remote host user, etc, but this time select "System level file sharing" in the Access project files via box:
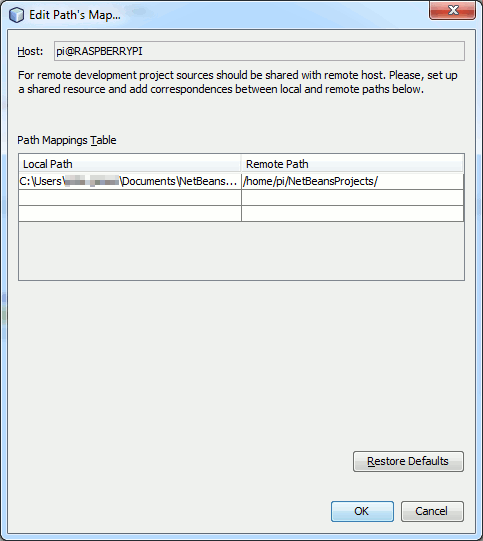
At this point NetBeans has no idea where to store new projects to make use of the shared folder - because it doesn't know where the shared folder is. In fact the situation is worse than this because it doesn't know where the shared folder is on the local machine and where it is on the remote machine. This is where path mapping comes in. There are two paths that need to be specified. The path to the folder that is shared on the local machine i.e. the Windows path and the path to the share that has been mounted on the remote machine i.e. the Linux machine. Notice that in both cases what his needed is the path that a user of the machine would use to get to the folder and not a share or UNC path. In the example the local path is:
and the remote path is:
and these are the two paths that need to be specified as being the project directory in both cases. To do this right click on the build server in the list and select Path Mapper. In the dialog box that appears enter or navigate to the two specified paths:
Next you can create a project with this new build server specified.All you have to do is make sure that the project folder is specified as the local folder you specified in the path mapper. As we have been using NetBeansProjects this will be the default but if you used a different local folder to share you will have to change the default. Now when the project is created it will be visible in the remote machines NetBeansProjects folder as well - because its the same folder. When you run the project NetBeans uses SSH to give the compile commands to the remote server and specified the shared folder on the remote machine i.e. using the remote path in the path mapper. Notice that no files are copied because they are accessible from both machines. About the only things that can go wrong with this set up is to do with permissions - which is usually what goes wrong when a Linux and a Windows system meet. |
||||
| Last Updated ( Monday, 23 May 2016 ) |