| Android Adventures - Menus, Context & Popup |
| Written by Mike James | ||||
| Tuesday, 26 May 2015 | ||||
Page 2 of 3
The Contextual Action ModeThe context menu is easy to use but after Android 3 the contextual action mode menu is preferred as it extends the behavior of the action bar. However they are implemented independently and the contextual action bar just happens to occupy the same screen location. When a user long clicks a View object a contextual action bar appears at the top of the screen and not alongside the associated View object as the context menu does. This may be the way to do things, but it is more complicated because it requires you to implement more code. The contextual action mode can be used in earlier versions of Android via the support library. Unlike the context menu you don't just register UI components that trigger the menu. You have to call the startActionMode method to display the contextual action mode menu and this means you have to write a long click event handler. Notice that it is up to you what user action triggers the contextual action mode, but it is nearly always a long click. The steps to creating a contextual action mode menu are:
For example, if you have button and you want a long click event to trigger the menu you need to write in the Activity's OnCreate something like:
You can have Android Studio generate this stub by typing in the "new View.OnLongClickListener" and then right click, select Generate and Implement Interface. So far all we have implemented is an empty long click event handler for the button. To make the long click event display a menu we first need an instance of the ActionMode.Callback interface. Again, you only need to enter the text up to "new ActionMode.Callback()" and then you can use the generate code option to implement the interface:
As you can see, the Callback object has four methods each of which is called as part of the menu's life cycle. As you might well guess, to make the menu appear you have to fill in the details for the onCreateActionMode method:
All we do is inflate the menu resource and the system adds it to the menu. You can also fill out the details of the other methods - you most likely will want to add something onActionItemClicked but this involves nothing new. Finally we need to activate the contextual action menu in the button's onLongClick event handler:
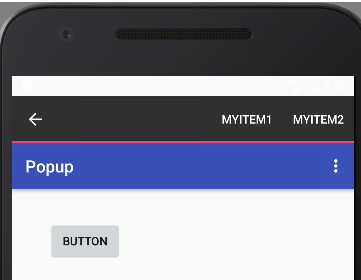
Now when you long click the button a new context bar like menu appears over the usual action bar:
Notice that this behaves a little differently in that the menu stays on the screen until the user clicks the right arrow button in the corner. You can allow the user to make multiple selections or dismiss the menu as soon as the user selects one option. In this sense the contextual action bar is more sophisticated and flexible than the simple context menu. The complete code to make the contextual action bar appear is:
Again this introduction has just scratched the surface of how the new context menu can be used but the general principles follow the ideas of the general Android menu and many of the specifics of the action bar.
|
||||
| Last Updated ( Monday, 10 October 2016 ) |

