|
Page 1 of 3 As well as the all-purpose action bar, there are three other commonly encountered menus - the context menu, the contextual action menu and the popup menu. They share the basic Android approach to menus and they also have some special characteristics.

Starting With an App
Third Edition
Is now available in paperback and ebook.
Available from Amazon.
- Getting Started With Android Studio 3
- The Activity And The UI
- Building The UI and a Calculator App
- Android Events
Extract: Using Lambdas
- Basic Controls
- Layout Containers
- The ConstraintLayout
Extract: Guidelines and Barriers
- UI Graphics A Deep Dive
Extract: Programming the UI ***NEW
- Menus & The Action Bar
- Menus, Context & Popup
- Resources
- Beginning Bitmap Graphics
Extract: Simple Animation
- Staying Alive! Lifecycle & State
- Spinners
- Pickers
- ListView And Adapters
If you are interested in creating custom template also see:
Custom Projects In Android Studio

There are menus other than the action bar and it is important to understand what they should be used for. Essentially we need to deal with two different types of use - context and pop-up. Both the context menu and the pop-up menu appear when the user long clicks on some item on display in the UI.
The context menu should display commands that take the item clicked as their subject. For example, selecting a line in a table might bring up a context menu that allows you to delete or move the item.
A popup menu on the other hand can be used for any task that a context menu isn't suitable for. It can be used, for example, to provide additional choices to customize an action.
The context menu is easy to understand and fairly easy to implement however there is a slight confusion caused by the introduction of the Contextual Action mode - a context menu in the form of an action bar.
The Context Menu
The action bar is the apps main menu but there are times when you want other menus to be available. Now that we have the principles of menu construction well understood it is easy to extend what you know about the action bar to other types of menu.
Perhaps the second most useful is the context menu although this has been replaced in Android 3.0 and higher by the contextual action mode.
To create a context menu is very easy once you know the basic mechanism. You can register any View object in the UI to respond to a long click. When any registered View object receives a long click the Activities onCreateContextMenu event handler is called. This is where you create the menu that will be shown as the context menu.
Notice that you can register as many View objects as you like and each one will respond to a long click by onCreateContextMenu begin called. This means that if you want to show a different menu for each View object you need to test to see which one has caused the event.
So the recipe is:
- Create an XML menu resource
- register all of the View objects that you want to trigger the context menu using registerForContextMenu
- override the onCreateContextMenu event handler and use a menu inflater to create the menu
For a simple example create a new menu resource, right click in the res/menu directory and select new resource menu file option. Call it mycontext.xml and enter the following:
<?xml version="1.0" encoding="utf-8"?>
<menu xmlns:android="http://schemas.android.
                        com/apk/res/android">
 <item
       android:title="MyItem1"
       android:id="@+id/myitem1" />
 <item
       android:title="MyItem2"
       android:id="@+id/myitem2"/>
</menu>
A very basic menu but enough to demonstrate what is happening.
Next place a button and a checkbox on the UI and in the OnCreate method add the lines as shown below.
@Override
 protected void onCreate(Bundle savedInstanceState) {
 super.onCreate(savedInstanceState);
  setContentView(R.layout.activity_main);
 Button btn=(Button)findViewById(R.id.button);
  registerForContextMenu(btn);
  CheckBox cb=(CheckBox) findViewById(R.id.checkBox);
  registerForContextMenu(cb);
 }
You can see what is happening here - we find the Button and CheckBox objects and register them using registerForContextMenu. After this a long click on either UI component will trigger the onCreateContextMenu event.
You can now right click in the Activity code and select Generate and Override method. Select onCreateContextMenu and Android Studio will generate a stub for you.
All you have to do in this stub is inflate the menu resource file or otherwise create a menu object in code:
@Override
 public void onCreateContextMenu(
       ContextMenu menu,
       View v,
       ContextMenu.ContextMenuInfo menuInfo) {
 super.onCreateContextMenu(menu, v, menuInfo);
  getMenuInflater().inflate(R.menu.mycontext,menu);
 }
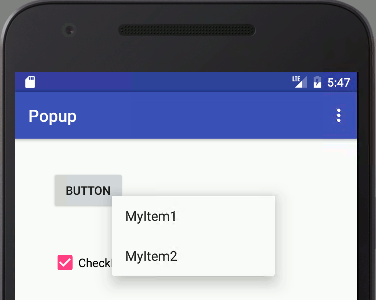
If you now run the program you will find that the same context menu appears when you long click on either the Button or the CheckBox.

Of course if you really want this to be a context menu then you need to test the View object passed into the onCreateContextMenu event handler and load the menu resource that corresponds to the appropriate menu for the View object.
How do you handle the context menu item selection?
In more or less the same way as for the action bar.
When any of the items in the context menu are selected the Activity's onContextItemSelected event handler is called. So all you have to do is override this and use the item ids to control what should happen. For example:
@Override
public boolean onContextItemSelected(
                               MenuItem item) {
  switch (item.getItemId()) {
    case R.id.myitem1:
       do myitem1 action
       return true;
    case R.id.myitem2:
       do myitem2 action
       return true;
    default:
       return super.onContextItemSelected(item);
  }
}
The only extra detail is the availability of the ContextMenuInfo object which is passed to the onCreateConextMenu handler and can be retrieved from the item in the event handler using item.getMenuInfo(). This contains extra information such as which line in a list view has been long clicked. Exactly what information is included depends on the View object that generated the event.
If you want to see a context menu in action add a TextView to the UI and try:
@Override
 public boolean onContextItemSelected(
                            MenuItem item) {
 TextView tv=
    (TextView) findViewById(R.id.textView2);
 switch (item.getItemId()) {
  case R.id.myitem1:
   tv.setText("item1");
   return true;
  case R.id.myitem2:
   tv.setText("item2");
   return true;
  default:
   return super.onContextItemSelected(item);
 }
 }
|


