| Android Adventures - ListView And Adapters |
| Written by Mike James | ||||||
| Thursday, 08 October 2015 | ||||||
Page 3 of 5
A Custom ArrayAdapterAs long as you can cope with what is being displayed for each row being a String returned by the object's toString method then you can use a standard ArrayAdapter. You can even customize the object's toString method to display something different - but it's still a String. If you have an array of general objects and want to display multiple items from each object or items which are not Strings then you need to create a custom ArrayAdapter. This isn't difficult but there are one or two more advanced points to take note of but for this first example - let's keep it as simple as possible. First we need some objects to hold the data we are going to display - a record type say with a field for name and one for number in stock say, you could also add a photo of the item but in the spirit of keeping it simple a String and and int are enough. If you know other languages you might be thinking that we need a stuct or something similar. In Java there are no structs. If you want to create a record you create an object with the necessary properties. Start a new project called CustomList and accept all the defaults. Navigate to the main java directory right click and select New,Class. Call the class MyData and enter:
The new class has two public fields myTitle and myNum and a custom constructor allowing us to initialize these fields. Adding this initialization constructor makes it easy to create arrays of the new class. For example, in the onCreate method you can add
You might need to add more data than this to try out the ListView properly. Now we have some data to display we need to add the custom adapter. Once again right click on the java directory and create a new class called MyAdapter. This has to inherit from ArrayAdapter:
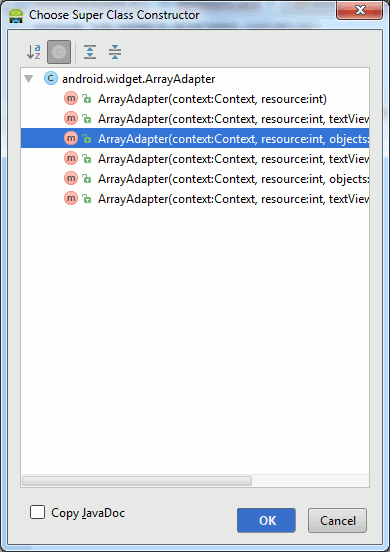
Notice that we want the generic ArrayAdapter to work with MyData objects. Most of the methods of ArrayAdapter will work perfectly well with arrays of arbitrary objects. Next we need to add a suitable constructor based on the constructors that ArrayAdapter has. Android Studio can help. Right click on the class line and select Generate, Constructor. You will see a list of possible constructors. The one we want to use is third in the list.
When you select it the following code is generated for you:
We need to extend this because we need to keep track of context, resource and the array of objects and first we need some variables to store them in:
The constructor can now store the values passed in to these variables:
Notice that with this constructor our adapter is used in the same way as in the previous example - we supply context,resource id and the array of data. We now reach the key part of the customization - overriding the adapter's getView method. This is the core of the functionality of the adapter. Each time the ListView needs to display a new row it calls the adapter's getView method and expects to get back a View object that it can display as the row. To override the method you can use Android Studio to generate some code. Right click in the adapter class and select Generate, Override method and then select getView. The generated code isn't particularly helpful but at least it gets the method signature correct:
It really doesn't matter how getView generates the View object it is going to return but the most common way of doing the job is to inflate a layout file. To give the inflator something to work with right click on the res/layout folder and select New,Layout file. Call the file mylayout and change the LinearLayout to horizonal and add two TextViews with ids title and number. Feel free to change the layout to make things look pretty - it wont change the code you need to write. Our first task is to get an inflator and inflate the layout file:
Notice that we make use of the resource id we stored when the constructor ran and we use the parent View object passed in to the getView method. The only purpose the parent View object serves is to allow the system to layout the resource in a known container. The final false parameter tells the inflater not to add the resource generated object to the parent - this is a job for the ListView. Before this happens we have to put the data into the View object. To do this we need to find the two TextView objects that we placed into the layout and this is just a matter of sing the familiar findViewById pattern:
Once you have the View objects you need to change you can use the position parameter to get the data from the array of objects that was set by the constructor:
That's it, job done. All we need to do now is return the row View object:
The complete myAdapter class is:
Now all we have to do is write some code that makes use of the new class and this is exactly the same as the code that made use of the standard ListView:
And of course, don't forget to put a ListView component on the main layout.
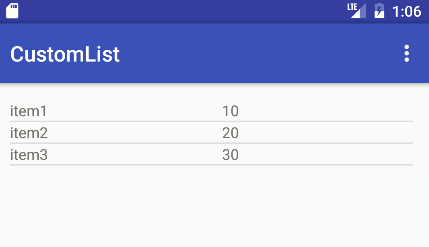
If you run the program you will now see a list consisting of two TextViews each with something different to display on each line. In a real app you probably wouldn't create a new class for two text items - overriding the toString method would be easier but the principles are the same no matter what the multiple View objects created by the adapter are. |
||||||
| Last Updated ( Saturday, 15 October 2016 ) |

