| Android Adventures - ListView And Adapters |
| Written by Mike James | ||||||
| Thursday, 08 October 2015 | ||||||
Page 2 of 5
Working With The DataThe whole point of showing the user a list of items is so that they can interact with it. You can manipulate the data on display in various ways and handle events when the user selects an item. Get SelectionPerhaps the most important thing is to deal with the user selecting and item. The usual way of doing this is to write a handler for the OnItemClickListener. This passes four parameters
The AdapterView is the complete View displayed by the container, the View is the View object the user selected, the position in the collection and the id is the items id number in the container. For an ArrayAdapter the id is the same as the array index. You can use this event to find out what the user has selected and modify it. For example the event handler:
sets each item the user selects to "selected" - not useful but you could change color to grey out the selection. It is important to know that changing what the View object displays doesn't change the data stored in the associated data structure. That is in this case setting a row to "selected" doesn't change the entry in the String array. To set the handler to the ListView you would use:
You can also set the selection in code using:
where position is the zero based position of the item in the list and you can scroll to show any item using
A subtle point worth mentioning is that you can't make use of the view object that is passed to the event handler to display the selection in another part of the layout. A View object can only be in the layout hierarchy once. In most cases this isn't a problem because you can usually manually clone the View object. For example, in this case the View object is a TextView and so you can create a new TextView and set its Text property to be the same as the the one in the list. For example:
This can be more of a nuisance if the View object is more complex. Changing The DataOne of the slightly confusing things about using adapters is the relationship between what is displayed and what is in the underlying data structure. You can change the data but if you want to see the change in the container you have to use an adapter notify method to tell that the data has changed. For example, if you change an element of the array:
then nothing will show until you use:
Notice that you have to cast the ListAdapter returned from getAdapter to an ArrayAdapter to call the notify method. There is a second way to change the data using the ArrayAdapter itself. This provides a number of methods to add, insert, clear, remove and even sort the data in the Adapter. The big problem is that if you use any of these then the underlying data structure associated with the Adapter has to support them. For example the add method adds an object onto the end of the data structure but if you try:
with the program as currently set up you will find that you get a runtime crash. The reason is that in Java an array has a fixed size and the add method tries to add the item to the end of the array which isn't possible. If you want to add items to the end of an array like data structure you need to use an ArrayList and not just a simple array. An ArrayList can increase and decrease its size. For example we can create an ArrayList from out existing String array:
and you can associate this new ArrayList with the adapter instead of the String array:
Following this you can use:
and you will see the new data at the end of the displayed list. You may have to scroll to see it. As long as you are using an ArrayList you are safe to use all of the adapter data modifying methods:
You can also make use of
and
A Custom LayoutSo far we have just made use of the system provided layout for the row. It is very easy to create your own layout file and set it so that it is used to render each row - but you need to keep in mind that the only data that will be displayed that is different on each row is derived from the items .toString method. The simplest custom layout has to have just a single TextView widget which is used for each line. In fact this is so simple it has no advantage over the system supplied layout so this is really just to show how things work. Use Android Studio to create a new layout in the standard layout directory and call it mylayout.xml. Use the designer or text editor to create a layout with just a single TextView object. Create a new layout and accept any layout type for the inital file. You will can then place a TextView on the design. You wont be able to delete the layout however as the editor will not allow you to do it. Instead you need to switch to Text view and edit the file to remove the layout:
Notice that you need the xmlns attribute to make sure that the android namespace is defined. To use the layout you simply provide its resource id in the ArrayAdapter constructor:
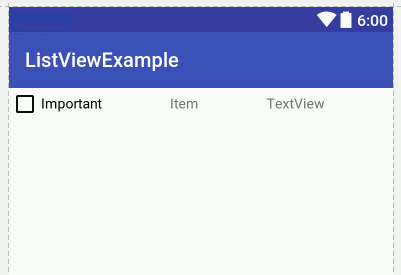
If you try this you wont see any huge difference between this and when you use the system layout android.R.layout.simple_list_item_1. The next level up is to use a layout that has more than just a single TextView in it. The only complication in this case is that you have to provide not only the id of the layout but the id of the TextView in the layout that you want to use for the data. For example, if you create a layout with a horizontal LinearLayout and place a CheckBox, and two TextViews:
Then you can use the layout by creating the ArrayAdapter with:
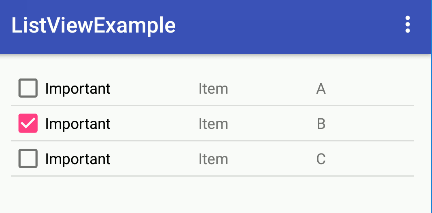
assuming that the TextView you want the data to appear in is textView2. The result is a little more impressive than the previous example:
Notice that each of the View objects in the layout gives rise to a distinct instance per line. That is your layout may only have had one CheckBox but the ListView has one per line. This means that when the user selects the line you can retrieve the setting of the CheckBox say. It also means that a ListView can generate lots and lots of View objects very quickly and this can be a drain on the system. Important Note:There are a few things that you need to know if you are going to successfully handle onItemClick events. The first is that your layout can't have any focusable or clickable Views. If it does then the even isn't raised and the handler just isn't called. The solution is to stop any View object in the container from being focusable. Add
With this change the event handler should be called but now you need to keep in mind that the View object passed as v in:
is the complete View object for the row and not just the TextView. That is in the case of the example above it would be the LinearLayout plus all of its children. If you are going to work with the View object you have to access the objects it contains and you can do this is in the usual way. For example:
Notice that you can use findViewById in the View that is returned.
|
||||||
| Last Updated ( Saturday, 15 October 2016 ) |