| Android Adventures - Basic Controls 2.2 |
| Written by Mike James | ||||
| Tuesday, 03 March 2015 | ||||
Page 2 of 3
To attach a click event handler on both buttons you can simply define a function:
in the activity and set the onClick property on each button to doButtonClick. You can find examples of using buttons in this way in earlier chapters. Now that we know how to handle events using anonymous classes it is worth doing the same job in this way. As we want to assign the same event handler to all three buttons we need to create an instance of OnClickListener. All you have to type is:
and select OnClickListener and let Android Studio generate:
Notice it doesn't generate a final semicolon so remember to add it. You also need to fill in the details of the onClick event handler - there is only so much Android Studio can do by way of writing your program. Finally you need to set the instance on each of the buttons:
Now when you click on either of the buttons the myonClickListener is called. It is also worth noting that, while a button has no function in life other than to be clicked, all of the other controls can also respond to an onClick event. That is you can use anything as a button if you want to. All PropertiesIf you have looked at any example of using Buttons in the documentation, or if you look at slightly older Android code, you may discover some properties that you can't seem to access using Android Studio. The Properties window only shows you a small sub-set of the most used properties. To see them all you need to click on the two arrow icon at the top and bottom of the window. The big problem with is is that you go from a very small sub-set to an overwhelming list. The best way to deal with this is to know what you want to change and find the exact name of the property that does the job. This is easier to say than to do in many cases. For example, suppose you want to set an icon within a standard text button so that it displays to the left of the text that button contains. This appears to be impossible if you restrict yourself to the properties presented in the initial Properties window. If you lookup the details of the properties that Button inherits you will find
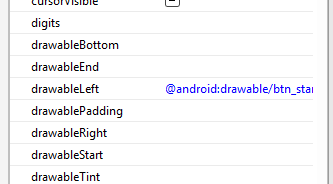
which are not in the Properties window list. These allow you to display a drawable, i.e. a graphic, at the location specified relative to the text. Once you know the name of the property you can find it in the list of all properties:
Click on the ellipsis button next to it and select a drawable of your choice to display the icon to the left of the text:
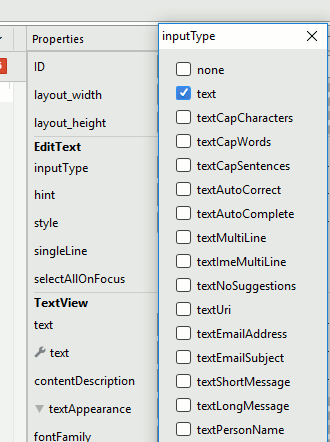
Text FieldsTextFields are the way you get the user to enter some text for you to process and as you can guess they form an important part of most UIs. There are a lot of Text Fields provided in the Toolbox but they all work in the same way differing only in the type of input they expect the user to type. In the course of developing apps you will encounter most of them sooner or later but you really only need to know how to use one of them to understand how they all work. If you have used another UI Framework then you will have encountered some form of the Text Field before but the Android control is slightly different in that it generally offers the user a customized virtual keyboard - an IME Input Method Editor. You can build your own IMEs but for the moment lets just use the ones provided by the system. If you want the Android simulator to make use of the IME that a real Android device would use then you need to deselect the Hardware Keyboard Present option when you are creating the AVD (Android Virtual device). If the simulator makes use of the host machine's keyboard you don't see the IME at all. The first thing to clear up is that even though there appear to be a lot of different types of Text Field controls in the Toolbox they are all examples of the EditText control with its inputType property set to a particular value. When you place one on the design surface you will see that it is of type EditText and if you scroll down to its inputType property you can change the type of input the Text Field will handle.
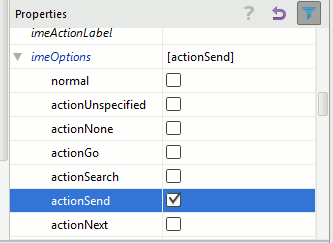
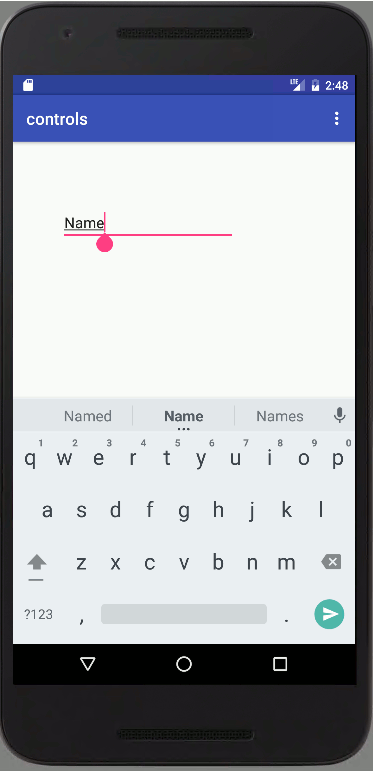
When you use a particular inputType the user is presented with a virtual keyboard that is suitable for typing a value - e.g. if you specify a numeric value then the keyboard only displays numbers. You also get an action key at the bottom right of the keyboard that the user can press to complete the action e.g.Send for an SMS message say. To select the action button for a particular keyboard, use a Send button for a general text input then you will need to use the All Properties view and select a setting for the imeOptions property.
For example setting it to actionSend forces a Send button to be displayed:
There are many other properties that you can use to customise a Text Field but there is one standard task worth explaining in detail - writing a handler for the onEditorAction event.
|
||||
| Last Updated ( Sunday, 23 October 2016 ) |


