| Exposing the Kubernetes Dashboard with Istio Service Mesh |
| Written by Sigal Zigelboim | ||||||
| Thursday, 24 November 2022 | ||||||
Page 2 of 2
Step 2: Save and Edit the Definition FileDownload the Kubernetes-dashboard.yaml definition file using the wget command:
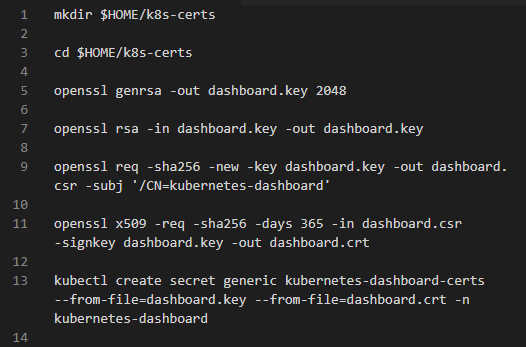
Here is how to implement the Namespace specification. It requires us to define the API version, its kind, spec and metadata as follows: apiVersion: v1 Let’s implement the dashboard secret. In order to avoid certificate errors that can occur in several web browsers, we will develop it manually. We define API version, its kind, type and metadata as follows: apiVersion: v1 Step 3: Create Namespaces and CertificatesThis stage involves the generation of Namespaces and Certificates.
Step 4: Deployment of the ConfigurationIn this step, we will deploy the Kubernetes-deployment.yaml file using the create command:
A Kubernetes Namespace defines the scope of the cluster's Pods, Services, and Deployments. We can analyze the Pods and Services using the get commands:
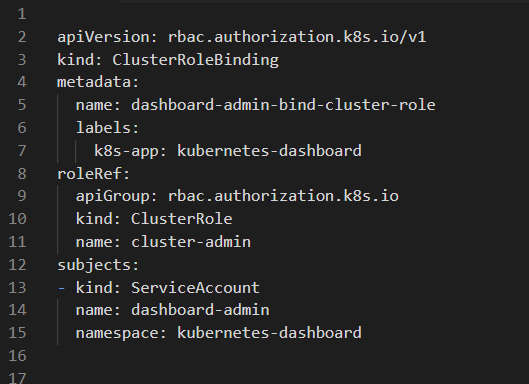
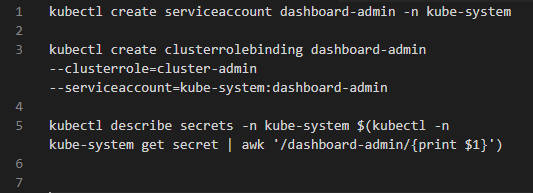
Step 5: Implement the Kubernetes DashboardHere we build ClusterRoleBinding and a ServiceAccount. Create a ServiceAccount using dashboard-admin.yaml: apiVersion: v1 Now create ClusterRoleBinding using dashboard-admin-bind-cluster-role.yaml: To implement a Kubernetes Dashboard, users need to apply the ClusterRoleBinding and a ServiceAccount using the apply command in their cluster: kubectl apply -f dashboard-admin.yaml kubectl apply -f dashboard-admin-bind-cluster-role.yaml Users can access the dashboard by opening the host url, which we defined in the VirtualService. In our case, navigate to k8sdashboard.example.com Create a connection between the default cluster administrator and the cluster administrator by establishing a ServiceAccount using the create command as follows:
Lastly, users can log in to the Kubernetes dashboard using the newly acquired token. ConclusionIn this article, I explained the basics of Istio for Kubernetes clusters, and showed how you can use Istio to easily expose your Kubernetes dashboard to users and administrators of your cluster. This involves:
I hope this will be useful as you make better use of Istio for managing cluster communications. More InformationRelated ArticlesIstio 1.7 Expands Capabilities for the Hybrid Cloud To be informed about new articles on I Programmer, sign up for our weekly newsletter, subscribe to the RSS feed and follow us on Twitter, Facebook or Linkedin.
Comments
or email your comment to: comments@i-programmer.info |
||||||
| Last Updated ( Friday, 25 November 2022 ) |


