| Android Adventures - Dialog Classes In DialogFragments |
| Written by Mike James | ||||
| Thursday, 31 July 2014 | ||||
Page 2 of 3
Showing the AlertDialogNow we have to create a DialogFragment, the code for the AlertDialog and the code needed to use the DialogFragment. This is mostly the same as what we did in the previous chapter so the instructions are going to be brief. One big difference from the previous chapter is that we are going to use the Fragment template and modify it slightly to make it into a DialogFragment. Start a new blank Activity project and accept all of the defaults and set the minimum SDK to Honeycomb Android 3 to avoid having to deal with the support library. Next right click on the MyActivity.java file and select New,Fragment,Fragment(Blank). Call the Fragment generated MyDialog and accept all of the defaults. You fill find a new java file called MyDialog and a new Layout called fragment_my_dialog.xml. In this case we are not going to use the layout file. To convert the Fragment into a DialogFragment simply change:
to
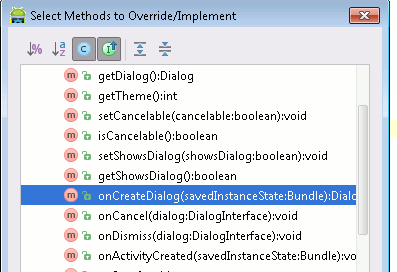
We can leave everything else in the generated code as it is but of course in a real project we would need to edit it to customise the parameters and the Fragment events. More of this later. For the moment we are simply concerned with creating the AlertDialog. We need to override the onCreateDialog method. You could just type the code in but it is simpler to find a location that you want the method to be inserted and right click, select Generate,Override Methods. Select onCreateDialog from the window that pops up:
The generated code is just:
and you can simply type it in if you prefer. Next we need to generate and return the AlertDialog and this is just a matter of pasting in the code developed earlier into the onCreateDialog method:
You should recognise all of this code - the only new feature is that the AlertDialog is returned as the result of the method. This is enough to make the dialog functional but the template has also an overridden onCreateView which inflates the layout to provide a UI. For fairly trivial reasons you can't update the layout of an AlertDialog using onCreateView and you either have to not override the method or return a null. If you do try to add a layout via onCreateView to the AlertDialog then you will most likely see an error about having to use requestFeature. Basically after you use the Alert.DialogBuilder.create the Window will not accept an inflated layout. You can however display a layout in the AlertDialog but only if you do it before calling create - more of this later. In this case the simplest thing to do is delete the entire onCreateView method. The ActivityNow we can move on to the Activity that is going to use the dialog. Using this AlertDialog based dialog is exactly the same as using the previous DialogFragment. First we need a button to show the AlertDialog so use the designer to put one into the UI in the usual way. We need to add the event handler to the button that calls the dialog's show method:
You should be able to see that this is exactly the same as before - create an instance of the dialog and call its show method to add it to the FragmentManager. After this the dialog will display until the user clicks one of its buttons to dismiss it. Now all we have to do is hook the OnClickListener with the button in the Activity's onCreate:
One final thing before we can test the program. As the template defines an interface this has to be implemented by the Activity. Change the class definition to read:
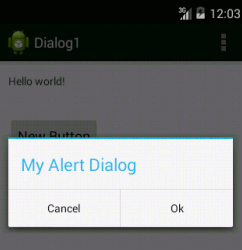
Right click on the Mydialog.OnFragmentInteractionListener and select Generate,Implement Methods to auto generate the single method that the interface defines. Now we are ready to go. If you run the program you will see the usual button and if you click it a two button AlertDialog will appear:
Communicating With The ActivityAt the moment the event handlers that deal with the button clicks are within the DialogFragment. This is fine is they can do what ever job the dialog is intended to do but often the dialog has to communicate data to the Activity that is using it. We already know how to pass data to the Activity from a Fragment in a way that doesn't depend on the Activity that is using it. We have to make use of the Fragment Interface pattern and as we have customized the Fragment template to create the DialogFragment we only have to make a few small changes to implement it. If you are happy you understand how this works skip to the next section because there is very little new here - just a specialization to the DialogFragment. As an example let's just return a single Boolean that is true if the Ok button is selected and false if the Cancel button is selected. To allow direct comparison this will be implemented in the same way as the example at the end of the previous chapter. First scroll down to the end of the DialogFragment's code and find the line:
Change the interface definition to read:
In other words our callback function will have one parameter that returns the button selected as true or false. At the top of the file change;
to
Now we have to fill in the details of the button event handlers. They simply call the dialogDoneListener.onDone method.
Finally we need to edit the onAttatch method to store the Activity's implementation of dialogDoneListener in mListener:
Finally we need to remember to delete the onButtonPressd method that was generated in case we needed to use it. To make use of the new version of the dialog we need to implement the interface again. Simplest thing it so delete the current implementation and get the generate menu option to create the method we need.
Now when you run the program the onDone method is called when the dialog is closed with the correct setting of state to let the Activity know which button has been selected. |
||||
| Last Updated ( Saturday, 25 July 2015 ) |

