| Beginning PHP with Eclipse |
| Written by Administrator | |||
| Monday, 16 November 2009 | |||
Page 1 of 2
If you want to learn the server side language PHP what could be better than to use Eclipse for PHP?
PHP is a server side language. Its main job in life is to build web pages and it does this very well and very directly. 
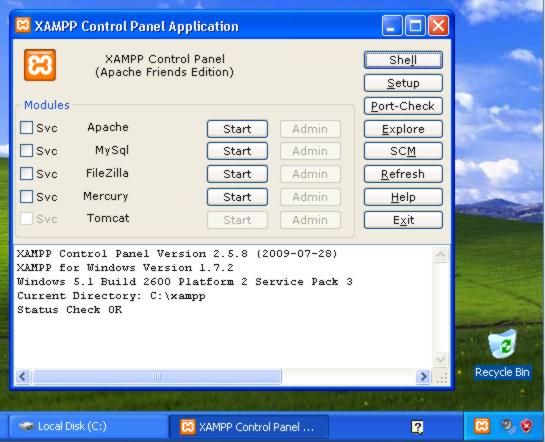
If you want to learn PHP what could be better than to get to grips using Eclipse for PHP? You can download a complete PHP development environment for free. The pre-requisitesTo run PHP and Eclipse you need a working web server with PHP installed, a Java runtime environment and last but not least a copy of Eclipse. You might also want a copy of MySQL running and a debugger but these are optional extras. You can install each of these items individually and Eclipse will work with almost any web server that works with PHP, Internet Information Server (IIS) for example. However, if you just want to learn PHP it is much simpler to take advantage of XAMP - cross platform Apache, MySQL and PHP - a single package that will give you a PHP environment in one download and more importantly one installation. XAMP is available for the Mac, Linux and Windows and it is by far the easiest way to get started and any PHP programs that you develop using it should just work under another web server with few or no modifications - more about compatibility and versions later. So this first installment of Beginning PHP is about getting to the "Hello World" stage - i.e. being able to write and run the simplest possible PHP program. The steps that we are going to follow are: 1) Download and install XAMP 2) Download and install Eclipse 3) If necessary download and install a Java runtime So three easy steps… Step 0 - a virtual machineYou might also want to add a step zero to this list and install everything to a virtual machine. This has lots of advantages. Installing to a virtual machine means that you can be 100% sure that nothing can go wrong, you don't complicate the set up of your main machine and when you are finished you can uninstall everything by deleting the virtual machine. Use either Virtual PC or VMware. Once set up its as easy as working with a real machine. Step 1 - XAMPTo get a copy of XAMP for your system either do a search on XAMP or visit: http://www.apachefriends.org/en/xampp.html Select the version you want to install - currently Linux, Windows, Mac OS X or Solaris. I'm going to illustrate the process using the Windows version installing on Windows XP. There are some problems installing under Vista due to security considerations so check out the FAQs on the site if you want to use Vista. Install the basic package. You can always upgrade and install the add-ons later. The self extracting archive is the easiest to use - save the file and run it. For a first installation simply accept all of the defaults. This will give you an XAMP installation in the folder \xamp. You can exit the installation and run the XAMP control panel - there should be an icon on the desktop and in the start bar. Once the control panel is running you can access it by clicking on the icon in the system tray. The XAMP control panel lets you start and stop the servers that have been installed and provides some test facilities. You only need two of the servers working to develop PHP applications - the Apache web server and the MySQL database server. In fact to get started you really only need Apache.
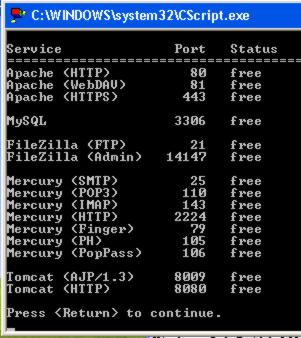
The control panel About the only thing that can go wrong in getting Apache running is that you already have a web server working on the same machine. Web servers use port 80 for HTTP requests and it is simpler if Apache has exclusive use of port 80. To check this click the Port-check button and you should see the status of all of the ports used by all of the servers - at least make sure that Apache has access to the ports it needs.
Checking that ports are available If you do find a port in use then the simplest solution is to locate the server that is using it and either configure it to use another port or uninstall it. On Windows systems the cause is usually that IIS has been installed at some earlier time and been forgotten. Uninstall IIS using the Windows Control Panel. The ultimate test is to start Apache - simply click the start button. You will also have to unblock the firewall to allow other users to connect to the server - if you only want to use the server on the local machine you don’t have to unblock the firewall. To test Apache simply click the Admin button. This loads a PHP web page that tells you that you have successfully installed XAMP - notice that this means that Apache and PHP are correctly installed and working. You can now move on to install Eclipse. If anything is wrong with the installation then it is almost certain that the problem is with other applications interfering. Check that there are no other web servers, IIS for example, and no earlier installations of PHP. It is always worth trying reinstalling XAMP but if you still can't get it working then consider creating a virtual machine and installing XAMP to this. Step 2 - Eclipse PDTDownloading and installing Eclipse PDT PHP Development tools is even easier than installing XAMP. All you have to do is download a zip, unzip it and run the program - there is no installation. You can find the latest version of Eclipse PDT at Navigate to the downloads section where you will find links to all of the different customizations of Eclipse. Notice that Eclipse is a single application that can be customized to a range of different development tasks by installing modules. You could in principle download a basic Eclipse IDE and then customize it to provide a PHP development environment by downloading and installing the correct plug-ins, but this is a lot harder work than simply downloading an "all-in-one". In this case download the latest Eclipse PDT zip file and unzip the contents to a suitable directory - Eclipse in Programs or in Documents, its location isn't important. To run Eclipse you simply double-click or open the Eclipse icon. To make this easier under Windows you can create a shortcut. Drag the icon while holding down the Ctrl key and either drop the icon on the start bar, the quick launch bar or the desktop - anywhere that you can find it quickly. Now you can run Eclipse as if it was a standard Windows program. Step 3 - Install a Java runtime
|
|||
| Last Updated ( Monday, 15 February 2010 ) |