| Offline C/C++ Development With The Micro:bit |
| Written by Harry Fairhead | |||
| Friday, 19 February 2016 | |||
Page 1 of 2 We have already discovered how to use the online editor to create a C/C++ program. Now we are going to move to the desktop with an offline approach. This has the advantage that we can use any tools we care to select and no Internet connection is needed. Important note:This article and the rest of the book have moved to our sister site: http://www.iot-programmer.com/ Where you will find any updates and more chapters.
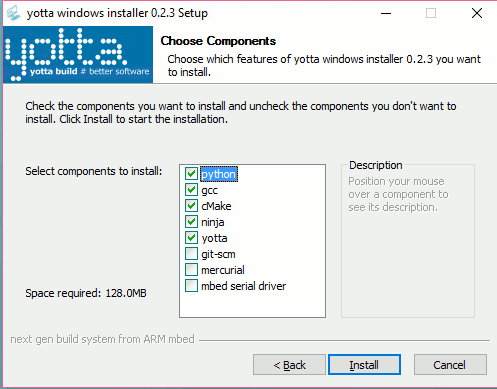
This is the follow on to Getting Started With C/C++ On The Micro:bit which explains the advantages for IoT of using C/C++ rather than any of the BBC micro:bits supplied languages and looks at using the mbed online compiler. To work locally we need to install the mbed build system Yocto, a suitable compiler tool set, and something to use as an editor. Fortunately this is all surprisingly easy once you know how. Build systemsThe biggest problem facing the embedded programmer is the apparent complexity of the build system. Back in simpler times an embedded C program might grow to a few hundred lines, perhaps with a simple single support library. Today libraries such as mbed or the microbit library are complex and need other software components to complete them. You could manage these manually, which is what we did in the past. Each time you included a header you would have to find and resolve references to other headers and then find the object files corresponding to these all of the libraries and link them into the final program. When the total amount of code was small this was entirely possible but, as already mentioned, this is no longer the case. The solution to the problem is a build system which can do the job for you automatically. You may already know build tools such as make that run scripts that invoke the compiler and linker on all of the necessary files. A build system goes beyond this in that it will also deduce dependencies, perhaps even get the files needed, and incorporate them into the build. An example of such as system is cmake which generates make files for you. For the mbed project a new build system called yotta was invented and it is currently under development. Offline development without using yotta is possible, but it would require you to manually organize all of the files needed to build the project and create the commands for the compiler and linker to perform the build; yotta can do this for you. In fact yotta generates cmake files which are then used to build the system using make or ninja which is the default build engine. There are some problems with this approach. The first is that yotta is a complicated system and if things go wrong you can be left wondering what to do. Complex systems like yotta are great when they work, but quickly become a nightmare and a time waste when the don't. The second problem is that this is something new to learn. There are enough problems in embedded programming without adding another layer of complexity and, of course, the need to learn something new feeds back into the difficulties of working out what is going wrong. However in practice yotta turns out to be easy to use and mostly reliable. How yotta worksYou don't need to know how yotta works under the covers to use it, but a little knowledge is helpful. Yotta works with modules which roughly speaking is a group of code and header files that does something. A yotta module includes a json format file which provides metadata such as its name, licence, author and any modules that it makes use of i.e. its dependencies. You don't have to create the json file manually yotta has commands that do it for you. Yotta also supports the same system for an executable and when you tell yotta to build the executable it reads the json file, gets the modules which are needed and then creates cmake files to build those modules for a specified platform - the target. Finally cmake generates files that are actually used to build the entier project using ninja or one of other make systems that it supports. This is complicated because you have yotta feeding cmake which feeds ninja which does the final job of compiling and linking the code. If you are feeling confused it will make a lot more sense after you have seen yotta in action. Notice that as well as automating the build of your program you can also use yotta to create and publish modules that can then be used by other people. Installing yottaIf you are installing on Windows don't worry too much about the web pages that give you long and detailed instructions on how to manually install yotta - unless the automatic installer doesn't work for some reason. For most users installing yotta on Windows is trivial. Download the yotta installer. Run the installer and follow the instructions. The installer will offer to install: python - which is what yotta is written in gcc - the gcc ARM cross compiler which you need to compile programs for the micro:bit cMake - which yotta needs to generate make/ninja files ninja - which actually runs the compiler to generate the program yotta - which of course is what you actually want to use
A typical selection of options can be seen below:
If you want to use either of the git-scm or mercurial version control programs then install these as well. The mbed serial driver will let you establish a serial connection to the micro:bit for debugging and other uses. If you don't already have it installed it is worth adding to the list. The installer just gets on with the job and when it finishes you should be able to use yotta. For OSX you can simply download and drag the yotta app OS X yotta.app into the applications folder. When you run it a terminal will open. Under Linux there is no installer, but it is easy to set things up using the package manager. You need to install the latest Python 2 - which is usually installed by default. You also need the latest python-setuptools, cmake, ninja and pip. You can then use pip to install yotta. You calso need to install the ARM cross-compiler gcc-arm-none-eabi. On Ubuntu you need gcc-arm-embedded instead. You can find detailed instructions on all installations on the mbed website http://yottadocs.mbed.com/. Before we move on there is one more dependency that is only needed for the micro:bit. The compiled binary is converted to a hex format file suitable for flashing the micro:bit's memory. This needs a utility called srecord. This you can get from Sourceforge as a source file that you can build yourself. Alternatively, and more simply, you can download a binary for Windows from: https://sourceforge.net/projects/srecord/files/srecord-win32/ Simply unzip srec_cat.exe into the yotta directory. If you don't do this then yotta will complain that it can't find srec_cat.exe in the final stage of the build and you will not have a .hex file in the output directory. Notice that while the micro:bit needs srecord other mbed project targets don't. Creating a micro:bit projectYou don't need to know all of the yotta commands to create and work with a micro:bit project. Open a command prompt and move to the yotta installation directory - usually c:/yotta on Windows - and run the batch file run_yotta. This sets the paths correctly to find all of the programs involved in using yotta. Alternatively you can run yotta via the icon that should have been installed on your desktop. To create a new project you first create a new project directory and while in the directory use the command:
For example, under Windows:
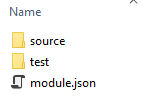
At this point you will be asked a set of questions: Name of module - defaults to name of directory Initial version - defaults to 0.0.0 Is this an executable? - Yes in this case, defaults to No short description - whatever you want to put author - whatever you want to put licence - your preferred licence you want, defaults to Apache 2.0 Yotta will create a set of folders complete with a json file describing the project:
At this point the source and test folders are empty. These are where you are supposed to put your code files for the project and any tests you want to implement. |
|||
| Last Updated ( Sunday, 10 July 2016 ) |