|
Page 1 of 3 One way around the problem of getting a fast response from a microcontroller is to move the problem away from the processor. In the case of the Edison there are three facilities which can be used to generate signals or communicate with other devices without having to worry about how fast the processor can do the job. In this chapter we take a close look at pulse width modulation including, driving LEDs and servos.
This is a chapter from our ebook on the Intel Edison. The full contents can be seen below. Notice this is a first draft and a work in progress. Use the comments or email harry.fairhead@i-programmer.info with your queries or suggestions.
Now On Sale!
You can now buy a print edition of Exploring Intel Edison.
You can buy it from:
USA and World Amazon.com
Canada Amazon.ca
UK Amazon.co.uk
France Amazon.fr
Germany Amazon.de
Spain Amazon.es
Brazil Amazon.br
Italy Amazon.it
Japan Amazon.co.jp
Mexico Amazon.com.mx
Chapter List
-
Meet Edison
In this chapter we consider the Edison's pros and cons and get an overview of its structure and the ways in which you can make use of it. If you have ever wondered if you need an Edison or an Arduino or even a Raspberry Pi then this is the place to start.
- First Contact
When you are prototyping with the Edison you are going to need to use one of the two main breakout boards - the Arduino or the mini. This chapter explains how to set up the Edison for both configurations.
- In C
You can program the Edison in Python, JavaScript or C/C+ but there are big advantages in choosing C. It is fast, almost as easy as the other languages and gives you direct access to everything. It is worth the effort and in this chapter we show you how to set up the IDE and get coding.
- Mraa GPIO
Using the mraa library is the direct way to work with the GPIO lines and you have to master it. Output is easy but you do need to be aware of how long everything takes. Input is also easy but using it can be more difficult. You can use polling or the Edison interrupt system which might not work exactly as you would expect.
- Fast Memory Mapped I/O
There is a faster way to work with GPIO lines - memory mapped I/O. Using this it is possible to generate pulses as short at 0.25 microsecond and read pulse widths of 5 microseconds. However getting things right can be tricky. We look at how to generate fast accurate pulses of a given width and how to measure pulse widths.
- Near Realtime Linux
You need to be aware how running your programs under a non-realtime operating system like Yocto Linux effects timings and how accurately you can create pulse trains and react to the outside world. In this chapter we look the realtime facilities in every version of Linux.
- Sophisticated GPIO - Pulse Width Modulation
Using the PWM mode of the GPIO lines is often the best way of solving control problems. PWM means you can dim an LED or position a servo and all using mraa.
- Sophisticated GPIO - I2C
I2C is a simple communications bus that allows you to connect any of a very large range of sensors.
- I2C - Measuring Temperature
After looking at the theory of using I2C here is a complete case study using the SparkFun HTU21D hardware and software.
- Life At 1.8V
How to convert a 1.8V input or output to work with 5V or 3.3V including how to deal with bidirectional pull-up buses.
- Using the DHT11/22 Temperature Humidity Sensor at 1.8V
In this chapter we make use of all of the ideas introduced in earlier chapters to create a raw interface with the low cost DHT11/22 temperature and humidity sensor. It is an exercise in interfacing two logic families and implementing a protocol directly in C.
-
The DS18B20 1-Wire Temperature
The Edison doesn't have built in support for the Maxim 1-Wire bus and this means you can't use the very popular DS18B20 temperature sensor. However with a little careful planning you can and you can do it from user rather than kernel space.
- Using the SPI Bus
The SPI bus can be something of a problem because it doesn't have a well defined standard that every device conforms to. Even so, if you only want to work with one specific device it is usually easy to find a configuration that works - as long as you understand what the possibilities are.
- SPI in Practice The MCP3008 AtoD
The SPI bus can be difficult to make work at first, but once you know what to look for about how the slave claims to work it gets easier. To demonstrate how its done let's add eight channels of 12-bit AtoD using the MCP3008.
- Beyond mraa - Controlling the features mraa doesn't.
There is a Linux-based approach to working with GPIO lines and serial buses that is worth knowing about because it provides an alternative to using the mraa library. Sometimes you need this because you are working in a language for which mraa isn't available. It also lets you access features that mraa doesn't make available.
The GPIO lines at their most basic output function can be set high or low by the processor. How fast they can be set high or low depends on the speed of the processor.
As we discovered in Chapter 5, the Edison can generate pulses in the region of 0.25 microseconds with memory mapped I/O. This means you can generate a pulse train with a frequency of up to 2MHz.
Using the GPIO line in its Pulse Width Modulation (PWM) mode you can generate pulse trains up to 9.6MHz, i.e. pulses as short as just a little more than 0.1 microseconds.
The reason for the increase in speed is that the GPIO controls a pulse generator and once set to generate pulses of a specific type the pulse generator just gets on with it without needing any intervention from the GPIO line or the processor. In fact the pulse output can continue after your program has ended if you forget to reset it.
Of course, even though the PWM line can generate pulses as short as 0.1 microseconds, it can only change the pulses it produces each time that processor can modify it. For example, you can't use PWM to produce a single 0.1 microsecond pulse because you can't disable the PWM generator in just 0.1 microsecond.
Some Basic Edison PWM Facts
There are some facts worth getting clear right from the start, although some of the meanings will only become clear as we progress.
- It is worth saying - even though it should be fairly obvious - there are no PWM inputs, just 4 outputs. If for some reason you need to decode or respond to a PWM input then you need to program it using the GPIO input lines.
- Unlike the Galileo, which was in many senses the forerunner of the Edison, each of the PWM lines can be set to any period and duty cycle you require - in the case of the Galileo they were all set to the same frequency.
- Although the raw interface with the PWM lines works in nanoseconds, the smallest period you can set is 1 microsecond - you can set a duty cycle smaller than 1 microsecond however.
- There is no fast memory mapped I/O for the PWM lines as there is for the general GPIO lines. All use of the PWM lines goes through the SYSFS file system and hence is slow - about 10 microseconds for any operation.
- The default period is 50 microseconds. So if you are trying for a specific period but see a 50 microsecond repeat rate then your program is probably not setting the period.
- The fastest pulse repetition rate is 1 microsecond and the slowest is 0.218453 seconds. That is you can't use a PWM line to flash an LED once every second.
- The PWM lines are not automatically reset when you start a program and this can be a problem i.e. you inherit whatever the PWM lines were doing when your program starts, more of this later.
- If your PWM using program seems not to work - reboot the Edison and try again before you assume there is something seriously wrong.
- As for all of the GPIO lines on the mini breakout board the PWM lines work at 1.8V and you need some extra hardware to make them drive anything useful.
- One the Arduino breakout board the PWM lines can be mapped to any of the standard Arduino PWM lines - this isn't necessary or possible on the mini-breakout board.
Mraa PWM commands
There are four PWM GPIO lines:
| MRAA Number | Physical Pin | Edison Pin
(SYSFS) | Pinmode0 | Pinmode1 |
|---|
| 0 |
J17-1 |
GP182 |
GPIO-182 |
PWM2 |
| 14 |
J18-1 |
GP13 |
GPIO-13 |
PWM1 |
| 20 |
J18-7 |
GP12 |
GPIO-12 |
PWM0 |
| 21 |
J18-8 |
GP183 |
GPIO-183 |
PWM3 |
You can either use these lines as standard GPIO lines or as PWM lines and you can switch between modes of operation as you please.
To use one of these lines in PWM mode you have to initialize it using one of the init functions;
mraa_pwm_init (int pin)
mraa_pwm_init_raw (int chipid, int pin)
As usual the first init function uses the mraa pin number and the second uses the GPIO number (SYSFS).
So far so easy - but now the confusion starts.
There are lots of ways of setting the output pulse characteristics of the pin. Some might say too many, but as you get used to them you will realize that each one has its particular advantage.
There are two basic things to specify about the pulse train that is generated - its repetition rate and the width of each pulse.
The basic way to specify the repetition rate is to use one of the period functions:
mraa_pwm_period (mraa_pwm_context dev, float seconds)
mraa_pwm_period_ms (mraa_pwm_context dev, int ms)
mraa_pwm_period_us (mraa_pwm_context dev, int us)
It is important to realise that you can't set any time you care to. On the current vesion of the Edison the PWM lines are constrained to 1 microsecond up to 218453 microseconds, i.e. 0.218453 seconds. If you set a time in any unit outside of this range then the PWM line is not updated. This can cause you to believe that your program has a bug and the PWM line is not responding.
So for example
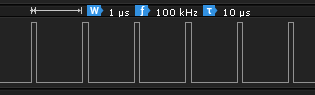
mraa_pwm_period_us (pindev, 100);
sets the period to 100 microseconds. That is a pulse will be generated every 100 microseconds, but how wide is the pulse? T
This is set by one of the pulsewidth functions:
mraa_pwm_pulsewidth (mraa_pwm_context dev, float seconds)
mraa_pwm_pulsewidth_ms (mraa_pwm_context dev, int ms)
mraa_pwm_pulsewidth_us (mraa_pwm_context dev, int us)
So, for example, after the previous period function call:
mraa_pwm_pulsewidth_us (pin, 10);
sets the pulse width to 10 microseconds. The resulting pulse train can be seen on the logic analyser trace:
As an alternative to setting the pulse width we can specify percentage of the period that the pulse is high. This is called the duty cycle. For example, a duty cycle of 50% means the pulse is high for half the period and we have a perfect square wave. A duty cycle of 0% is always low and 100% is always high.
To set the duty cycle you can use:
mraa_pwm_write (mraa_pwm_context dev, float percentage)
where percentage is between 0 and 1 as a fractional percentage i.e. percent/100.
You can also discover the current duty cycle using:
mraa_pwm_read (mraa_pwm_context dev)
Often you find that using PWM you set the period once and then modify the duty cycle repeatedly - hence the two sets of functions to set each value.
There are times when setting both period and pulse width/duty cycle is useful and for this we have:
mraa_pwm_config_ms (mraa_pwm_context dev, int period, float width)
which sets the period in whole milliseconds and the pulse width in milliseconds and
mraa_pwm_config_percent (mraa_pwm_context dev, int period, float duty)
which sets the period in whole milliseconds and duty cycle as a fraction between 0 and 1.
You need also need to know about:
mraa_pwm_enable (mraa_pwm_context dev, int enable)
which can be used turn the pulse train on and off. If enable is greater than zero then the pin is driven otherwise it is disabled.
If you have finished with the pin as a PWM output you can close it using:
mraa_pwm_close (mraa_pwm_context dev)
and then reuse it as a GPIO pin.
You can also discover the max and min workable periods with:
int mraa_pwm_get_max_period()
int mraa_pwm_get_min_period()
|
