| Raspberry Pi WiFi With The ESP8266 |
| Written by Harry Fairhead | |||||||
| Monday, 12 September 2016 | |||||||
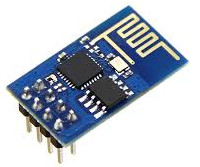
Page 1 of 6 The ESP8266 provides a low cost and relatively easy way to get a Pi onto WiFi without using a USB port. This is a particularly attractive proposition for the Pi Zero, which only has a single micro USB connector. As we will make a lot of use of the Pi's serial port, it is assumed that you know roughly how it works. In particular, it is assumed that you are familiar with the material in Serial C And The Raspberry Pi. Before we get on to the details of using the ESP8266 we need to find out what makes it special. The Amazing ESP8266The ESP8266 is a very odd and amazing device. It is remarkably low cost, $5 or less, but it is a full microprocessor with GPIO lines, RAM and built in WiFi. It is built by a Chinese company Espressif Systems, but there are a number of copies on the market. The proliferation of devices and software revisions makes it difficult to work with, but it is well worth the effort. While you can set up a development system yourself and program the ESP8266 to do almost anything, it comes with built-in software that allows it to be used as a WiFi module for other processors. This is how we are going to use it to give the Pi, and especially the Pi Zero which lacks a full size USB connector for a WiFi dongle, WiFi capability. The ESP8266 connects to the outside world using the serial port. The Pi controls it and transfers data using a system of AT commands. These were commonly used to control modems and other communication equipment and they still are used in mobile phone modems. In essence the ESP8266 looks like a modem that connects to WiFI. The module that is used in this chapter is the ESP-01 which is widely available from many different sources but they all look like the photo:
There is another version, the ESP-07, which comes with a screen RF stage and other advantages and this should also work. A bigger problem is that there are new versions of the firmware and some of these might not work in exactly the same way. However, it should be easy to make the changes necessary. Connecting the ESP8266 ESP-01There a number of minor problems in using the ESP8266. The first is that it comes with an eight-pin male connector which is not prototype board friendly. The best solution to this is to use some jumper cables - female to male - to connect it to the prototype board or use female-to-female cables to connect directly to the Pi. You can power the ESP8266 directly from the Pi's 3.3V supply, but only if you are using a Pi 2, Zero and later. Early Pis just didn't have the power. When transmitting, the ESP8266 takes a lot of current, 300mA or so, and this means there isn't a lot left over to power other things. You can use a separate 3.3V power supply if you need more power. Of course, you can use this to power both the ESP8266 and the Pi and in some situations this would be an advantage. You can use one of the many low cost prototyping board power supplies with no problems:
The pinout of the ESP-01 is usually shown from the component side, but in fact the pins that you want to connect to are on the other side. To make things easier the two views are given in the diagram:
The pin functions are: 1 Ground - connect to ground From the pinouts you should be able to work out the way the ESP8266 has to be connected. If we use P0 as Tx from the Pi and P1 as Rx to the Pi we have to connect ESP-01 pin 7 to P0, pin 2 to P1 and ESP-01 pins 8 and 4 to the external power supply. To make it all work we also have to connect ESP-01 pin 1 to the ground of the external power supply ground and to the ground of the Pi, as shown:
Of course this arrangement is particularly useful for the Pi Zero as you can now have a low cost WiFi connection without having to use up the one and only USB socket.
|
|||||||
| Last Updated ( Monday, 12 September 2016 ) |