| Android Adventures - Building The UI |
| Written by Mike James | ||||||
| Tuesday, 17 February 2015 | ||||||
Page 4 of 5
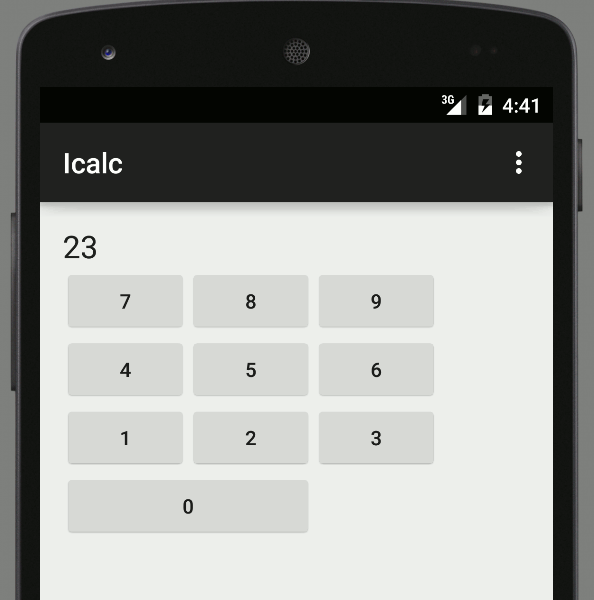
A First AppAs an example of building a simple app using layout and the Designer let's build a calculator. Some of the techniques used in this app are a little beyond what we have covered so far but you should be able to follow and it is time to show what something more than a single button app looks like. This is a very simple calculator - it has just nine numeric buttons and a display. It takes the values on each of the buttons and adds them to a running total. There are no operator buttons, add, subtract or clear - but you could add them. Start a new Basic Activity project called Icalc or whatever you want to call it. Accept all of the defaults. The principle of operation is that we are going to set up a grid of ten buttons. Set each button to 0 through 9 as a text label. We are then going to assign the same onClick handler to each of the buttons. All it is going to do is retrieve the text caption showing on the button, convert it to an integer, add it to the running sum and then store it back in the TextView after converting it back to a String. Put simply when a button is clicked the event handler is called which retrieves the button's label as a digit and adds it to the running total on display. The CodeSo the code is fairly easy. We need a private field to keep the running total in:
Next we need an onButtonClick function which is going to be used to handle the onClick event for all of the buttons. See chapter 2 if you don't know about simple event handling. The button that the user clicked is passed as a View object as the only argument to the function and we can use this to get its text caption:
Now that we have the button's caption e.g. 0, 1, 2 and so on we can convert it to an integer and add it to the running total:
Finally we get the TextView using its id (see Chapter 2) and set its text to the total converted to a String:
The complete event handler is:
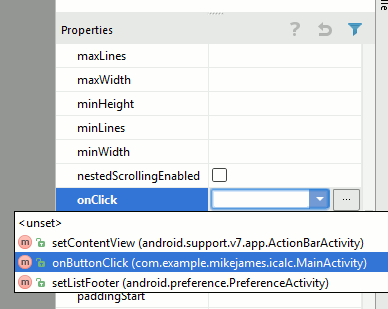
Put this code within the MainActivity class as one of its methods. When you enter this code you will see many of the classes and methods in red. This is because they need to be imported to be used by the project. You can do this manually, adding the necessary import statements at the start of the file. It is much easier to place the cursor into each one of the symbols in red and press alt+enter and select Import Class if necessary. This should be becoming second nature by now. The LayoutNow we turn our attention to the layout. Open the layout file, delete the default text and place a single button on the design surface. Double click on it, this is a shortcut to the Text and id properties, and enter 7 as its Text property. Place the button at the top right of the screen with a little space. Next go to the Properties window and find the onClick property. Set this to onButtonClick, the event handler you have just written:
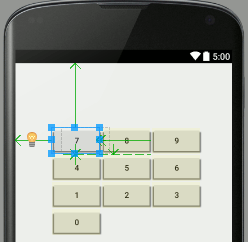
To create the grid of ten buttons select the first button and copy it to the clipboard. Next paste the copied button to the design surface and each time position it within the grid relative to the buttons that are already present. Now you have grid of buttons that all say 1. Double click each one in turn and change the text to 8,9, 4,5,6, 1,2,3 and 0.
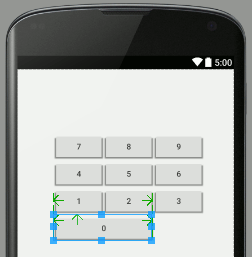
By using the copy and paste trick you now have ten buttons all set to the same onClick event handler and all you had to do was edit the Text property. Try to make sure that each Button you add is relative to one of the other Buttons. You can check that you have done this successfully by dragging one of the Buttons and see if they all follow! If one two don't then try repositioning them relative to one of the other Buttons. If you find any positioning difficult zoom in. If you get into a mess delete them all and start over. To make this look more like a keypad select the 0 key and size it so that it occupies a double width:
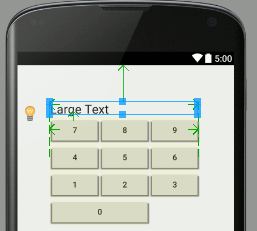
Finally add a Large Text View at the top. You can position it relative to the top row and the 7 key and then size it so that it spans the complete set of buttons.
Now you should be able to move the entire block when you move just the 7 button to a new location. This doesn't always work because one or more of the Buttons are set relative to the container! It is good to know that you can undo an action by using Ctrl-z. If you find the Designer too difficult to work with to create this layout, and it can be difficult, you might prefer to set the layout properties using the property window. Finally run the program in the usual way and you will be please to discover your first app does actually calculate things!
Try rotating the emulator to see what it looks like in landscape mode. Not bad but as promised as the app restarts you lose any calculation you were performing as the app is restarted when the orientation changes. |
||||||
| Last Updated ( Friday, 23 September 2016 ) |
