| Android Adventures - Custom Dialogs Using DialogFragment |
| Written by Mike James | |||||
| Thursday, 19 June 2014 | |||||
Page 1 of 4 Dialogs in Android can be confusing because there are two ways of working with them. The modern way is to use the Fragment mechanism but this seems a lot more difficult than simply using the Dialog class. As long as you understand the basics of creating and using Fragments, it is a lot easier and a lot more powerful to use them to create dialogs.
Android Adventures - Mastering Fragments & Dialogs
ContentsThis book is currently being revised. Chapter 5 and later refer to an earlier version of Android Studio - revisit for updates.
If you are interested in creating custom template also see: Custom Projects In Android Studio
The DialogFragmentA dialog is a UI that is displayed in a window of its own. The dialog stays put until the user dismisses it with an action - in the jargon it is a modal window. Dialogs are used to alert the user to some condition or to simply get the user to make a choice or input some data.
A dialog is a little bit of encapsulated UI that you can show when it is needed. When you think about the way a Fragment works it too is a little bit of encapsulated UI that you can show when it is needed. The only difference between a Fragment and a dialog is that the Fragment displays its UI in the View hierarchy of the Activity, i.e. in the Activity's window. All we need to turn a Fragment into a workable dialog is the ability to get it to display its UI in a separate window. This is precisely what a DialogFragment allows you to do. A DialogFragment inherits directly from Fragment and has all of its methods and properties. This means that everything you know about Fragments applies to a DialogFragment. They work in exactly the same way. Where a DialogFrament is different is that it has a show method which creates a new window and then calls the onCreateView event handler so that the DialogFragment can return its UI for display in the new window. Exactly how it creates a new window is important but for the moment we can ignore the matter. This sounds too easy to be true - so let's see it in action. A Simple DialogAs a DialogFragment is also a Fragment we could create an example by taking any Fragment we created in earlier chapters and changing
to
However, this would produce some overly complicated examples and so for the sake of creating a really simple example let's return to the first Fragment we created back in Chapter 9. Start a new blank Activity project and accept all of the defaults and set the minimum SDK to Honeycomb Android 3 to avoid having to deal with the support library. The DialogFragment class is in the support library and the changes you have to make to use the support library are exactly the same as for the Fragment. To keep things simple we will use the Fragment built into the OS from Honeycomb on. It is very likely that in the near future Android Studio will have a DialogFragment template, but at the moment there isn't one. You could use the full Fragment template and change the extends to DialogFragment but, as already mentioned, this would produce a more complex example. However, in practice this is exactly what you should do. To create a DialogFragment all you have to do is to add a new Java class. Simply right click on the MainActivity class in the java directory and select New,Java Class. Give it the name myDialogFrag or something similar. A new class file will be created and you have to edit it to read:
This is exactly the same as the Fragment described in detail in Chapter 9. If you need to know more about it then re-read the start of that chapter. However, you can see that all this Fragment does is to return a LinearLayout containing a single Button. This is the Fragment's UI and it is generated in code for simplicity. You could just as well create it using an XML layout and use the LayoutInflater to create the View hierarchy - which is what will be done in the next example. Now we move to the Activity and write some code to display the DialogFragment. Using the DialogFrament follow the same basic steps an for any Fragment, but with a couple of small differences. For simplicity we can create the dialog in the Activity's onCreate event handler. First we need to create the Activiy's UI and then create an instance of the DialogFragment class:
At this point we could use the FragmentManager to add myDiag to the Activity's UI in the usual way. However, we want to display myDiag's UI in a different window and to do this we simply call the DialogFragment's show method:
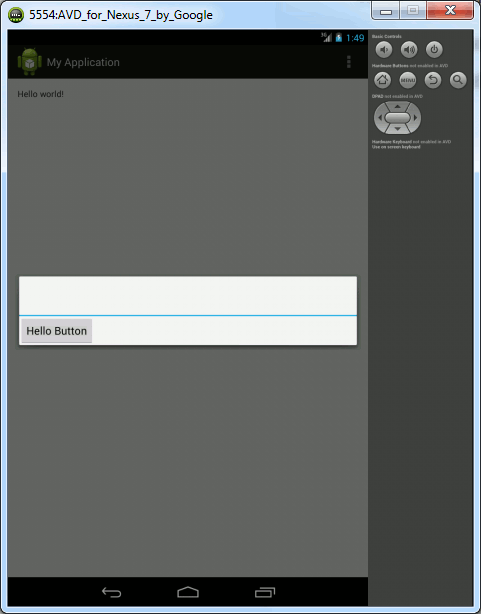
This is all we have to do. The show method uses the FragmentManager to add the DialogFragment to the Activity using the String specified as the tag. Notice that this is a short cut and you can go through the steps of starting a transaction, use an alternative version of show to add and display the DialogFragment and then use comit in the usually way. The FragmentManager looks after the DialogFragment as it would any Fragment but the DialogFragment is automatically removed when the user dismisses it. It is also worth noting that the show method doesn' t add the DialogFragment to the backstack. Also notice that the dialog isn't shown until the event handler terminates. That is the dialog is only shown once the function that creates it by calling show terminates and releases the UI thread. The UI thread then turns its attention to the dialog. If you have used dialog boxes in other languages and systems it is worth noting that the Android dialog is not blocking in this sense. If you run the program you will see the dialog appear in the middle of the screen. You can dismiss it by clicking on the application UI that you can see greyed out behind it.
This isn't very useful but it shows how the simplest possible dialog actually works. To make is slightly more realistic we can add a Button to the app's UI to show the dialog only when the user selects it. This is more normal in that dialogs generally appear only when they are needed:
The event handler can be as simple as:
Now if you run the program you can make the dialog popup when you click the button. Notice that the dialog persists if you rotate the screen orientation using F11. This is one of the many advantages of using a DialogFragment. Also notice that, as the DialogFragment's UI is created within the OnCreateView it can also be used to add to the Activity's UI using the FragmentManager in the usual way. This means that the DialogFragment can be used to implement a dialog or just a portion of the UI depending on the size or orientation of the device. |
|||||
| Last Updated ( Saturday, 25 July 2015 ) |


