| Graphics Accelerators |
| Written by Administrator | |||
| Monday, 01 March 2010 | |||
Page 1 of 2 The GPU - Graphics Processing Unit - now rivals and even exceeds the CPU in processing power but how does it work and what's special about graphics that it needs a custom processor?
The latest computer games have come along way since we were mesmerised in attempts to bat a tiny white dot across the screen. While there are lots of users and players who yearn for the days of simplicity and classic games there is no way of putting the genie back in the bottle – computer games are developing close to the goal of "realtime cinematic rendering". If you watch TV or go to the movies you will be familiar with the pixel-perfect computer generated graphics in productions such as Lord of the Rings, Star Wars, Avatar and similar. What you might not realise is that each frame of the movie could take anything up to a few hours to render from computer data to photographic quality image. Today's computer games aim to produce the same visual effects and quality but at a rate of 60 frames per second in realtime from data to image. So how do they hope to achieve this and how do today's super game work? The architectureThe first surprise is that there really hasn't been anything major added to the theory of realtime graphics since about 1987 when the idea of using a sophisticated "pipeline" based on the use of "shaders" was introduced. The recent focus has been in creating fast and efficient implementations of the basic idea. At first all of the work needed to produce a graphics image was done by the main machine's processor, the CPU, but this is no way to create realtime cinematic quality because the CPU isn't optimised for graphics, and anyway, it has enough to do already. The key to advanced graphics is to move as much of the rendering from the CPU to a special Graphics Processing Unit, or GPU, built into the graphics card. The early "graphics accelerators", i.e. graphics cards with GPUs, were introduced from around 1995 and these were mostly "fixed-function" devices. That is, they had specific graphics algorithms hard coded into them. A graphics programmer could choose to make use of these or ignore them, but they couldn't add to the range of special effects. So in the main games that used this sort of hardware tended to achieve about the same level of realism and speed. Today things are very different because of the availability of programmable GPUs based on a processing pipeline that implements vertex and pixel shaders. So what exactly is a shader? To answer this question we have to look at exactly how 3D graphics get onto the screen. To do this we need to understand the fixed architecture of the previous generation of GPUs. The classic pipeline
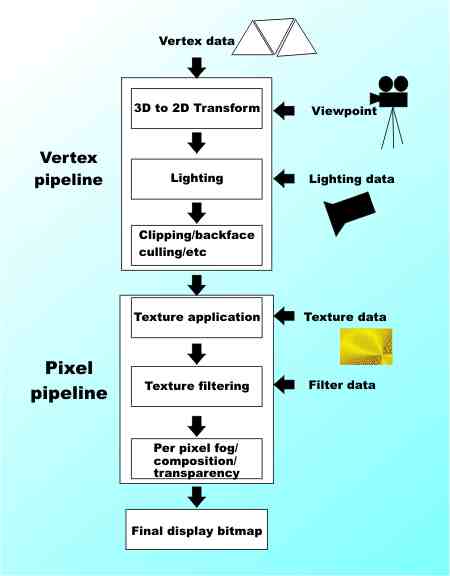
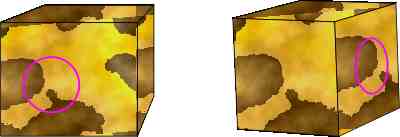
All 3D images start off from a model of the 3D solids being displayed. The models take the form of "meshes" that define a surface in 3D. Each mesh is usually made up of a collection of tiny flat triangular faces and in many ways if you know how a 3D graphic system renders a triangle then you know how it creates the entire scene. A triangle is composed of just three points, or vertices, in 3D space and the first task the 3D graphics system has to perform is to transform the 3D co-ordinates into the 2D screen co-ordinates that correspond to the pixels that represent the surface. Of course the 3D to 2D transformation depends on where in 3D space the triangle is relative to the observer or camera that represents 2D viewing surface. However this transformation process is the same for all triangles no matter where they are in the scene and so it is fairly easily moved to hardware. The simplest 3D graphics accelerators store a list or vertices in a "vertex" buffer and these are fed into a processing "pipeline" which applies a standard transformation to all of them to produce the 2D display. Of course you also need to specify the colour and brightness of the triangular surface and this involves similar computations to the 3D to 2D transformation, only now involving where the light sources are and the material properties of the surface. Again the same sort of calculation is applied to each surface defined by the vertices and this too can be built into the hardware. This is the T&L, or Transformation and Lighting, part of the graphics pipeline. After this we have another collection of standard operations that usually don't need to be modified, such as removing surfaces that are hidden and clipping the scene so that objects that are outside of the viewing window aren't drawn. These plus the T&L form the "vertex" processing section of the graphics pipeline. Using just the vertex pipeline it is possible to create high quality 3D objects but the surfaces will all look smooth. Real objects have textured surfaces and this needs additional processing. A texture is defined as a 2D pattern of pixels called "textels" in this case. Think of it as a sample of the texture from the real object but flattened out. In principle all you have to do to add a texture to a model is to apply it as if you were covering the object with patterned wallpaper. In 3D graphics this can be achieved by mapping the textels into the 2D rendered image that results from the vertex pipeline using "texture co-ordinates". The texture co-ordinates define the way that the texture is resized and distorted by the shape of the 3D object. This is the start of the "pixel" pipeline that essentially processes the 2D output of the vertex pipeline to create a more realistic image. A textured model looks more realistic but it isn't the end of the story. The quality of the overall image can be improved by "anti-aliasing" which makes sharp edges smoother. Paradoxically this makes them look sharper to the viewer. A similar process can be applied to textures which generally look very "raw" and unrealistic after they have been mapped on the model. Bilinear and Trilinear filtering works well on surfaces that appear to be at right angles to the viewer. In each case the filter takes a weighted average of the surrounding pixels to smooth the texture. The most sophisticated texture filter in current use is the "anisotropic" filter. This takes account of the fact that a group of pixels that represent points that are close in the 3D model tend to lie on an ellipse rather than a circle. This means that to smooth the texture correctly the weighted average should be taken of pixels in the ellipse – see the figure. This may seem like a small change but the anisotropicly filtered textures are sharper and give a much better impression of the 3D orientation of a surface.
Pixel processing includes extras such as the addition of fog effects and the composition of multiple bitmap images to provide background and transparency where required. The pixel processes are simple enough to be built into the hardware of the graphics card to create a fixed function pixel pipeline. |
|||
| Last Updated ( Monday, 01 March 2010 ) |