
| A Drive List Control |
| Written by Ian Elliot | ||||
| Friday, 09 October 2009 | ||||
Page 2 of 3
OwnerDraw comboBoxIf we want to add icons to the drive listing we are going to have to modify the way the comboBox is drawn. The designers of the .NET Framework have done their best to make such modifications easy. If the DrawMode property is set to either OwnerDrawFixed or OwnerDrawVariable then, rather than draw the items in the dropdown list, the comboBox raises the DrawItem event. The DrawItem event handler is passed all of the information and objects it needs to actually draw the item. There is a small complication in that if you set DrawMode to OwnerDrawVariable the comboBox raises the MeasureItem event just before the DrawItem event. This allows you to tell the comboBox how much space you need to draw the next item. In this case the icons are the same size so we can use OwnerDrawFixed and ignore the need to handle the MeasureItem event – the comboBox will work out how much space there is to draw an item. There is one final small detail before we implement the DrawItem event handler. The default mode of operation of a comboBox is to allow the user to edit or enter the selected item. Clearly if the user can edit an item it cannot be shown graphically – it has to be text. What this means is that the DrawItem event is raised for each of the items in the dropdown list, which the user cannot edit, but the item displayed as selected is still drawn by the comboBox as text. The solution to the problem is to force the comboBox to stop the user editing or entering items by setting its DropDownStyle equal to DropDownList. Now we are ready to implement the drawing. In the Form's constructor add the following lines to customise the comboBox: comboBox1.DropDownStyle = If you now run the program the result will be a blank comboBox because it doesn’t draw itself and neither do you. The easiest way to add the DrawItem event handler is to click on the comboBox in the Form Designer. Click on the event icon in the Properties window and double click on the DrawItem event. This generates the template for an event handler in the code: private void comboBox1_DrawItem( The DrawItemEventArgs object passed into the routine contains a great deal of information concerning the drawing of the item. In particular if there is no item selected and the display area should be left blank it has an Index of –1 and we should do nothing: if (e.Index == -1) return; If the Index corresponds to an item then we have to acquire the icon appropriate to the drive type of the item we are drawing. The Index can be used to extract the DriveInfo item that we have to draw: DriveInfo drive = (DriveInfo) Notice the use of a cast to DriveInfo. This is necessary because the Items collection is a collection of Objects and we need to tell the compiler exactly what the object retrieved from the comboBox is. Now we have the DriveInfo object we can use its DriveType to retrieve the appropriate icon using the ShellIcons class: Icon icon; The switch simply sets icon to the appropriate icon using ShellIcons. Whenever I see code like this I think that there should be a better way of doing it but the fact of the matter is that there is no direct connection between DriveType and the specification for the icon, so you need to handle each case in turn. Sometimes you just have to write code! Now we are ready do to do the necessary drawing. The Bounds property, a Rectangle object, gives the co-ordinates of the area that we can draw in. We need to create a Rectangle object that specifies exactly where the icon is to be drawn from the Bounds Rectangle. We need a small square box, icons are always square, at the far left of the Bounds and filling the available height: Rectangle iconbox = new Rectangle( You can add an offset to indent the icon if it you want to. Now we can draw the background and then the icon in the area specified by the iconbox Rectangle using the Graphic object passed to the event handler: e.DrawBackground(); Finally we have to draw the text that would otherwise be displayed automatically by the comboBox – when you take over drawing a control you take over everything. This is quite easy as we can obtain the drive’s name and volume label if one exists from the DriveInfo object: string text = drive.Name; The text can be drawn onto the Graphics object using the DrawString method. The only complication is we have to specify the font, colour and location of the top left-hand corner of the text. All of this information can be derived from the values passed into the event handler: e.Graphics.DrawString(text, At this point we could declare our work done but the Status property tells us when the user has the mouse hovering over a selection and we can respond to this by drawing a “select frame”: if (e.State == DrawItemState.Focus) This now completes our modifications and if you run the example you will see a list of the available drives with icons. You can select a drive and the control behaves in every other respect like a comboBox.
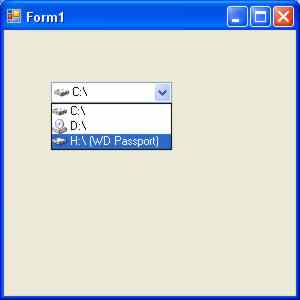
A Drive comboBox complete with icons |
||||
| Last Updated ( Friday, 09 October 2009 ) |