| Silverlight maps |
| Written by David Conrad | ||||
| Monday, 02 August 2010 | ||||
Page 2 of 3

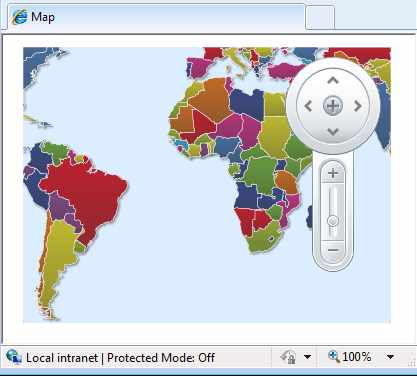
Pan and ZoomYou can already pan and zoom around the map as the view port has this default behavior built in. Simply drag with the mouse to pan and use the wheel to zoom or shift and drag to a zoom area. You can also also use the keyboard - arrow keys pan and pageup/pagedown zooms in and out. Of course you might want to provide the sort of pan and zoom location widget that is so common in other maps. This is also fairly easy. First create a MapNavigationPane, customise it and add it to the Map control: MapNavigationPane navPane = If you now run the application you will see the same map but now with a navigation widget docked at the right:
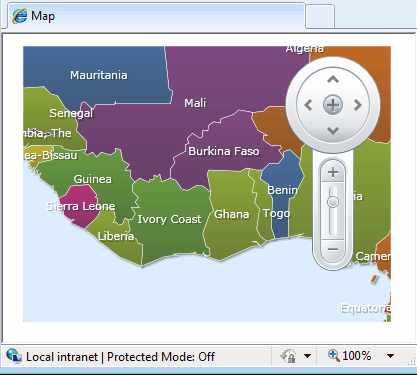
Displaying DataNow we come to the real point of the exercise - displaying data. You can display any of the data contained in the .dbf file that comes as part of the Shapefile package. The only problem is that you need to know what data it contains. As it is dBase format you can generally easily find out by opening the file in say Excel or similar. Ideally you should be able to find details of the data on the website that you obtained the Shapefile from but this is often difficult. In the case of the world data the first field is a country code CODE, the second field a country name CNTRY_NAME, third field population POP_CNTRY. Now to display this data you have to first understand that the Shapefile map is divided up into separate graphic elements - MapElements. You can see these highlighted as you move your mouse over the map - in this case each one corresponds to a country. That is in this case each country on the map corresponds to a different MapElement. The trick is to associate properties on the MapElements with fields in the database. For example, to show the country name as the Caption property of each MapElement you would use: DataMapping.Converter converter = If you now run the program again you will see that each country does now have its name displayed:
Custom dataAll of the data that is in the data file is read in and stored in each of the corresponding MapElements using the same name. Any that you explicitly map to intrinsic properties such as Caption are not mapped to new properties. The point is that every MapElement has all of the data that the database defines stored within it and you can programmatically make use of it. Before we continue it is worth pointing out that you can't access the element collection before the Shapefile has finished loading. What this means is that you generally have to use the layer imported event handler to do the job. In our example we simply use a button which you can click after the map has displayed to process the element collection. For example, to store the population figures int he Caption property programmatically you would write something like: foreach (MapElement ele Notice the way that you can use the MapLayer's Element collection to step though each of the elements and the GetProperty to retrieve any property generated by the database. You can, of course apply formatting to the data before assigning it to the display property. For example: foreach (MapElement ele formats the population number displayed to have comma thousands separators.
|
||||
| Last Updated ( Monday, 02 August 2010 ) |