| Micro:bit Commando Jump with The Microsoft Block Editor |
| Written by Mike James | ||||
| Monday, 04 July 2016 | ||||
Page 2 of 3
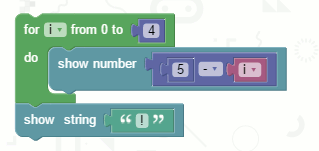
The Count DownThe game starts with a count down and this is just a matter of using the show number block in a for loop:
The count is complicated by the fact that you cannot set the initial value of a for loop. That is, all for loops start from zero and there isn't anything you can do about it. This is not good from an educational point of view and can't be justified on the grounds that this is a repeat n times loop as there is a repeat n time block. As we cannot set the initial, final and increment in the for loop there is no choice but change the index value with arithmetic blocks. In this case the index i is transformed to 5-i giving 5,4,3,2,1 and then we print an exclamation mark to indicate the game has started. Counting Button PressesUnlike MicroPython, the Blocks Editor doesn't provide a button press count function, but it is easy and instructive to create one. The system and the language supports asynchronous events. The on button x pressed block can be placed on the editor away from the rest of the program. It isn't in the main line of execution because it executes its do blocks when the user pressed the button - as its name suggests. So if we want to count the number of times that user has pressed a button all we need is a variable press to increment each time button A is pressed.
Back in the main program we need to zero the count to make sure the user hasn't pressed before the game starts. The WallWhen the game starts we need a wall of LED for the commando to jump. Originally this was done using plot but the LEDs switched off as soon as a sprite was added to the display. The only option was to use sprites, even though the wall doesn't move and makes no use of the sprite's extra abilities.
Again we have to suffer because the for loop can't start from 1 or anything other than zero. We need to create sprites at 2,1 down to 2,4 hence we have to add one to j. Also notice that the same variable is used for each of the sprites created, so we only get to keep track of one of them. In fact we don't really want to keep track of any of them so this doesn't matter. The Game LoopNow we come to the core of the game - the game loop. Most games work by repeating the same set of actions over and over again each time round responding to what the user has done since the last time. In this and most cases this is most appropriately implemented as a while loop. The while loop comes to an end either when time is up or when a variable is set to indicate that the game is over:
Before the loop starts a sprite is created at 4,4 ready to move up as the user presses button A. We store the time since the program started running in t so that we can find out how long the loop has been going. The run variable is used to stop the loop when the game is over because the user has won. The conditional expression in the while loop looks complicated but it consists of two parts. The first is:
i.e. the loop stops after 20 seconds. This is far too long for a good game, but great for testing one. The second part is:
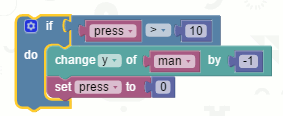
which keeps the loop going until run is set to zero or some other value. The two parts are tied together with an and which means they both have to be true for the loop to continue. Notice that once the loop ends we use the game over block which displays a modest light show and the score. Now we have to deal with what goes into the loop as the do block. Moving the CommandoThe commando is a sprite it will sit there and do nothing if we leave it alone. In this game if the user has pressed button A 10 times we want the commando to move up one. This is fairly easy to arrange:
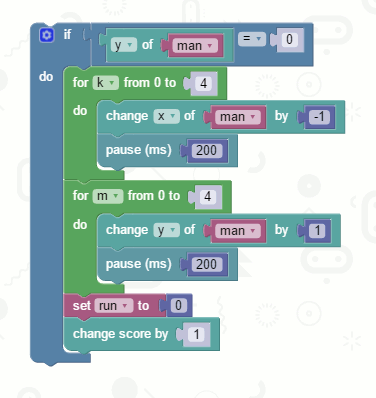
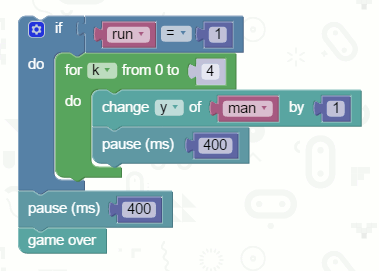
The if block tests to see if press is 10 or more and then changes the position of the commando's y coordinate by -1, keep in mind that y gets smaller as you go up the screen. The variable press is then zeroed so the count for ten presses can start over. Getting Over The WallIf the commando gets to the top of the wall then we need to animate a horizontal move from x=4 to x=1 and then a vertical "drop" from 0,0 to 0,4. This is just more of the sort of thing we have already done even if there is rather more of it: The initial if block checks to see if the commando has reached the top of the wall and if so we have two for loops that animate the sprite in the x and then the y direction. Finally we set run to 0 to indicate that the game loop is over and add one to the score. Of course, doing anything with the score only makes sense if the player has more than one go but the principle is the same. Notice that this set of blocks is still within the while loop. If the game comes to an end because the time runs out then the whie loop exits, but this time with run still equal to 1. We can use this to animate a "fail" routine by just testing for run=1 and animating the commando back down the wall:
This block, of course, follows on after the while loop - see the complete program if you are in any doubt. Notice that the for loop will attempt to move the man off the bottom of the LED display if the commando isn't at the top. This doesn't cause an error because sprites are implemented so that you can't move them off the display. This is an example of a language being implemented in such a way that you can write a program more easily without having to worry about errors. If the sprite didn't behave like this you would have to have an other if block testing y and making sure it didn't move off the screen. |
||||
| Last Updated ( Thursday, 12 September 2024 ) |


