
| Getting started with PhoneGap |
| Written by Harry Fairhead | ||||
| Tuesday, 13 September 2011 | ||||
Page 3 of 3
A tour of a PhoneGap projectNow that you have a PhoneGap project running you really need to find out how it all fits together. The first thing you need to know is that the UI is generated by a single HTML page: \assets\www\index.html If you right click on it and select Open With -> Text editor you will see the HTML that generates the page. Also in the same folder are main.js and master.css. These are the JavaScript and CSS components of the demo web app. Basically all you now have to do is place into the \assets\www folder a complete HTML application i.e. all of the files that are needed and it will become an Android native application. To see how this works delete the HTML in index.html and replace it with: <!DOCTYPE HTML> Now when you run the application you will see a screen with the message "Hello PhoneGap World" and this is your "Hello World" app to prove that you are up and running with PhoneGap. A ported Timer appFor a quick proof of concept, I took a Timer app that had a minimal HTML/CSS file and a lot of DOM-based JavaScript and converted a web page app into a fully functioning Android app in about a minute. It didn't look stylish because there were some odd layout differences but these were all fairly trivial to fix. Considering that all I did was to copy the HTML, CSS and JavaScript files to the /res/www directory it was an easy port. There are a few additional things you need to know about the PhoneGap project. The first is that the Java file, example.java, which is the entry point for the Android application simply sets up the browser and loads the HTML:
If you compare this to the standard Android sample program you will see that we have an additional library com.phonegap and the app inherits from DroidGap. Change the name of the HTML file loaded in the loadURL method call if you need to. The only other big difference between this project and a standard Android project is in the XML Manifest file where the application has to request lots of permissions to access various resources. Changing the project's nameFinally, to change the name of the demo app to something more appropriate to your own custom project you can use the Eclipse Refactor command and some manual editing. For example, let's change the project to TimerDroid: To bring the project into the workspace select the project's name, then right-click on it and use the command Refactor->Move and select Use default location. This moves all of the files and folders from wherever you created them into the Workspace. To rename the generated code open the AndroidManifest XML file and change the name of the package to: package="com.phonegap.timerdroid and the activity to: activity android:name=".timerdroid" When you save the manifest you will be asked if you want to update the launch configuration, you do, so click Yes. Next you have to select the project name, right click and select: Refactor->Rename and enter TimerDroid. The final step is to rename the exampleapp.java file in the src directory and move it into the correct package. Select exampleapp.java, right click and select Refactor->Rename enter timerdroid. Then open the exampleapp.java file in an editor and change the first line: package com.phonegap.exampleapp; to package com.phonegap.timerdroid; Save everything and try running the app again.
From here you can start to work on the files in the assets/www directory and you can make use of the PhoneGap framework calls to access the phone's hardware and services. In nearly all cases it's just a matter of HTML, JavaScript and CSS from here on in and porting to another phone follows the same sort of steps. 
|
||||
| Last Updated ( Tuesday, 13 September 2011 ) |
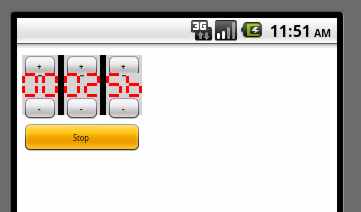 The first port of TimerDroid - only formatting required!