| Introduction to Android 2 application development |
| Written by Sing Li | |||||||
| Wednesday, 25 August 2010 | |||||||
Page 5 of 6
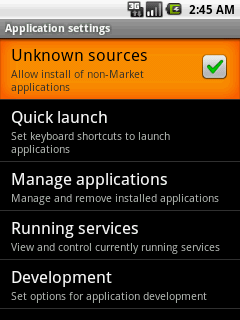
Connecting Java Code to the Components in the XML UI DescriptorIn the i-Programmer App, when the button is clicked, a big "Thank you!" is printed in the TextView. The code responsible for handling the button click is in the IProgrammerFirstAndroidActivity class. In fact, it is an anonymous OnClickListener installed by calling the Button's setOnClickListener() method. Review this code in Listing 1. To find the button component (also a View) in the Java code, you can use the id of the component specified in the main.xml file. The button component can be located via its id by calling the findViewbyId() method. The R class is actually Java code that is generated from the res/layout/main.xml UI description. The generated class provide easy access to UI resources via its configured XML ids. For example, findViewById(R.id.button) locates the element with ID "button" in the res/layout/main.xml file. If you take a look at the generated R class, you can see how R.id.button is actually a resource id 0x7f050001, see Listing 4. Listing 4package info.iProgrammer.android; Running the Android App on Your PhoneNow that you know how the application is constructed and have it running perfectly on the emulator, you are ready for deployment to the actual phone. Android is quite possibly the easiest smart phone platform to deploy applications to - requiring very few steps before you can see the results. First and foremost, your application must be in a signed package. The good news is that the Eclipse ADT environment, when compiling your code in debug mode, has automatically done the packaging and signing for you. In fact, it even has run zipalign against the binary - an optimization tool that makes the binary package more efficient to load on the actual phone. The signed package is located under the bin directory of your Eclipse project, and has an .apk (Android Package) extension. For the sample project, it will be named iProgrammer Android.apk. Next, you must relax the security setting of the phone to allow installation of applications from an unknown source (not from the Android Market). This is typically done by selecting menu, then Settings, and then Applications. See Figure 8. Figure 8
The next step is to move the APK file from your computer to the storage on the phone. This is typically done via the USB cable supplied with your phone. Use this cable to connect the phone to your computer. On my phone, the default mode is a read-only drive; I need to touch a notification to switch the phone to storage mode.This behavior may be different with your phone. Once your phone appears as a writable drive to the computer, just drag and drop the APK file from the PC to the phone. Disconnect the cable, then use the Android File Manager App to locate the APK file. Click on the APK file and it will install. You can now try the i-Programmer App on your phone. <ASIN:0981678009> <ASIN:0470565527> <ASIN:0596009208> <ASIN:1430232226> <ASIN:0321627091> <ASIN:1934356565> |
|||||||
| Last Updated ( Sunday, 19 September 2010 ) |

