| JavaScript Canvas - WebGL 3D |
| Written by Ian Elliot | ||||||
| Monday, 06 December 2021 | ||||||
Page 4 of 5
The Matrices - Connecting with the ShadersAt some point in working with WebGL you have to define the matrices used in the shader. In general, you have to make connections between all of the variables used in the shaders and objects in the JavaScript program. For a uniform follow the same three steps:
In this case you have to connect the use of: uniform mat4 modelViewMatrix; uniform mat4 perspectiveMatrix; in the vertex shader and two JavaScript matrices that specify the transformations. At this point in most tutorials we have to take a detour to explain how the two matrices are constructed. In full OpenGL there are a lot of handy helper functions that will build and manipulate matrices and construct perspective transformations from “camera-like” specifications. These aren't available in WebGL and while there are alternatives, let’s keep things simple. To make things even more simple we are going to use predefined transformation matrices. How they are constructed isn't difficult, but it takes us away from the main part of the story. The model view matrix might as well just be the identity matrix, i.e. no transformation of the 3D co-ordinates is performed: var mvMatrix = [1, 0, 0, 0,
0, 1, 0, 0,
0, 0, 1, 0,
0, 0, 0, 1 ];
Using this matrix means we are working with the fundamental co-ordinate system. The JavaScript matrix is a one-dimensional array even though it specifies a 2D matrix in the shader. Making the connection between the JavaScript data and the vertex shader uniform follows the same standard steps using methods provided by the WebGL object. First get the reference to the shader object: var shaderMVMatrix = gl.getUniformLocation(program,
"modelViewMatrix");
You have to specify the program and the variable within the program that you want the reference to. The reference is in fact an index into a table of variables. Next you make the connection, there are a set of methods that you can use depending on the data type being transferred to the shader. In this case the method we need is: gl.uniformMatrix4fv(shaderMVMatrix, false,
new Float32Array(mvMatrix));
You can see that this copies the data in mvMatrix to the specified shader variable. From this point on the shader will use the specified matrix. There are many “uniform” functions which transfer data from the JavaScript program to the uniform in the shader and they differ according to the data type involved. In this case you can see that the data being transferred is a Matrix4, with float elements and it is a vector. If you have a uniform that is a single float you would use uniform1f and so on. Perspective TransformationThe procedure is the same for the perspective matrix: var pMatrix = [
3, 0, 0, 0,
0, 3, 0, 0,
0, 0, 1, 2,
0, 0,-1, 0
];
var shaderpMatrix = gl.getUniformLocation(program,
"perspectiveMatrix");
gl.uniformMatrix4fv(shaderpMatrix, false,
new Float32Array(pMatrix));
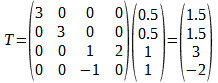
You can see that we define the JavaScript array, get the location of the attribute and then use a method to transfer the data to the attribute. This is all you need to know about making the connection between the JavaScript object and the shader uniform variable. However, it is worth spending a few moments considering what the perspective transform is doing. If you know your 3D theory you can skip this section. The perspective matrix provided is simply one that results in a reasonable view of the simple object we are going to draw - you can worry about how to work out what the perspective matrix has to be in any particular situation later. The key to understanding the perspective transform is to know that there is a little more to homogeneous co‑ordinates than simply implementing a transformation. Before the co‑ordinates are plotted, they are converted to normal co‑ordinates by dividing by the last component. That is, if you specify: [x,y,z,w] then, before being plotted, the system converts this to: [x/w,y/w,z/w] and the pixel is rendered at x/w, y/w. The z value is used to determine what is in front of what. Notice that the division isn’t part of the matrix multiplication. It is how all homogeneous co‑ordinates are treated before being plotted in 2D. Also notice that when w equals 1, which it does for all of the homogeneous vectors you create, then the division has no effect. The perspective transformation, however, creates a vector with w different from 1. Consider:
You can see that the final 1 is now -2 and after division this gives:
which is a point within the fundamental co‑ordinate system. As the z co‑ordinate of the point varies, the perspective transformation alters x and y so that things that are further away get smaller. Notice that this transformation can result in points that are outside of the canvas drawing area if z is small. This corresponds to zooming in really close to an object. There is a lot more to creating perspective transformations, but this is enough to get started. |
||||||
| Last Updated ( Monday, 06 December 2021 ) |