| Getting started with Jetpack |
| Written by Mike James | ||||
| Wednesday, 30 June 2010 | ||||
Page 3 of 3
Creating a widgetThe next step is to give the addon some functionality and here we hit a snag. At the moment there isn't very much you can do in Jetpack by way of the user interface and indeed in the latest version you can do even less because you can't directly access the browsers XUL DOM directly. UI elements are in being added to Jetpack to make things easier and once you know how to work with the UI Jetpack style it should be very easy. With this in mind lets implement a simple widget. Jetpack implents a widget bar just above the status bar. To add a widget all you have to do is use the supplied widgets.add method. You can read about the details in the documentation. First we need to load the widgets code: const widgets = require("widget");
Next we construct a widget object by initialising its standard properties - a widget has to have either a content or an image property. var Mywidget={
Finally we can add the widget to the widget bar: widgets.add(widgets.Widget(Mywidget)); The usual way of doing all of this is to define your widget "on the fly" so enter into main.js the more general version of the above code: widgets.add(widgets.Widget({
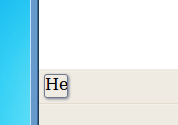
Now when you run the package you will see Firefox again but with a small button with some of the letters of "Hello" visible. At the moment you can't modify the size of the widget as displayed in the widget bar.
Widget eventsTo go beyond this you have to define some event handlers. Once again this can be done by simply defining properties of the Widget object. In defining event handlers you have access to the usual range of objects and properites via the DOM - or you might have. Jetpack is slowly accumulating security features and as the documentation says "direct access to the browser's XUL window DOM, directly or through events, may break in the very near future" As an example of interacting just a little with the XUL DOM we can define a click event hander as: var doClick=function(e){
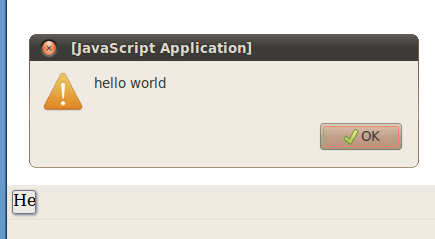
The event object, e, provides a view property that gives the window object that the event occured in. We can use this to call the window.alert method with an appropriate message. To attach this to the widget we simply set it on the onClick property. The complete program is: const widgets = require("widget");
Now when you run the package and click on the widget you will see an alert box appear.
Where next?Now you are ready to explore Jetpack further but be warned the lack of documentation and features makes this a frustrating experience.This is the price you have to sometimes pay to be ahead of the pack. As well as the widget facility there is also a right click context menu that you can use. Once you have a finished add-on you can convert it into a XPI which is the standard Firefox add-on format. It can then be loaded into Firefox in the usual way and no one will ever know that you used Jetpack rather then XUL and XPCOM. You also need to keep in mind that if you do make use of your knowledge of the inner workings of XUL or XPCOM anything you implement might well not work in the next version. If you want a deeper look into XUL and XPCOM then have a look at Extending Firefox and Thunderbird. To find out more about Jetpack the only real options are to read what little documentation there is, search for examples, read the Javascript source code for the modules and ask questions on the forum.
|
||||
| Last Updated ( Wednesday, 30 June 2010 ) |