There are a lot more chapters waiting for you there.
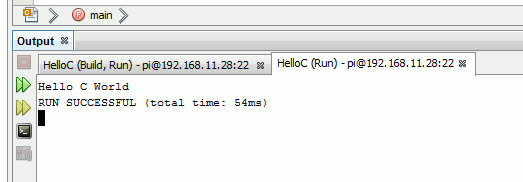
If you have entered the program correctly it should compile, link and run. If there are any problems you will see error messages in the Output window. You will see the Hello C World message in a new Ouput window tab that opens automatically. The prinf function always sends its output to the Output window and this is very useful for status and debugging messages while you are developing the program.
It is worth knowing where NetBeans stores your project files.
If you are using the Pi or a Linux desktop to run NetBeans then your projects are stored in
/home/username/NetBeansProjects
If you are using a Windows desktop machine to run NetBeans then your projects are stored in NetBeansProjects in your Documents directory and when you run the program the project's files are copied to the Pi to the
/home/username/NetBeansProjects
The two directories on the different machines are kept in sync by the system and sometimes NetBeans will inform you that a file on the Pi has been changed and offers you a chance to copy it back to the desktop machine. In general this isn't necessary because the changes aren't important for editing the project, only running it.
Troubleshooting
Of course, in practice things go wrong.
There isn't much that can go wrong if you are running NetBeans on a Pi. If you have any problems then the best advice is to use a fresh installation of Raspbian and install NetBeans again.
The main things that can go wrong if you are using the Pi as a build host is that it fails to connect. This can be only because you have the IP address wrong, the user name wrong or the password wrong. There is a small probability that you might not have SSH enabled on the Pi but this shouldn't happen unless you explicitly turned it off. Again the best advice is to install a fresh copy of Raspbian.
If you have any trouble connecting make sure you can connect using an SSH terminal such as Putty.
Summary
C is a very good language to learn for any IoT project. It is fast and efficient and close to the machine. There are lots of other languages that have it as their ancestor, so it is worth learning.
You can write programs in C using just an editor and the command line compilers, but NetBeans makes it much easier to create and debug programs. It is free to download and is open source.
There are two ways to use NetBeans with a Raspberry Pi. You can install it on the Pi or you can install it on a desktop machine and use the Pi as the build host.
There are lots of advantages to using a desktop machine to edit the programs in NetBeans and using the Pi as the build host to compile and run them.
All you have to do to use the Pi as a build host is to make sure it is correctly set up, know its IP address and be sure that SSH is enabled. You can then set the Pi up as a build host in NetBeans.
When you create a new project NetBeans creates the files you need to get started in the NetBeansProjects directory, which is either in your home directory on Linux or your Documents directory under Windows.
When you run your project, NetBeans will first upload the files to the NetBeansProjects folder if you are using a remote build host and use the compilers specified to run the program.
Important Note:
The whole of this book has moved to our sistersite
All of the articles in this list are in the process of being updated from the first edition to the second edition.
Chapter List
Getting Started With NetBeans In this chapter we look at why C is a good language to work in when you are creating programs for the IoT and how to get started using NetBeans. Of course this is where Hello C World makes an appearance.
First Steps With The GPIO The bcm2835C library is the easiest way to get in touch with the Pi's GPIO lines. In this chapter we take a look at the basic operations involved in using the GPIO lines with an emphasis on output. How fast can you change a GPIO line, how do you generate pulses of a given duration and how can you change multiple lines in sync with each other?
Input and Interrupts
Memory Mapped I/O
Near Realtime Linux You can write real time programs using standard Linux as long as you know how to control scheduling. In fact it turns out to be relatively easy and it enables the Raspberry Pi to do things you might not think it capable of. There are also some surprising differences between the one and quad core Pis that make you think again about real time Linux programming.
PWM
I2C
I2C Temperature Measurement
A Custom Protocol - The DHT11/22 In this chapter we make use of all of the ideas introduced in earlier chapters to create a raw interface with the low cost DHT11/22 temperature and humidity sensor. It is an exercise in implementing a custom protocol directly in C.
Getting On The Web - After All It Is The IoT Coming Soon
One Wire Bus Basics The Raspberry Pi is fast enough to be used to directly interface to 1-Wire bus without the need for drivers. The advantages of programming our own 1-wire bus protocol is that it doesn't depend on the uncertainties of a Linux driver.
iButtons If you haven't discovered iButtons then you are going to find of lots of uses for them. At its simples an iButton is an electronic key providing a unique coce stored in its ROM which can be used to unlock or simply record the presence of a particular button. What is good news is that they are easy to interface to a Pi.
The DS18B20 Using the software developed in previous chapters we show how to connect and use the very popular DS18B20 temperature sensor without the need for external drivers.
The Multidrop 1-wire bus Some times it it just easier from the point of view of hardware to connect a set of 1-wire devices to the same GPIO line but this makes the software more complex. Find out how to discover what devices are present on a multi-drop bus and how to select the one you want to work with.
SPI Bus The SPI bus can be something of a problem because it doesn't have a well defined standard that every device conforms to. Even so if you only want to work with one specific device it is usually easy to find a configuration that works - as long as you understand what the possibilities are.