Although computing a checksum isn't specific to I2C, it is another common task.
The datasheet explains that the polynomial used is:
X8+X5+X4+1
Once you have this information you can work out the divisor by writing a binary number with a one in each location corresponding to a power of X in the polynomial - i.e. the 8th, 5th, 4th and 1st bit.
Hence the divisor is 0x0131.
What you do next is roughly the same for all CRCs. First you put the data that was used to compute the checksum together with the checksum value as the low order bits:
Now you have three bytes, i.e 24 bits in a 32-bit variable.
Next you adjust the divisor so that its most significant non-zero bit aligns with the most significant bit of the three bytes. As this divisor has a one at bit eight it needs to be shifted 15 places to the right to move it to be the 24th bit:
uint32_t divisor = ((uint32_t) 0x0131) <<15;
Now that you have both the data and the divisor aligned, you step through the top-most 16 bits, i.e. you don't process the low order eight bits which is the received checksum. For each bit you check to see if it is a one - if it is you replace the data with the data XOR divisor. In either case you shift the divisor one place to the right:
for (int i = 0 ; i < 16 ; i++){
 if( data32 & (uint32_t)1<<(23 - i) )
                   data32 =data32 ^ divisor;
 divisor=divisor >> 1;
 };
When the loop ends, if there was no error, the data32 should be zeroed and the received checksum is correct and as computed on the data received.
A complete function to compute the checksum with some optimizations is:
Once you have the device working and supplying data it is time to write your code in the form of functions that return the temperature and the humidity and generally make the whole thing more useful and easier to maintain.
This is often how this sort of programming goes - at first you write a lot of inline code so that it works as fast as it can then you move blocks of code to functions to make the program more elegant and easy to maintain checking at each refactoring that the programming still works.
Where Next
The I2C bus is useful, but there are are other less standard buses that prove to be useful for one off devices. In the next chapter we look at the first problem we have to solve - working with 1.8V logic. The problem is that while there might be 1.8V I2C devices other less standard buses tend to work at 5V or 3.3V. So before moving on it is worth spending some time looking at how to inter-work 1.8V with 5V and 3.3V logic.
Now On Sale!
You can now buy a print edition of Exploring Intel Edison.
Meet Edison In this chapter we consider the Edison's pros and cons and get an overview of its structure and the ways in which you can make use of it. If you have ever wondered if you need an Edison or an Arduino or even a Raspberry Pi then this is the place to start.
First Contact When you are prototyping with the Edison you are going to need to use one of the two main breakout boards - the Arduino or the mini. This chapter explains how to set up the Edison for both configurations.
In C You can program the Edison in Python, JavaScript or C/C+ but there are big advantages in choosing C. It is fast, almost as easy as the other languages and gives you direct access to everything. It is worth the effort and in this chapter we show you how to set up the IDE and get coding.
Mraa GPIO Using the mraa library is the direct way to work with the GPIO lines and you have to master it. Output is easy but you do need to be aware of how long everything takes. Input is also easy but using it can be more difficult. You can use polling or the Edison interrupt system which might not work exactly as you would expect.
Fast Memory Mapped I/O There is a faster way to work with GPIO lines - memory mapped I/O. Using this it is possible to generate pulses as short at 0.25 microsecond and read pulse widths of 5 microseconds. However getting things right can be tricky. We look at how to generate fast accurate pulses of a given width and how to measure pulse widths.
Near Realtime Linux You need to be aware how running your programs under a non-realtime operating system like Yocto Linux effects timings and how accurately you can create pulse trains and react to the outside world. In this chapter we look the realtime facilities in every version of Linux.
Sophisticated GPIO - Pulse Width Modulation Using the PWM mode of the GPIO lines is often the best way of solving control problems. PWM means you can dim an LED or position a servo and all using mraa.
Sophisticated GPIO - I2C I2C is a simple communications bus that allows you to connect any of a very large range of sensors.
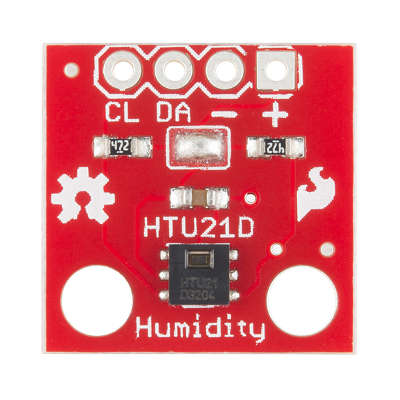
I2C - Measuring Temperature After looking at the theory of using I2C here is a complete case study using the SparkFun HTU21D hardware and software.
Life At 1.8V How to convert a 1.8V input or output to work with 5V or 3.3V including how to deal with bidirectional pull-up buses.
Using the DHT11/22 Temperature Humidity Sensor at 1.8V In this chapter we make use of all of the ideas introduced in earlier chapters to create a raw interface with the low cost DHT11/22 temperature and humidity sensor. It is an exercise in interfacing two logic families and implementing a protocol directly in C.
The DS18B20 1-Wire Temperature The Edison doesn't have built in support for the Maxim 1-Wire bus and this means you can't use the very popular DS18B20 temperature sensor. However with a little careful planning you can and you can do it from user rather than kernel space.
Using the SPI Bus The SPI bus can be something of a problem because it doesn't have a well defined standard that every device conforms to. Even so, if you only want to work with one specific device it is usually easy to find a configuration that works - as long as you understand what the possibilities are.
SPI in Practice The MCP3008 AtoD The SPI bus can be difficult to make work at first, but once you know what to look for about how the slave claims to work it gets easier. To demonstrate how its done let's add eight channels of 12-bit AtoD using the MCP3008.
Beyond mraa - Controlling the features mraa doesn't. There is a Linux-based approach to working with GPIO lines and serial buses that is worth knowing about because it provides an alternative to using the mraa library. Sometimes you need this because you are working in a language for which mraa isn't available. It also lets you access features that mraa doesn't make available.