| Exploring Edison - Pulse Width Modulation |
| Written by Harry Fairhead | ||||
| Thursday, 29 October 2015 | ||||
Page 2 of 3
Using PWMSo now you know how to make use of the PWM lines. All you have to do is initialize one of the four possible pins and set the period and pulse width/duty cycle - as soon as you enable the output the pulse train starts. The simplest PWM program you can write is:
This produces a pulse train consisting of a microsecond wide pulse every then microseconds on mraa pin 14 which is J18-1 on the mini-breakout board. Notice that there is no need to put the program into an infinite loop. Once the PWM line has been set up and enables it just gets on with generating the pulse train no matter what the Edison does. In this case the pulse generation continues long after the program has ended. Just to demonstrate that all of the PWM lines can be used independently of one another here is a program that sets each one of the four to a different period and duty cycle:
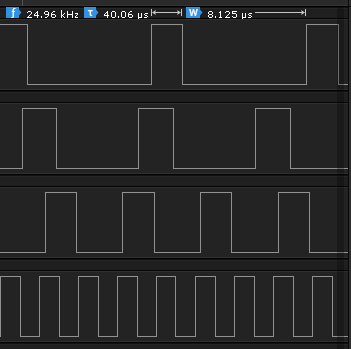
and you can see the result in the following logic analyser display:
If you want to make sure that you don't inherit any settings from a previous program and want to make sure that your settings do update any existing ones it is a good idea to disable the PWM lines before you use them. That is:
How Fast?Of course in most cases the whole point is to vary the duty cycle or the period of the pulse train for reasons that will be discussed later. Occasionally the issue of how fast a pulse can be created and this is a surprisingly difficult question to answer. If you try to use the max and min period functions to discover the values using something like:
which will print to the Eclipse console, you will see min 1 or 1 to around 0.22 seconds. Which corresponds to a max frequency of 1MHz and a minimum frequency of around 4.6Hz. The next question is how fast can you change the characteristic of a PWM line? In other words how fast can you change the duty cycle say? There is no easy way to give an exact answer but if you change the duty cycle in a tight loop you will discover that a period of 12 microseconds gives a train with one pulse of each type:
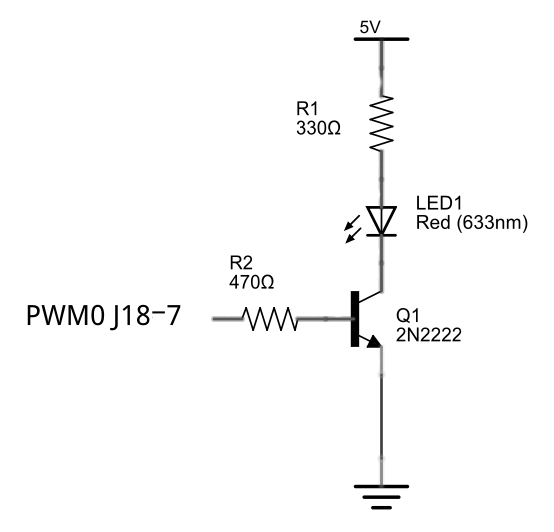
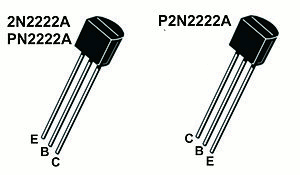
What this means is that the pulse duty cycle is being changed at the same rate as the pulses are generated. Increasing or decreasing the period slightly and the result is a slow phase shift. You can therefore infer that the time to update is about 12 microseconds. Which is in line with the shortest pulse times on the SYSFS driven GPIO lines. As in the case of the GPIO lines you can't expect to make changes to more than one line in 12 microseconds. Each change that you make takes around that time. For PWM lines in many uses this isn't a problem because the pulse time is typically milliseconds and 12 microseconds is more than fast enough. However there are PWM applications - e.g. pulse width coding - where it could be a real problem. Uses of PWM - Driving LEDsWhat sorts of things do you use PWM for? There are lots of very clever uses for PWM. For example you can already use it to create pulse trains that would be difficult to create in any other way - a one microsecond pulse train for example. However there are two use cases which account for most PWM applications - power modulation and signaling to servos. The first, power modulation, is more simply put as "dimming an LED". By changing the duty cycle of the PWM pulse train you can set the amount of power delivered to an LED, or any other device, and hence change its brightness. The amount of power delivered to a device by a pulse train is proportional to the duty cycle. A pulse train that has a 50% duty cycle is delivering current to the load only 50% of the time and this is irrepective of the pulse repetition rate. So duty cycle controls the power but the period still matters in many situations because you want to avoid any flashing or other effects - a higher frequency smooths out the power flow at any duty cycle. You can use a PWM supply to control the brightness of an LED for example, or the rotation rate of a DC motor. The only differences in applications such as these are to do with the voltage and current you need to control and the way duty cycle relates to what ever the physical effect is. For example for an LED we might use a 5V supply and a current of a few tens of milliamps. In the case of an LED the connection between duty cycle and brightness is a complicated matter but the simplest approach uses the fact that the perceived brightness is roughly proportional to the cube of the input power. The exact relationship is more complicated but this is good enough for most applications. As the power supplied to the LED is proportional to the duty cycle we have: b=kd3 where b is the perceived brightness and d is the duty cycle. Notice that as the LED is either full on or full off there is no effect of the change in LED light output with current - the LED is always run at the same current. What all of this means is that if you want an LED to fade in a linear fashion you need to change the duty cycle in a non-linear fashion. Intuitively it means that changes when the duty cycle is small produce bigger changes in brightness than when the duty cycle is large. For a simple example we need to connect a standard LED to the PWM line. Given that all of the Edison's lines work at 1.8V and most LEDs need more voltage than this we also need a transistor to drive the LED. You could use an FET of some sort but for this sort of application an old fashioned Bipolar Junction Transistor works very well and is cheap and available in a through hole mount - i.e. it comes with wires. Almost any general purpose npn transistor will work but the 2N2222 is very common:
You can use pin J20-1 to supply the 5V and pin J19-3 is ground. The PWM0 line is J18-7. If you are using the 2N2222 then the pin outs are:
And of course, as always the positive terminal on the LED is the long pin. Assuming that you have this circuit constructed then a simple PWM program to modify its brightness from low to high and back to low in a loop is;
The basic idea is to set up a pulse train with a period of 1ms. Next in the for loop the duty cycle is set to 1 to 100 microseconds and then 100 back down to 1 microsecond. Although this is just a duty cycle of around 0 to 10% it provides a good range of brightness. You can experiment with the limits for your LED. Notice that the way that the loop counts up and down is to use inc which is either 1 or -1 and using the age old trick of flipping between 1 and -1 and back again by multiplying by -1. |
||||
| Last Updated ( Friday, 06 May 2016 ) |