| Getting started with Microsoft Kinect SDK - Skeletons |
| Written by Mike James | ||||
| Monday, 19 December 2011 | ||||
Page 2 of 3
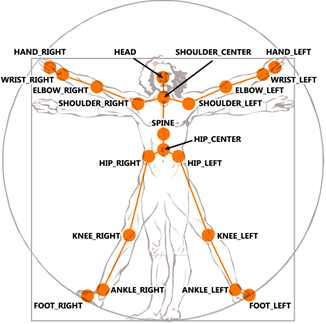
With this method we can simply display the video. Place a PictureBox on the form and add: Bitmap bmap = PImageToBitmap(videoimage); To the end of the SkeletonFrameReady method. You also need to add: using System.Runtime.InteropServices; The complete SkeletonFrameReady method is: void SkeletonFrameReady(object sender, If you run the program as it is you will see the video captured by the Kinect displayed in the PictureBox. To make sure that the program ends without an error you also need to add the FormClosing event handler: private void Form1_FormClosing( The SkeletonNext we need to investigate the data returned to the SkeletonFrameReady. The first thing to say is that it isn't a skeleton. This is the most important thing to realize. What is returned is a collection of "joints". Roughly speaking a joint corresponds to a part of the human body. The online help has the following diagram to show you which parts of the body are tracked by the Kinect:
Each part of the body listed in the diagram returns a corresponding joint which gives its position and other useful data. The collection of Joints is returned as part of a SkeletonData object which also has some other useful properties such as its position. The position of a SkeletonData roughly corresponds to the center of the player (more accurately the centroid). Notice that no complex data regarding how the body parts are connected to form a skeleton is returned. If you want to draw a skeleton on the screen then it is up to you to join the appropriate body parts by lines. This is the sense in which the SkeletonFrame object does not represent a skeleton but you can see that it would be quite easy to write a routine that would connect appropriate parts of the body together with lines. Also notice that the data only contains the point location of each of the body parts. If you want to work out say the length of an arm you will have to do it by computing the distance from the shoulder to the elbow then to the wrist and finally to the hand. All we need to do is plot the position of the head and this just means finding the Joint corresponding to the player's head and plotting its position. Let's see how this is done. First we need to retrieve the SkeletonFrame from the event parameters: SkeletonFrame skeletonFrame = There could be as many as two fully tracked players returned in the SkeletonFrame so we need to process each one: foreach (SkeletonData data in Each SkeletonData contains a collection of Joints as its Joints property but not all of the Skeletons will be actively tracked. Skeletons that are tracked have a valid collection of Joints. Skeletons that are not tracked only have a valid position. Before processing Skeleton data you need to discover if it is valid or not - the Kinect might not be able to track a user for one reason or another: if (data.TrackingState== If the data is tracked we can move on to process it. If you wanted to process the entire collection of body parts you would now write a foreach loop to scan though the collection and draw something for each one. In our case we simply want the Head Joint. This can be retrieved from the collection using its id: Vector location = We only need the Head's location so we immediately use its Position property to return a vector containing its x,y,z location. At this point we have to consider what the skeleton location co-ordinate system is. Each body part is located using a standard reference frame:
The units used are meters and some times this is all you need to locate the player. However, we need to convert the 3D co-ordinates of the Joints into 2D co-ordinates that can be plotted in either a depth image or a video image. Part 4 of this series goes into detail about how to convert the depth co-ordinates, x,y,z , into 2D video co-ordinates and the process of converting the skeleton data into 2D video co-ordinates is very similar. |
||||
| Last Updated ( Monday, 06 February 2012 ) |


