
| Pi IoT In Python Using Linux Drivers - GPIO Character Driver |
| Written by Mike James & Harry Fairhead | |||||||
| Monday, 29 January 2024 | |||||||
Page 3 of 3
Working With More Than One LineThere are also “bulk” versions of the line functions which work with a set of lines at one time. The key to understanding these is the LineBulk object lines=gpiod.LineBulk([List of Line objects]) For example: chip=gpiod.Chip("0")
This isn’t a particularly useful way of creating a LineBulk object and the get_lines method is more commonly used: lines = chip.get_lines(offsets) where offsets is a List of GPIO line offsets. Using this the previous example can be written: chip=gpiod.Chip("0")
You can do the same thing using find_lines which returns a LineBulk object with lines defined by a List of names. There is also a method that will get all of the lines supported by a GPIO chip: lines=chip.get_all_lines() Once you have a LineBulk object you can initialize all of the lines it represents using its request method: request(consumer, type=None, flags=None, This sets all of the lines to the same consumer, type and flags. The default_vals is a list of values that are applied one per line. For example, to set the two lines to output you would use: chip=gpiod.Chip("0")
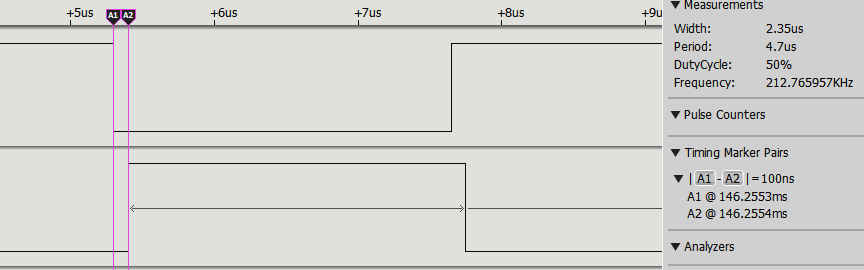
Notice that consumer and type are set to the same value for each line, but the default values are different. There is also a function that will close all of the lines that you have been working with: lines.release() Once you have set up the bulk lines you can get and set them: vals=lines.get_values() lines.set_values(vals) For the get function the vals List is set to the state of all of the lines, including output lines, and for the set function the vals List is written to the lines. How these functions all work is easy to understand after you see an example. In this case the program pulses two lines that are out of phase: import gpiod The new steps are the creation of a LineBulk object for lines GPIO 4 and GPIO 17. Once we have the line_bulk object we set the lines to output mode and then the set_values method sets them to 1,0 and 0,1. Remember the need to change the chip number to "4" for a Pi 5. You can see that despite the program implying that the lines are switched at the same time, they are not:
You can see that for a Pi 4 the pulse is about 2µs and 240kHz and there is a lag of 0.1µs. For a Pi Zero the pulse width is 16µs a frequency of 30kHz the lag is around 0.2µs. In chapter but not in this extract
Summary
Raspberry Pi IoT In PythonUsing Linux Drivers
|

Deno Not Giving Up Over JavaScript Trademark 01/07/2025 Deno has faced a setback in its attempt to get Oracle to relinquish the JavaScript Trademark. The US Patents Office Trademark Trial and Appeal Board (TTAB) dismissed Deno's fraud claim which is one th [ ... ] |
CISA and NSA - Use Rust Or Perhaps Java 02/07/2025 The CISA and the NSA are urging us to adopt memory-safe languages (MSLs) for the sake of cybersecurity. You probably think they mean Rust but things aren't as clear cut as you might expect. |
More News
|

Comments
or email your comment to: comments@i-programmer.info