| Pi IoT In C Using Linux Drivers - GPIO Character Driver |
| Written by Harry Fairhead | ||||||
| Monday, 29 March 2021 | ||||||
Page 2 of 2
As an example of using the contextless functions, simply toggle GPIO4 as fast as possible: #define _GNU_SOURCE
#include <gpiod.h>
#include <stdio.h>
#include <unistd.h>
#include <stdlib.h>
int res;
int main(int argc, char **argv) {
for (;;) {
res = gpiod_ctxless_set_value("0", 4, 1, 1,
"output test", NULL, NULL);
}
}
You might well conclude that this program is wrong as it sets line 4 to 1 and never sets it to 0. However, if you run the program you will discover that you do see pulses because the line is closed and hence it returns to 0 between each of the calls to the set function.
The trace is for a Pi Zero and you can see that the pulses are 30µs wide with a gap of around 290µs. For a Pi 4 pulses are 10µs wide with a gap of 74µs. The gap is the time needed to close the line file and re-open it. This is slower than using the character driver driver directly and the pulse width isn’t under our control. The line is set high for the time it takes to complete the call. To set the pulse width you have to use a callback function to delay the closing of the file: #define _DEFAULT_SOURCE
#include <gpiod.h>
#include <stdio.h>
#include <unistd.h>
#include <stdlib.h>
#include <time.h>
int res;
int delayms(int ms) {
struct timespec delay = {0, ms * 1000*1000};
return nanosleep(&delay, NULL);
}
int main(int argc, char **argv) {
for (;;) {
res = gpiod_ctxless_set_value("0", 4, 1, 1,
Notice that the final parameter isn’t actually being used as a pointer, it is just a way of passing an untyped value and the parameter isn’t dereferenced in the callback. This version of the program is more useful in that it does produce pulses of around 100ms. Also notice the wrapper for nanosleep because we can only pass a single parameter to the callback function. The first set makes the line go high and it stays high for the duration of the nanosleep and then the close operation resets it to input. The second set makes the line go low for the duration of the nanosleep and it stays low while the line is closed again. What this all means is that the time that the line is low is still longer than the nanosleep time because it includes the time to close and open the file. You can see that the high time is around 100ms, but the low time is a little longer. You can either adjust the low timings or simply put up with it. As well as single line get and set functions, there are also multiple line versions: gpiod_ctxless_set_value_multiple(“device”,offsets[], These work in the same way, but now you can specify a set of lines as an array of line structs and an array of values to get/set them to. Of course you have to specify the number of lines and the arrays have to be the correct size. For example, to pulse two lines out of phase you could use: #define _DEFAULT_SOURCE
#include <gpiod.h>
#include <stdio.h>
#include <unistd.h>
#include <stdlib.h>
#include <time.h>
int res;
int delayms(int ms)
{
struct timespec delay = {0, ms * 1000 * 1000};
return nanosleep(&delay, NULL);
}
int main(int argc, char **argv)
{
int offsets[] = {4, 27};
int state1[] = {1, 0};
int state2[] = {0, 1};
for (;;) {
gpiod_ctxless_set_value_multiple("0", offsets,
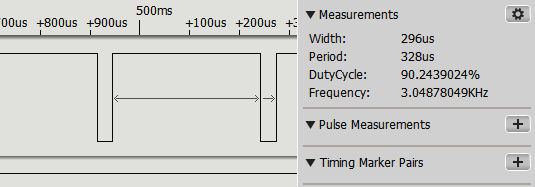
This pulses lines 4 and 27 so that one is high while the other is low. Even though the function promises to change the lines at the same moment, there is a 10µs delay between changing the state of lines, as can be seen in the logic analyzer display below: If you are working in milliseconds, a delay of 10µs probably isn’t important, but it is still necessary to know that the lines do not all change together and there are situations in which this matters. The context-less functions are rarely helpful and they are only slightly easier to use than the much more powerful context-using functions which we look at next. In book but not in this extract.
Summary
Raspberry Pi IoT In C Using Linux DriversBy Harry Fairhead
Buy from Amazon. Contents
<ASIN:1871962641> <ASIN:B08W9V7TP9> To be informed about new articles on I Programmer, sign up for our weekly newsletter, subscribe to the RSS feed and follow us on Twitter, Facebook or Linkedin. 
Comments
or email your comment to: comments@i-programmer.info
<ASIN:1871962617> <ASIN:1871962455> <ASIN:1871962463> |
||||||
| Last Updated ( Saturday, 03 April 2021 ) |