| Getting Started With Google's Android Things - Preview 2 |
| Written by Harry Fairhead | ||||
| Monday, 13 February 2017 | ||||
Page 3 of 3
How Fast Is Native?To find our how fast we can toggle the GPIO lines, load the blink.cpp file and change its contents to read:
This will toggle line BCM4 exactly as the Java program given earlier did. So what is the speed improvement?
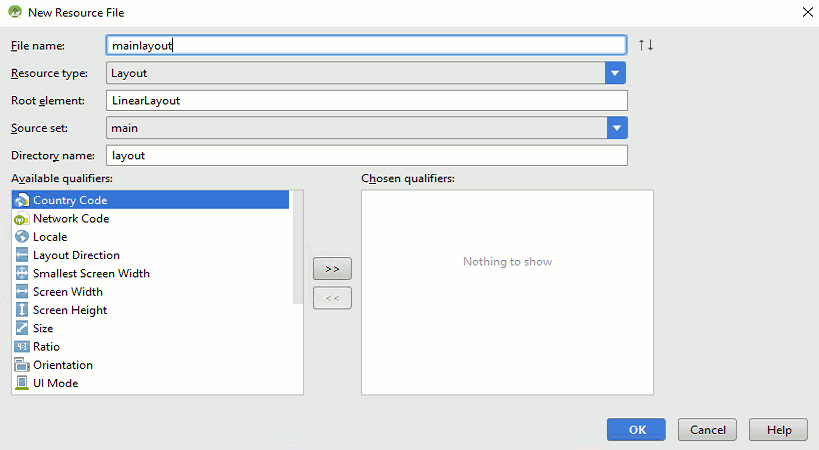
The bad news is that the 0.23ms is reduced to around 0.15ms which is an improvement, but not enough. A pulse time of 150us is not fast enough to write drivers that interface to custom protocols. So why is it so slow? As the source code for the Android Things native library hasn't been released it is impossible to be certain. but it seems likely that it isn't using memory mapping to access the GPIO lines. For example, using SYSFS inefficiently yields a pulse time of around 200us. Doing the job correctly without opening and closing the file for each pulse improves this to 5us and using memory mapping you can generate pulses shorter than 1us. It seems that the problem isn't that Java slows things down, it is probably the basic GPIO access method. The UITo finish on a happier note - the real strength of Android Things is the ease with which you can create a UI. There is almost no need to explain if you already know how to create an Android UI - if you don't then obtain a copy of Android Programming: Starting With An App by Mike James which is a comprehensive introduction to creating an Android UI. To demonstrate how easy it is let's just add a button to our current example. First select the res directory, right click on it and select New, Android Resource file. Fill in the details in the dialog box that appears:
Call the file mainlayout and set its resource type to Layout. You can leave the root element as LinearLayout, but in most cases you would want to choose something more sophisticated. When you close the dialog box the resource is created. The chances are you will see an error message when the Designer tries to open. Don't panic - just refresh the editor and it should work. Use the Designer to add a Button to the layout . You could add an event handler if you want to but more of this another time. Now all you have to do is add the line:
in onCreate immediately after
This loads, inflates and displays the resource file to display the UI. Now when you run the program you will see a single button, assuming you have a monitor. If you also have a mouse, or if the display is a supported touch-sensitive screen, then you can also click the button. For the IoT having a complete Android UI toolkit is a luxury indeed. Watch this space for more developments. ListingThe complete blinky Java program including a suitable destructor is:
The XML file for the simple layout is:
More InformationRelated ArticlesAndroid Things Dev Preview 2 Could Be What We Need.
To be informed about new articles on I Programmer, sign up for our weekly newsletter, subscribe to the RSS feed and follow us on Twitter, Facebook or Linkedin.
Comments
or email your comment to: comments@i-programmer.info
<ASIN:187196251X> <ASIN:1871962463> <ASIN:1871962447>
|
||||
| Last Updated ( Sunday, 26 March 2017 ) |


