|
Page 1 of 4 A UI isn't just made up of buttons and other widgets - the menu is still a useful way of letting the user select what happens next. Android's menu system is easy to master. We also need to find out about the new Toolbar implementation of the Actionbar.

Starting With an App
Third Edition
Is now available in paperback and ebook.
Available from Amazon.
- Getting Started With Android Studio 3
- The Activity And The UI
- Building The UI and a Calculator App
- Android Events
Extract: Using Lambdas
- Basic Controls
- Layout Containers
- The ConstraintLayout
Extract: Guidelines and Barriers
- UI Graphics A Deep Dive
Extract: Programming the UI ***NEW
- Menus & The Action Bar
- Menus, Context & Popup
- Resources
- Beginning Bitmap Graphics
Extract: Simple Animation
- Staying Alive! Lifecycle & State
- Spinners
- Pickers
- ListView And Adapters
If you are interested in creating custom template also see:
Custom Projects In Android Studio

There is a menu designer in but working with the XML isn’t that difficult.
The basic principles are the same in that a menu is a collection of View objects. You can create the View objects in code or you can use an XML file and a special inflater - a MenuInflater - to convert it into the objects.
Defining a menu is more or less the same process every time but the way in which you use the menu varies according to where and when the menu is shown but even this follows roughly the same steps.
Let's look a the general idea first.
Creating A Menu Resource
Menus are generally defined by a menu resource file which is an XML file which is rendered to create the menu.
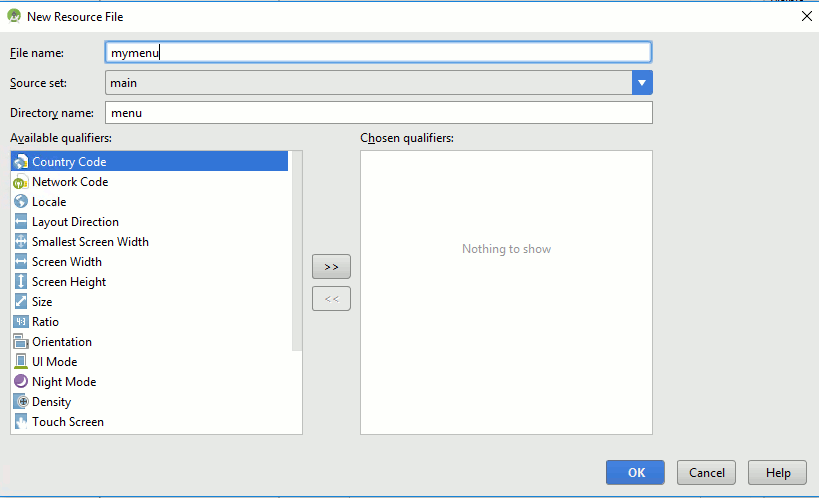
All menu resources are stored in the app\res\menu directory. If you right click on this directory you can select the New, Menu resource option and type in a name - all lowercase as usual. 
You can ignore the Available qualifiers for the moment. The idea is that each resource you create will be used in a given situation according to the qualifiers you select. In this way you can create custom menus for particular nationalities for example. More about this idea in a later chapter.
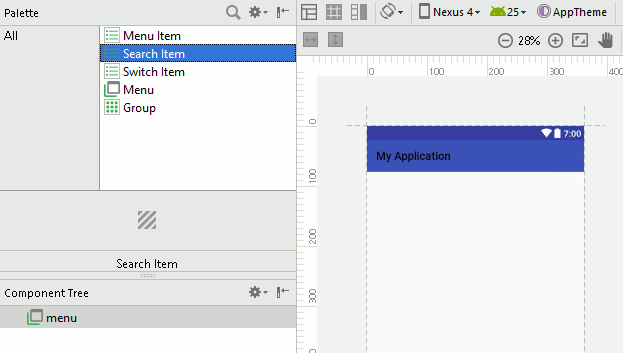
When you click the OK button the resource file is created and it will be opened in the layout editor. This in principle should allow you to edit the menu using drag-and-drop just like a general layout, but at the moment it is very limited and tends to create XML that doesn't work. You can place a menu item onto the menu and customize some of its properties, but this is about as far as it goes.

You can work either with the menu editor or the XML directly. You will discover that it helps you enter the XML by suggesting autocompletions so you aren't entirely without help even if you have to abandon the menu editor.
Before we can create a menu we need to know something about the XML tags and the corresponding menu items we can use.
The Menu Tree
A menu is a hierarchy of options.
The top level menu presents a set of items. If any of the items is itself a menu, i.e. a sub-menu then it can contain more items.
Android menus make use of three objects and hence three XML tags:
<menu>
This inflates to a Menu object which is a container for menu items and group elements.
<item>
This inflates to a MenuItem object which is a single option in the menu. It can also contain a <menu> tag which can in turn contain more <item> tags to create a sub-menu.
<group>
This tag doesn't inflate to an object. Instead it sets the group id of all of the items it contains. You can set various properties of a group of items in one operation i.e. they act as a group.
There are also a range of attributes that can be used with <item> and <group> and not all can be used in every situation.
The three that you need to know about are:
- id - an integer that you use to identify the menu item
- title - a string that determines what the menu item displays
- icon - a drawable image used when the menu item can be displayed as an icon.
With all this explained let's define a menu with a single File item and a submenu consisting of two items New and Open.
<?xml version="1.0" encoding="utf-8"?>
<menu xmlns:android=
      "http://schemas.android.com/apk/res/android">
 <item
       android:id="@+id/file"
       android:title="File">

    <!-- "file" submenu -->
    <menu>
     <item
        android:id="@+id/create_new"
        android:title="New" />
     <item
        android:id="@+id/open"
        android:title="Open" />
    </menu>
 </item>
</menu>
You can see in the example that we have a top level menu item that we don't bother giving an id to which contains a single <item> tag this displays the text File when the menu is displayed. In case you have forgotten the notation "@+id/name" automatically creates the id resource name and sets it to a newly generated integer value. You can then use name in code to find and work with the menu item.
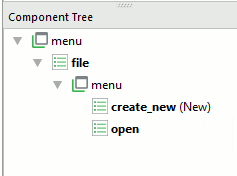
The <item> tag contains another <menu> tag which in turn contains two more items that correspond to New and Open file menu options. You can see the structure in the Component Tree:

The component tree can also be used to do some limited editing of the menu by dragging-and-dropping to modify how items are nested.
Exactly how this simple menu looks depends on how it is displayed but it defines a menu with a single top level File option which when selected displays a submenu of two other options New and Open.
Displaying A Menu
There are four different ways you can display a menu:
- action bar/tool bar
- context menu
- contextual action mode
and
- popup
The action bar was introduced in Android 3 and it is a replacement for the original options menu. You should always use the action bar or its replacement the Toolbar as the primary menu for your application. With Android 5 a new way of implementing an ActionBar like menu menu was introduced The Toolbar is a standard widget that can be edited using the designer. This makes it easier to integrate and work with. If you want to use the ActionBar in earlier versions of Android you need to make use of the Support Library - this is automatically included when Android Studio creates a project for you.
The context menu is a popup menu that appears in response to a long click on a component of the UI.
The contextual action mode is bar that appears at the top of the screen when the user long-clicks on a UI element and it is supposed to be used to provide actions that are appropriate for the item that has been selected. It too needs the Support Library to work with older versions of Android.
The popup menu can be displayed in response to almost any user action you care to use. It appears next to the View object that causes it to be displayed. For example you could have a button that displays a popup when clicked or a popup could appear when a user types something into a text field. It is difficult to know exactly when to use a popup menu.
Logically the next step would be to use the XML file we just created to display either a contextual action mode or a popup but as the default project type generates the code and menu resource file needed to implement an action bar/tool bar, and it is used in most applications, it is better to start with it.
The remaining menu types are the topic of the next chapter.

|


