|
Page 1 of 3 Android Studio is now very clear about what layout component you should use - only the ConstraintLayout. But what does it give you that wasn't in the other layouts? This extract about bias constraints and chains is taken from the chapter The ConstraintLayout in a new book aimed at Android programmers wanting to use Kotlin.
Android Programming In Kotlin
Starting with an App
Covers Android Studio 3 and Constraint Layout.
Is now available as a print book:
Buy from: Amazon
Contents
- Getting Started With Android Studio 3
- The Activity And The UI
Extract: Activity & UI
- Building The UI and a Calculator App
Extract: A First App
- Android Events
- Basic Controls
Extract Basic Controls
Extract More Controls ***NEW!
- Layout Containers
Extract Layouts - LinearLayout
- The ConstraintLayout
Extract Bias & Chains
- Programming The UI
Extract Programming the UI
Extract Layouts and Autonaming Components
- Menus & The Action Bar
- Menus, Context & Popup
- Resources
Extract Conditional Resources
- Beginning Bitmap Graphics
Extract Animation
- Staying Alive! Lifecycle & State
Extract State Managment
- Spinners
- Pickers
- ListView And Adapters
-
Android The Kotlin Way
If you are interested in creating custom template also see:
Custom Projects In Android Studio

Bias Constraints
So far the ConstraintLayout hasn't really provided anything new, but it does have a more sophisticated constraint that doesn’t have a counterpart in the RelativeLayout. Referred to as “bias” this type of constraint works in terms of ratios, expressed as percentages and displayed as zig-zag lines:
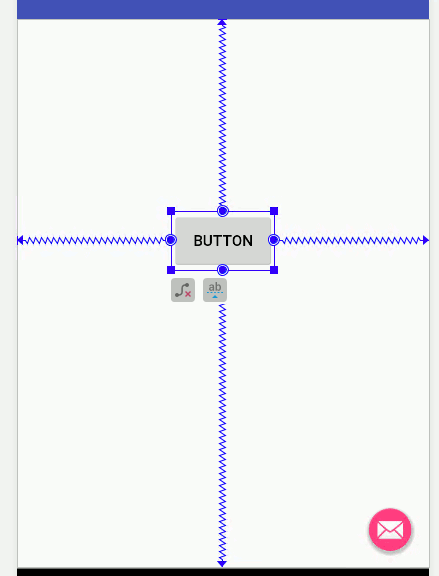
To use it you have to create two constraints that “fight” each other. For example, if you drag one constraint to the left and its counterpart to the right, the result is a horizontal bias used to position the control at the desired proportion of the layout size. You can achieve a vertical bias by dragging constraints from the top and the bottom.
As you drag the control around the screen, the fractions or percentages are updated in the Attributes window. You can use the sliders that appear to set the percentages:
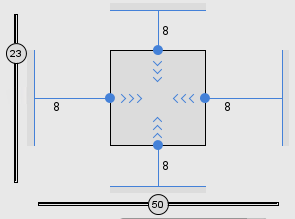
Things are just a little more complicated in that you can also specify a margin which provides a relative component to the bias constraint. If you inspect the display in the Attributes windows shown above, you can see that the constraints have a value of 8 displayed alongside them. This is the default margin assigned when you created the constraint. As you drag the component around the screen you cannot position it closer to the sides than the margin set in that direction.
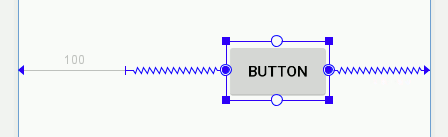
For example, if you edit the left margin to be 100, then the constraint display acquires a straight portion 100 units long. If you now try to move the button to the left, you will find you cannot get closer than 100 units. Notice that it is the distance between the specified margins that is divided up in the ratio set by the bias. If you want the entire screen to be used, then set the margins to zero:
<ASIN:1871962544>
<ASIN:1871962552>
|