| Android Adventures - Static Fragments |
| Written by Mike James | |||||
| Monday, 16 January 2017 | |||||
Page 3 of 4
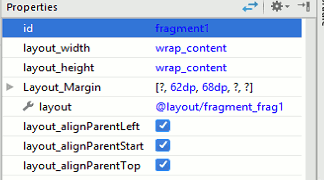
Where Are My Fragments?The only problem with letting Android Studio generate the code and the XML for your Fragments is that it creates the Fragment objects behind the scenes. This makes it easy but what do you do if you want to work with a particular Fragment? This is similar to the problem of how to get a View object that has been created by the inflater. The solution is to use findById and there is a findById for Fragments only it is a method of the Fragment Manager not the Activity. As already mentioned you can assign a Fragment an id using the id property in the XML fragment tag and you can set it using the id property in the Properties window:
Notice that it is the fragment tag you have to set the id on:
If you don't set an id then they system will make use of the id of the container the Fragment is loaded into. For this reason many programmer make the mistake of thinking that they have to assign the id to the container rather than the <fragment> tag. Of course this assigning of an id to the fragment tag is something of a fiction created by Android Studio and the system. We already know that what happens when the Fragment is inflated is that any id associated with the fragment tag is assigned to the top most View element in the UI that it creates. As well as the id property there is also a Tag property which can be used to set a String identifier - via the Properties Window or in the XML. For a static Fragment it looks as if having and id and a Tag property to identify it is more than you need. However as will be explained in the next changer the Tag is the main way of identifying dynamic Fragments. If you load content_main.xml into the designer you can then set the id properties the Fragment to fragment1 and the Tag to "Frag1". After this you can find the code corresponding to the instance of the Fragment that the system has created using:
To the end of the onCreate event handler. You also need to import the class definitions and in this case you need to be careful to use the support library:
If you use the native OS library then the program will return frag1 and frag2 set to null as the Fragment uses the support library. If you run the program and place a breakpoint after the calls to findFragmentByTag and ById you will find that frag1 and frag2 are set to instances of the Fragment class. Of course you would normally have to cast the type to what ever Fragment you were actually using before calling custom methods and properties. For example suppose we add:
to the Fragment class. As it is public it can be called from outside of the class but you have to find the instance first. Make sure that the <fragment> tag is set to have a tag property set to "Myfrag" and then add a Button to the main layout and add to the Activity the code:
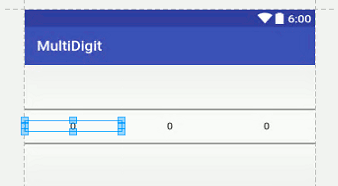
Set this as the button's onClick event handler. Now when you run the program you can set the Fragment's Button text by clicking the new Button. Notice the use of the cast to convert the Fragment to Testfrag complete with its custom methods. Notice that retrieving the Fragment isn't the same as retrieving the Fragments UI. What we have retrieved is the code that backs the UI and we can now call methods and access properties. If you want to access the UI you have to work in the usual way with FindById operating on the View hierarchy. In principle you should avoid allowing the Activity to interact directly with the UI provided by the Fragment. In all cases you should write accessor methods to allow the Fragment to set and get the information it needs. If you find that the Activity needs to reference a particular View element in the Fragment's UI then you are probably implementing the Fragment incorrectly or a Fragment doesn't suit the situation you are working with. The Activity should interact with the Fragment and its UI by first finding the Fragment using findFragmentByTag or findFragmentById and from this point on all interaction should be via the retrieved Fragment reference. The Fragment should always hide its inner workings including the details of its UI. A MultiPicker ExampleA simple example of a very basic Fragment primarily intended for use as a static Fragment is the MultiPicker. This is essentially a reimplementation of the Multi-Digit Input example in Chapter 14 of the beginner's level Android Programming: Starting with an App. It is assumed that you know how the Number Picker control works. Start a new Empty Activity project called MultiDigit and accept all the defaults. When the project has been created, add a new Fragment called Digits, create a Layout XML but do not create a factory method or an interface callback. When the Fragment has been generated, load fragment_digits.xml into the Designer and switch to the text editor and change the FrameLayout tag to LinearLayout. Set the LinearLayout to horizontal and drop three numberPickers onto it. Make sure the id of the one to the far left is numberPicker1, the numberPicker2 and finally at the right numberPicker3. This completes the layout.
Next we can move to the Digits.java file and add the code needed to make things work. In the onCreateView method we need to add some code that will initialize the three numberPickers.
All that happens is that first we retrieve the three numberPicker View objects and save them in an array to make processing easy. Then we set a range of values for pickers and then initialize them one by one. This is simple but completely general. You can modify the code to set any range you need to. We also need at the very least two simple accessor methods. The first is setValue which stores three integer value a,b and c in the numberPickers:
You can see how this works, get the Activity, get the numberPicker and set its value. This is a very basic setter and in practice you would write others such as setValue(int val) which would split the value specified into three digits a,b and c and call setValue(a,b,c). As well as setValue you also need a getValue(). This is also easy and follows the same general pattern:
Each of the values provided by the numberPickers is multiplied by a suitable factor to construct a single number which is returned. Notice that in both cases the accessors get the View objects each time they are called. The temptation is always to store these references but you have to keep in mind that the Fragment or the Activity could have been destroyed and created since the previous use of the setter and this would invalidate stored references. It is usually better to get fresh values whenever reasonable. |
|||||
| Last Updated ( Monday, 16 January 2017 ) |

