| WPF .NET Core - Creating Objects With XAML |
| Written by Mike James | ||||
| Thursday, 07 May 2020 | ||||
Page 2 of 3
Naming objectsSo we have a working program that creates an instance of MyClass but this does us very little good as the instance is dynamic and goes out of scope as soon as the main form is loaded! To keep the instance in scope, and to allow us to work with it within the C# code, we need to give the instance a name. Standard WPF components are generally given a name via the NAME property but a more direct mechanism for custom classes is to use the facilities provided by the XAML “x” namespace. The “x:Name” attribute can be used to set the name used by XAML to create the instance:
With this change you can now run the program and, with the help of a breakpoint and the debugger, you can confirm that there it really does create MyObject1. Put a breakpoint in the MainWindow constructor after the call to InitializeComponent(). You will see MyObject1 listed in the Locals window:
If you would like to see the generated C# code that does the instantiation then load the file called MainWindow.g.cs - click on the Show All files icon in the Solution Explorer:
After a moment you can navigate to the obj\Debug directory - where you will find MainWindow.g.cs. If you look at the code you will discover that what happens boils down to: internal MyProject.MyClass MyObject1; followed a few lines later by:
This creates the objects defined in the XAML file and then the instruction:
makes the connection between the object and the variable referencing it. As already mentioned, WPF classes inherit a Name property which can be used in place of x:Name. If a class doesn’t have a Name property then use x:Name. To assign a name property to a class you simply use the RuntimeNameProperty Attribute to designate a property that will store the name of the instance. For example:
However this only works if the class belongs to another assembly and not the one actively being edited in Visual Studio say. Notice also that the XAML compiler will create an instance with the name you specify and store the name in the property in case you need to make use of it. Initializing PropertiesAs with WPF objects in XAML we can set properties on custom objects. For example, if we add a trivial int property to MyClass:
we can set this to “20” within XAML using:
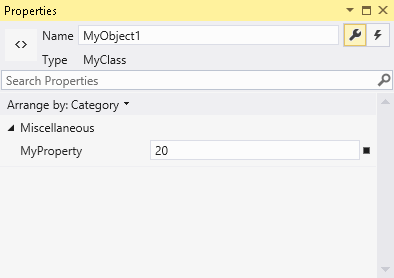
Now if you run the program and examine it after an early breakpoint you will see that the object has been created with the property set to 20. You can also modify the property using the Property window:
Notice that the property type implied by XAML is string but the conversion to int is automatically taken care of – essentially by XAML asking the Convert object to convert the string to the type of the property. This is fine as long as Convert has definitions for the appropriate ToType. In addition to converting to the usual primitives, XAML will also try to convert a string to a suitable value of an enumeration by performing string matching against its values.
<ASIN:0735619573> <ASIN:0672330318> <ASIN:0596526733> |
||||
| Last Updated ( Saturday, 16 May 2020 ) |


