|
Page 1 of 4 The CM5 has a PIO and now you can use it directly. This is an extract from the newly-published Raspberry Pi Compute Module 5 IoT In C
Raspberry Pi Compute Module 5
IoT In C
Using Linux Drivers and Gpio5
By Harry Fairhead
Buy from Amazon.
Contents
- The CM5 For The IoT
- Setting Up the CM5
- C and Visual Studio Code
- Drivers: A First Program
- The GPIO Character Drive
- GPIO Using I/O Control
- GPIO Events
- GPIO Hardware With Gpio5
- Some Electronics
- The Device Tree
- Pulse Width Modulation
Extract: PWM Using GPIO5
- SPI Devices
- I2C Driver and Gpio5
- Sensor Drivers – Linux IIO & hwmon
- 1-Wire Bus
- The PIO
Extract: Getting Started With PIO ***NEW!!!
- Going Further With Drivers
- Almost Real-Time Linux
- Appendix I Gpio5
The PIO
The traditional way to approach any custom or unsupported protocol is to use “bit banging”. This is simply the act of writing a program which controls GPIO lines to simulate the hardware that might be used to implement the protocol. Basically what you have to do is set GPIO lines high and low as dictated by the timing of the protocol and then read data at set times. This is easy in theory, but getting the timings right is harder that it appears and synchronization between state changes is particularly challenging. In addition there is the problem that bit banging ties up the processor. In many cases this doesn’t matter. In other cases you can use one core to implement the protocol and another to process the data. Even so with a multi-tasking operating system like Linux you always have the possibility that the task will be suspended and this generally ruins the timing of the protocol.
A good alternative to using the general purpose CPU to control the GPIO lines involved in a timing sensitive protocol is to build a special programmable subsystem that is sufficiently flexible to be used in generating and measuring pulses. The Raspberry Pi Pico introduced just such a device in the form of its Programmable Input Output, PIO . This allows custom implementation of protocols without the involvement of the CPU but at the price of having to learn how to use it.
Until recently, the big problem was that there was no easy way of using it without extensive reverse engineering. Now we have access to the PIO via a driver and a wrapper library PIOLib, written to emulate the Pico SDK along the same lines as Gpio5. This means you can take an existing Pico PIO program and run it on the CM5 with only minor modifications.
Setting up PIOLib
PIOLib needs the CM5 to be fully up-to-date and it is a good idea to follow the setup instructions exactly:
First update Linux and dependencies on the CM5:
sudo apt update
sudo apt upgrade
Make sure you have the latest EEPROM
sudo rpi-eeprom-update -a
Install CMake
sudo apt install build-essential cmake
Next you need to download PIOLib and this can be done in a number of ways. The simplest is to download the entire utils repo from GitHub:
https://github.com/raspberrypi/utils/tree/master
Use the Code button and select download ZIP. When you have the ZIP file open it in a compression tool and extract just the piolib directory into the location where you create CM5 programs. Of course, if you want other utilities you can extract these as well, but piolib is all you need to use the PIO.
Change directory to piolib and use the command:
cmake .
followed by
make
This will compile the library and the driver.
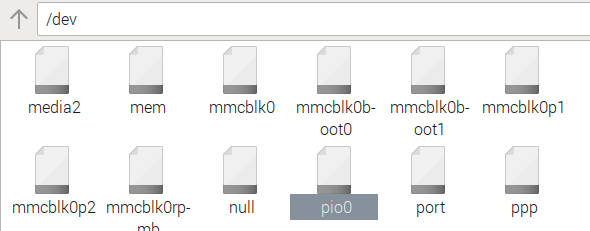
Finally reboot and you should see pio0 in the /dev directory.
If pio0 is owned by root and in group root you will also need to add the line:
SUBSYSTEM=="*-pio", GROUP="gpio", MODE="0660"
to the end of:
/etc/udev/rules.d/99-com.rules
and either restart or use:
sudo udevadm control --reload-rules &&
                         sudo udevadm trigger
If this procedure doesn’t work repeat at least twice before you look for some more serious problem.
|
