| The Hopfield Network - A Simple Python Example |
| Written by Mike James | ||||
| Monday, 14 October 2024 | ||||
Page 3 of 3
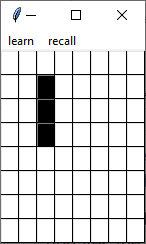
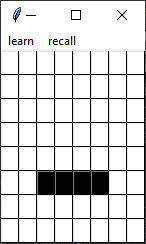
The ProgramThe time has come to program a Hopfield network. There is nothing like building a program to prove that you understand what is happening. The Python program listed implements an 8x8 grid of neurons but you can change this by setting n to a different value. The state of each neuron is recorded in the list s[] and weights are stored in w[][] and these are initalized using comprehensions: s = [-1 for x in range(n*n)] The most difficult part of the program is the user interface implemented in Tkinter. This consists of a frame with a set of buttons organized on an x,y grid. This isn't efficient, but it is very simple: root = Tk() grid_frame = Frame(root) A menu is set up with two simple options - learn or recall. The learn option learns the current state of the system and the recall iterates to convergence starting from the current state of the system. The buttons have no text and are set to white as a background color. A custom attribute, n, is added to the button and this gives the button's number in the state vector. That is, if n=8 the buttons are numbered 0 to 63. We also need a click event handler for each button: def click(e): This finds the number of the button that has been clicked and toggles its state from 1 to -1 and vice versa. The button's color is also updated to give feedback to the user. Finally we need to implement the Hopfield part of the program. The first is the learn function: def learn(): This simply makes one pass though the state vector updating the weight matrix. Notice that we only compute the upper triangle of the matrix and enforce symmetry. We also avoid updating the diagonal. The second is the recall function: def recall(): This is only complicated from the basic equations by the need to detect a change in the state. The inner for loop computes the update to neuron i i.e. s[i] and as Python doesn't have a sign function we have to test for positive or negative changes. The update function called at the end of the recall function simply updates the display: def update(): This scans though all of the buttons in the frame and updates their color based on the value in the state vector s. Trying It OutIt can be a little difficult to figure out what the network is doing when you first interact with it. Your first task is to use it to remember some patterns. The simplest say is a horizontal line and then a vertical line:
Click the learn menu option after entering each pattern. Next you can erase the grid. Then place a single pixel on the grid and press recall. What will appear depends on how close to either line the single pixel is. You can move on from this to see what happens if you input patterns close to the horizontal or vertical line. Once you have seen this, try learning some simple digits or letters and recalling them with slightly noisy or distorted patterns. The Complete Programfrom tkinter import * The program could be improved by the addition of a menu option to Clear the grid. Related ArticlesGeoffrey Hinton Shares Nobel Prize For Physics 2024 Neural Turing Machines Learn Their Algorithms To be informed about new articles on I Programmer, sign up for our weekly newsletter, subscribe to the RSS feed and follow us on Twitter, Facebook or Linkedin.
Comments
or email your comment to: comments@i-programmer.info
|
||||
| Last Updated ( Saturday, 19 October 2024 ) |


