| The Insider's Guide to the Java Web Developer Nanodegree - 2 |
| Written by Nikos Vaggalis | |||
| Monday, 10 August 2020 | |||
Page 2 of 2
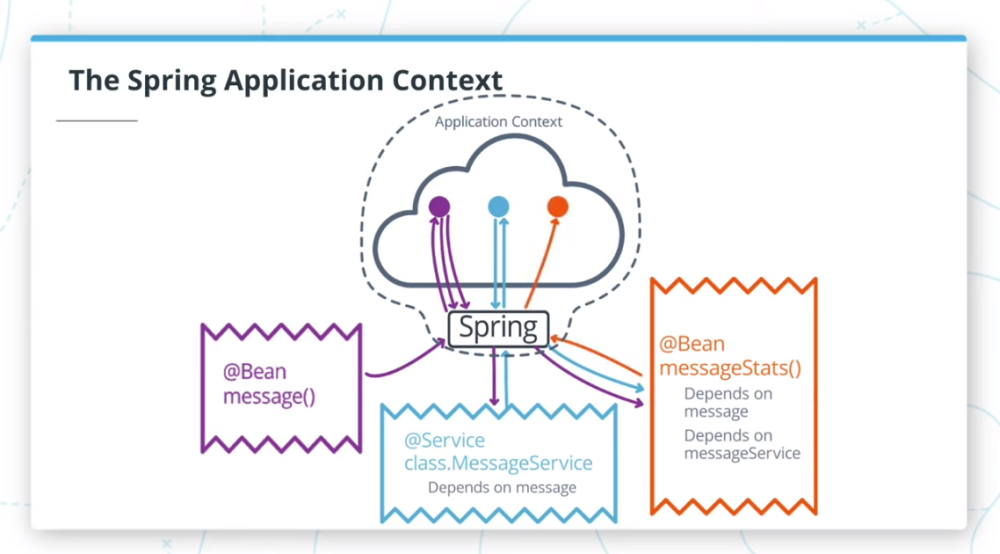
We are now ready to dive deeper into the framework in tackling Lesson 3 Spring Boot Basics for Web Development. In this lesson, we learn that Spring is an implementation of the Inversion Of Control pattern. Components are configured with dependencies on other components, which are injected at runtime. Dependency management is happening through annotating Classes and fields. Some annotations of prime importance are: @Component @Controller @Service @Repository @SpringBootApplication @Bean Using those, you annotate your classes (except for @Bean) and instantiate beans which are stored in Spring's private repository of objects called Application Context. The lesson goes through these important concepts, letting you know when to use which annotation. There is also an exercise in which you have some classes having to decide which annotations to use on which. However, it was not apparent to me what the difference between the @Component and @Bean annotation were, so I asked for the help of the Mentors: Hi,what is the difference between the Bean and Component annotations? Within five minutes, I got an answer which included a passage that said: @Component is a class level annotation whereas @Bean is a method level annotation and the name of the method serves as the bean name. Had I been more patient, I would have found the definitive answer progressing further into the material by reaching the final review exercise which cleared things up. It provided a great example on when to use @Bean vs @Component, how to go about injecting dependencies, and the order they are injected. I also fired another question on @Service vs @Component: Can I use Service and Component interchangeably? That is instead of marking a class as a Service can I just use Component? Does service add extra configuration on top of Component? Getting the answer: I had these questions when I came across these as well. From my reading, the @component is like a super annotation, while all the others are it's children. Meaning it has features that all the other annotations such as @controller and @service share. But these intern have their own specific features that are local to them. This means a @service has all of what @component has to offer and more, while @component has common functions that are shared by other annotations. And that's the value of the Mentoring; it's very useful to have someone more experienced answering your questions as you progress through the course. Of course, everything you can do with annotations, you can also do with xml files, but that was the way of the past. Anyway, the pain of configuring Beans manually by xml files is showcased in "Edge Case: XML Configuration". Spring Boot's annotations make that unnecessary but it's nice to know in case you someday get to work with legacy applications. Lastly, the focus is on the application.properties file with which we can take over Spring Boot's autoconfiguration and instead provide specific instructions according to our needs. For example, the embedded Tomcat server by default runs on port 8080; we can change that with server.port=8086. Also we can enable SSL, turn on logging or provide the database credentials and connection strings: server.port=8086 logging.level.com.udacity.jdnd.course1exercises=DEBUG spring.datasource.username=superman spring.datasource.password=FishTacos1234 These are used as server-wide defaults which means that they are propagated to the corresponding application components. And this wraps up lesson 3. In Lesson 4 - Spring MVC and Thymeleaf attention shifts to the Thymeleaf HTML templating engine. HTML templates are essentially just HTML files with special tags and attributes that can be combined with dynamic data to generate fully functional HTML documents. Think about how templating allows us to populate reusable html structures with server data. What are some advantages to this approach over creating the HTML structures ourselves?
This of course brings up the MVC pattern under which the Controller connects the template to the data which is either encoded into the request URL or sent into the body of the request message. The following quiz demonstrates the use of HTML templating: Consider a simple HTML snippet: <body> <p>Welcome to the future!</p> </body> If your Model object has an attribute superGreatString, what attribute can you add to your HTML to replace the text on the page with the value of superGreatString? <p th:field=”${superGreatString}”> //This attribute lets you map form fields, so it’s not the right choice for this problem. <p th:text=”${superGreatString}”> //Good work! Populating your template with values from your model allows you to easily make dynamic content. <p th:object=”${superGreatString}”> //Specifying the object attribute allows you to set a selected object for a scope, but is not the right way to replace a string on the page. <p th:string=”${superGreatString}”> //Sorry, that’s not a valid attribute type! Of course, the lesson delves deeper in explaining and demonstrating the relation of the Controller to the dynamic template rendering of the View, and the gotchas if you don't use the correct annotations, such as when you should use @ModelAttribute. Lesson 5 - Data Persistence & Security ORM, MyBatis and Authentication by user credentials. Till now we've been using model.attribute() from within our Controller to populate the fields of our Thymeleaf templates. It's now time to move on to the real world of backing up our Model with a database. We get to know why a database is preferred, how to interact with it through the norm of an ORM, and because you can't store everything in the database, what sort of data to persist. Of course, to use a database we need a data model.The example used here is that of an e-shop with the following inter-related entities:
These tables are finding themselves mapped as Java classes with their interaction handled by the shallow ORM MyBatis. MyBatis lets you quickly define queries using annotations and Spring handles injecting the implementation. It makes applying SQL to Java objects pretty easy. To exemplify further, we are expected to go through an exercise of implementing the data model for a Taco Delivery service. After tackling designing the data model and mapping SQL to Objects through Mybatis, another very important concept, that of Database Security is due. Authentication is happening by username and hashed password.The first obstacle is where do we do the actual hashing, in the MyBatis Mapper or in our application's Controller? The correct answer is in our application's Service layer, thus its very first introduction to the module as an extra layer to the MVC. What follows up is hooking up Spring Security's AuthenticationService, retrieving the user credentials from the HTTP request, comparing them to the stored hashed ones and if they match, returning a valid UsernamePasswordAuthenticationToken which grants access to the user. Of course. the user credentials are mapped through MyBatis to the corresponding database table fields. Further, as an exercise we have to add functionality to:
At this point it's important to note that each Lesson's exercise comes with its solution, because after all you are still learning. That won't be as such when you reach the Lesson's final Project. So take your time and try to do the exercise by yourself and then compare it to the official solutions. At the end of each Lesson there's also a Final Review exercise, this too coming with its official solution, in which you build on an example application which was kick-started at the beginning of the Chapter. Thus you keep working on an application, enriching it with newer features as you learn about them. So in this final review exercise, we get to update our chat app from the last lesson to support user registration and login, as well as to store chat messages in a database rather than an in-memory list as we did last time. In Lesson 6, Testing, we learn how to use Selenium, write tests with JUnit, and integrate Selenium in order to test complex, multi-action user stories. Finally, the project. We must implement "SuperDuperDrive", a personal storage app that allows users to store files, personal notes, and website credentials for a new company in the cloud storage business. Fortunately we don't get to start from scratch but instead work on an boilerplate project to which we must provide the Java code that interacts with our templates and database.I’ll share some insights about the role of projects in the Java Web Developer Nanodegree in future installments. More InformationRelated ArticlesThe Insider's Guide to the Java Web Developer Nanodegree Two New Nanodegree Programs - Java and JavaScript |
|||
| Last Updated ( Monday, 10 August 2020 ) |