| Insider's Guide to Udacity Android Developer Nanodegree Part 7 - Full Stack Android |
| Written by Nikos Vaggalis |
| Monday, 23 April 2018 |
|
Page 7 of 8
Functional Programming in Java
As a side note, functional constructs like:
or:
or:
or high order function composition and first class citizenship with lambda's, as those used for the Loaders defined as:
and later on summoned with:
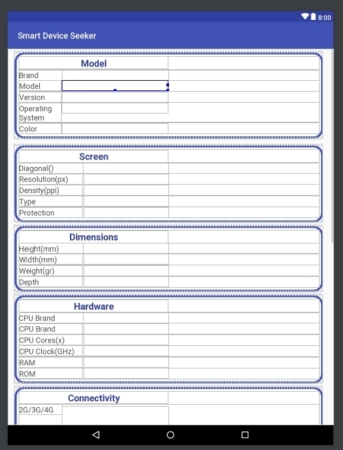
which are all now possible in Java 8, make the language more expressive and Perl-like, thus easing the transition.Check my book review of Java Closures and Lambdas for more on that. Another convention I transferred from Perl was the use of naked blocks to enforce local scope when filling each device's "fragment_page _comparables_detail" layout fields
"fragment_page_comparables_detail" layout
"fragment_page_comparables_detail" layout's fields
"fragment_page_comparables_detail" layout filled
This way I was able to create as many TableRow "row" and TextView "column" instances as I'd like, else I would had to reassign the variables down the line thus overwriting the last reference stored in them, or either use new names the likes of "row1","column1" etc.Enforcing a local scope with a naked block took these mishaps away. Yet another great Java 8 feature was the introduction of the Optional type which I used to guard against any potential null values creeping in.For example if tabletDetailObj.getBrandName() would result to null, the whole operation would fail with java.lang.NullPointerException: Attempt to invoke virtual method 'java.lang.String java.lang.Object.toString()' By using Optional column.setText(Optional.ofNullable(tabletDetailObj I just check whether the value is null and in case it is, then replace it with an "" empty string.
The remaining requirements (Firebase,AdMob,Google Playstore) Widgets;I won't go into detail as I've already outlined the process in Insider's Guide To Udacity Android Developer Nanodegree Part 3 - Making the Baking App but I will suffice in saying that upon starting the app the widget just displays the app's logo graphic, but once the user starts putting devices on the Favourites list, it displays the promo images and the model names of the top 2 devices on that list.
Other requirements included Firebase and Admob integration.I will just go through some tips, tricks and gotcha's, as the process of integration is pretty much straightforward. Firebase in addition to the generic events that it captures by default, such as screen_view, session_start, ad_click etc, is also able to record custom events which can be set up through Firebase's console.I use them for recording the device model id that the user is looking at.
Aside from capturing statistics, Firebase can also be used to track the usage of each individual app component.This way it provides invaluable insight to the kind of features most frequently used and those that aren't.This kind of insight permits making educated predictions on the path the app should follow;that is, refactor, reenforce or move to new activities?Focusing where it matters saves much valuable time. Saying that, since Firebase's statistics and events can take up to 24 hours to show up in the console, in order to be able to receive real time feedback you can enable the Analytics Debug mode on the device you run the tests on.The official instructions are: "To enable Analytics Debug mode on an emulated Android device, execute the following command lines: adb shell setprop debug.firebase.analytics.app nvglabs.android.com.smartdeviceseeker This behavior persists until you explicitly disable Debug mode by executing the following command line : adb shell setprop debug.firebase.analytics.app .none."
While integrating AdMob, make sure that Admob's library binaries are in sync with those of Firebase's or else you'll be confronted with
"Google Play Service is out of date, the Google Mobile Ads SDK will not integrate with Firebase. Admob/Firebase integration requires updated Google Play Service."
If you've done everything ok but your Ads are still not showing up, check Firebase's console for the "location data for ads" option and turn it off if it's not;then try again.
Google Playstore Releasing the app to Google Playstore was not a Capstone requirement but it's customary to do it upon graduating.But before that, the app had to be tested on a range of devices.This can be easily done using Firebase Test Lab for Android. Just head to https://firebase.google.com/docs/test-lab/ , upload your APK and "Run a Test".This will run several generic UI tests on both emulators and physical devices.Good thing that these tests can also be customized .
Pe-release checklist 1.Build a signed APK.Make sure to check some excellent tips on optimising the application's size (of outermost importance when releasing the app to production) 2.Open a developer account and pay a one time $25 fee. 3.Create a "Closed Beta testing" release which you're going to upload your APK under, get the uniquely generated URL that points to your APK and pass it on to your trusted testers group after you've given them permission through the "Manage Testers" menu.
Then go fill the various forms it asks you to and start uploading the promo material.When everything is ready, push your Beta to Production. Another noteworthy service that is not well known is the "Start on Android Program": "Start on Android by Google program helps developers test, iterate, and optimize their app before launching on Google Play. Developers get hands on support, promotion opportunities, access to technical experts, and other perks. 300+ graduates of program including Socratic, Google Play's "Best of 2017" Best App." Check it out here There's also the upcoming GDPR policy to consider.To check your app for privacy leaks and discover hidden trackers embedded in your app, probably due to it integrating third party SDK's and libraries (Firebase Analytics and AdMob in my case), install the Exodify for Chrome extension and check your Playstore release against it
|
| Last Updated ( Monday, 23 April 2018 ) |


