| Getting started with Windows Kinect SDK 1.0 |
| Written by Mike James | |||||
Page 2 of 4
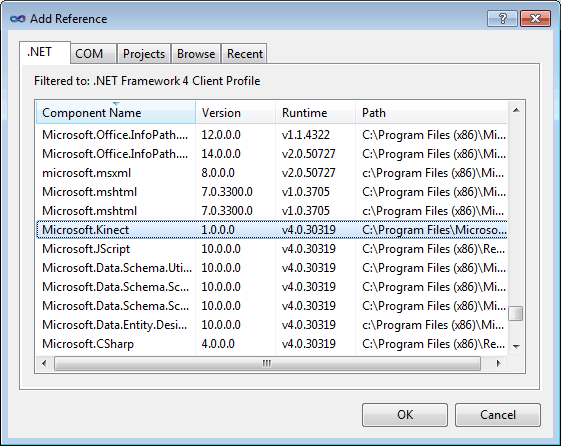
Hello KinectGetting started with Kinect is fairly easy but there are some small things that might cause problems. Start a new project - it doesn't matter really if it is a Windows Forms or WPF project but to make things easier let's start with a Windows Forms. Information about how to make a WPF version work is included as we go on. Note: if you have used an earlier Beta to create a project make sure you remove the reference to the old DLL. Next you need to include a reference to Microsoft.Kinect.dll. (the beta SDK DLL was Microsoft.Research.Kinect.dll) Right click on the project in the project window and select Add Reference. Finding the DLL in the .NET tab can be difficult so click on the Component Name tab to put them into alphabetical order and scroll down to the Microsoft section.
The project has to target the x86 platform but in most cases this is the default so you shouldn't have to adjust anything. To avoid having to type fully qualified names add: using Microsoft.Kinect; to the start of the code. Note: this is a change from the SDK beta. Setting up the KinectAt this point we could start with something complicated but as with all things simple is better - at first at least. So rather than digging into the details of the depth field and body skeletonization methods lets just make use of the video camera. It may not be as exciting but it does indicate the general idea of using the SDK. Every Kinect program starts in the same general way. First you need to retrieve the collection of Kinects connected to the machine and perhaps their status. (Since beta 2 there can be more than one functioning at any given time and version 1 of the SDK also introduced the idea that they might be in different states) To do this we use the static object KinectSensor and its Kinects collection (note - KinectSensor was called Runtime in the beta): sensor = KinectSensor.KinectSensors[0]; There are more complex and foolproof ways of getting a working sensor object but in this case for simplicity we are just assuming that there is at least one Kinect connected and ready to be used. You can see more sophisticated ways of managing the Kinects in the help documentation - including a Linq statement to retrieve the first Kinect that is ready. The sensor object that is returned is where everything is initialized and generally set up. Note: The setup procedure has changed quite a lot from the beta but it follows the same general principles. The first thing that you have to do is specify which sensors - video, depth, skeleton etc - you are going to use in what resolutions and modes. For example to setup the video camera you would use: sensor.ColorStream.Enable( This activates the video camera and sets it to return images in the format specified. At this point video camera is ready to supply data as soon as you use the Start method. Similarly you can stop the data generation using the Stop method. There are two ways of getting the data from a sensor - polling and event based. Polling simply requires you to inspect a status flag at regular intervals for the data to be ready. Polling is simple but not efficient or flexible. It is, in practice not much harder to use event handling. Each sensor triggers an event when a new frame of data is available. To make use of it we need to define an event handler for the FrameReady event. As its name suggests this is called each time a video frame is ready to be processed. Assuming that the event handling method is called FrameReady the event can be hooked up using: sensor.ColorFrameReady += FrameReady; For this to work the event handler has to have a particular signature. In this case: void FrameReady(object sender, (Note: there are now event args for each type of frame ready event.) |